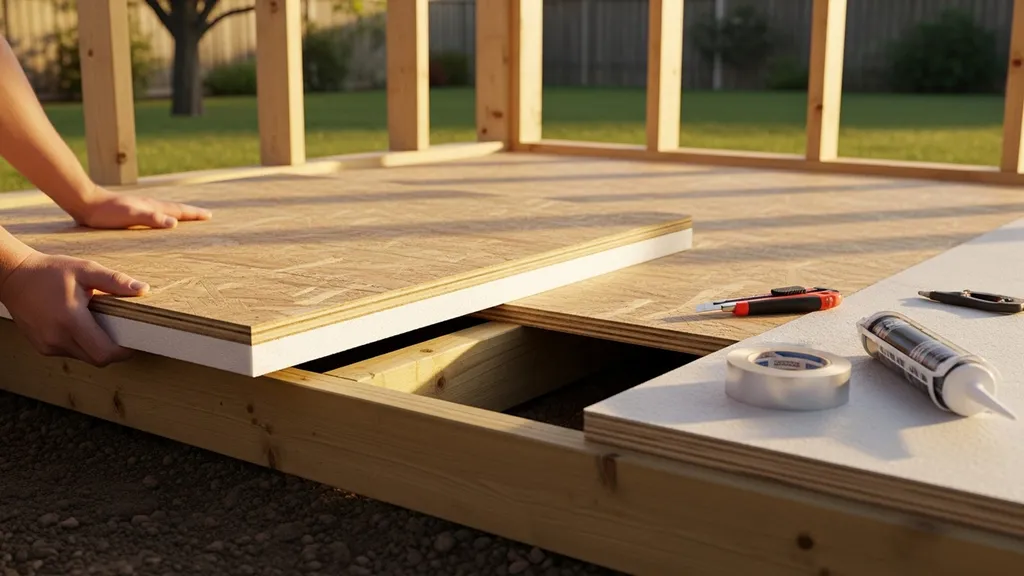
Step-by-step guide for beginners on how to insulate a shed floor — choose materials, prep for moisture, install insulation for raised and concrete floors.
How to Insulate a Shed Floor
Insulating a shed floor makes the building more comfortable, protects stored items, and reduces energy loss if you plan to heat the space. This guide explains how to insulate shed floor assemblies for both raised timber floors and concrete slabs, showing material choices, moisture controls, and step-by-step installation so you can insulate shed floor assemblies correctly on a budget.
TL;DR:
- Choose insulation by floor type: raised timber → rigid foam or batts with an air barrier; concrete slab → under-slab R-foam at build time or rigid foam over-slab for retrofit.
- Aim for R-values by climate: R-10 to R-30 for floors in cold zones; use DOE R-value guidance and check local codes before buying materials.
- Prep for moisture and air control: improve site drainage, add a capillary break under slabs, and seal rim joists and penetrations with caulk or spray foam.
Step 1: Assess Your Shed Floor and Set Insulation Goals
Identify Floor Type: Raised Timber vs Concrete Slab
Start by confirming whether your shed has a raised timber floor (joisted with crawlspace) or a concrete slab/slab-on-grade. Raised floors give easy access to joist bays and are simpler to retrofit. Concrete slabs often require different strategies: under-slab rigid foam is ideal at build time; over-slab insulation is the retrofit option.
Define Use and Comfort Targets (storage, Workshop, Living Space)
Decide how you’ll use the shed. Storage-only sheds usually need less insulation than a heated workshop or living conversion. Industry practice sets modest R-values for unheated storage (R-5 to R-10) and higher targets for conditioned uses (R-13 to R-30 depending on climate).
Check Local Climate Considerations and R-value Targets
Measure joist spacing, joist depth, slab thickness, and clearance under the floor before purchasing materials. Note the span between joists and the depth of the joist bay — these dictate what thickness of batt or foam will fit. For R-value guidance by climate zone, refer to the U.S. Department of Energy's insulation recommendations: DOE guide to insulation and air sealing. Also check code requirements for insulation and ventilation at your local building department or consult the national code information at energycodes.gov’s IECC resources.
Research on moisture performance of insulated raised wood floors provides data showing subfloor moisture contents remain acceptable with appropriate closed-cell foam or moisture control measures; see the USDA study for technical detail: Moisture performance of insulated, raised, wood-frame floors. That study helps quantify risks when choosing closed-cell foam in contact with subfloor materials.
Step 2: Choose the Right Insulation Method for Your Shed Floor
Compare Common Methods: Fiberglass/rockwool Batts, Rigid Foam Boards, Spray Foam
- Fiberglass or rockwool batts: Cost-effective, DIY-friendly, typical R-values ~3.1–3.4 per inch for fiberglass and ~3.0–4.0 per inch for mineral wool. Work well in deep joist bays with vapour and air control but absorb moisture if exposed.
- Rigid foam boards: Polyiso (~6–6.5 R/in), XPS (~5 R/in), EPS (~3.6–4 R/in). Rigid foam resists bulk moisture and provides high R per inch, useful where joist depth is shallow or you want a continuous layer under a subfloor.
- Spray foam: Open-cell ~3.5 R/in, closed-cell ~6–7 R/in. Closed-cell spray foam provides the best combined air-seal and moisture resistance but is the most expensive and typically requires a professional for reliable installation.
When to Use Structural Insulated Panels (sips) or Insulated Subfloor
SIPs or factory-built insulated subfloor panels are a prefab alternative that gives fast, airtight performance and a finished subfloor surface. They suit owners who want a low-labor, high-performance route. Learn more about SIP options and sizing in the structural insulated panels guide.
Cost, Performance, and Moisture-resilience Tradeoffs
- Lowest cost: Fiberglass batts — inexpensive materials, higher labor time for air sealing.
- Best R/inch: Polyiso or closed-cell spray foam — saves space and keeps floor thickness down.
- Moisture resilience: XPS and closed-cell spray foam hold up better to moisture, while fiberglass can sag and lose R-value if damp.
For a broader comparison of whole-shed approaches and year-round performance, see our best methods for year-round shed insulation. For detail on polyiso performance and environmental tradeoffs, consult the polyiso insulation methods article.
Step 3: Prepare the Floor—moisture Control, Ventilation, and Airtightness
Assess and Mitigate Moisture Risks (ground Moisture, Capillary Rise, Drainage)
Moisture is the most common failure mode for insulated floors. For new slabs, always include a capillary break: a continuous layer of compacted gravel and a 6-mil polyethylene vapor retarder under the slab. For raised floors, slope grade away from the shed and add drainage where water pools. If radon or soil gases are a concern under slabs, consult EPA guidance on mitigation and testing: EPA radon information and testing.
Simple moisture checks include a visual inspection for staining, a touch test for dampness, and using a moisture meter on subfloor panels. If humidity is high seasonally, avoid using unprotected fiberglass in joist bays without an air barrier.
Install Vapor/air Barriers Where Appropriate
Air barriers control convective heat loss; vapor control prevents moisture diffusion issues that vary by climate. In cold climates, prefer placing continuous insulation or an air/vapor barrier on the warm side of the floor assembly. Passive-house airtightness principles apply: continuous air barriers under the finished floor and sealed rim joists reduce heat loss significantly. For airtightness strategies, see our complete guide to passive-house airtightness and check common problem areas in air-leakage points to check.
Seal Common Air Leakage Points Around Rim Joists and Penetrations
Use low-expansion closed-cell spray foam or polyurethane caulk at rim joists, around service penetrations, and at the sill-to-subfloor junction. Install sill sealer under sill plates to block air pathways. Dry-fit insulation and check for gaps before final fastening.
Step 4: Install Insulation for a Raised Timber Floor (step-by-step)
What You’ll Need: Tools and Materials Checklist
- Materials: Rigid foam boards or batt insulation, low-expansion spray foam, caulk, sill sealer, 6-mil polyethylene (if code allows), OSB/plywood subfloor panels, construction adhesive, screws or ring-shank nails, tape for foam seams.
- Tools: Tape measure, utility knife or saw for foam, caulking gun, drill/driver, insulation supports (wire or netting), moisture meter, personal protective equipment (gloves, goggles, mask).
For a curated tool list and product suggestions see the insulation tool checklist.
Install Batts or Cut Rigid Foam to Fit Between Joists
Option A — Batts with an air barrier:
- Measure joist bay depth and width — cut batts to fit snugly but not compressed.
- Install faced batts with the vapor-retarder facing the warm side (climate-dependent) and avoid compressing the material — compressed batts lose R.
- Tape a continuous sheet of housewrap or polyethylene below the joists and seal seams and edges to create an air barrier.
- Fasten subfloor panels (OSB or plywood) to close the cavity.
Option B — Rigid foam between or under joists:
- Cut rigid foam boards to fit snugly between joists or apply continuous foam under the joists for a thermal break.
- Stagger joints and tape all seams with compatible tape or use spray foam to seal edges.
- If foam is installed under joists, fasten with long screws and washers into joists and cover with a mechanically fastened subfloor.
- Provide required fire protection for foam per local code — often 1/2" gypsum or the subfloor and finish floor meet code.
Air-seal Rim Joists, Add Continuous Underfloor Insulation If Needed
Rim joists are major leakage paths. Seal them with closed-cell spray foam or cut rigid foam to fit and seal edges with canned foam/caulk. If the space will be conditioned, consider continuous underfloor insulation (foam under the entire floor plane) to simplify the air barrier and reduce thermal bridging.
For joist measurement and framing detail reference the framing details for joists. If you’re considering a prefab route, see SIP systems for small buildings.
Watch this step-by-step guide on installing ceiling insulation in a basement or crawlspace & why you should. r30, r21, r19, r13.:
Step 5: Insulate a Concrete Slab or Slab-on-grade Shed Floor
Options: Under-slab Rigid Foam vs Over-slab Insulation
- Under-slab rigid foam (best at build time): Place rigid foam below the slab or at the slab edge to reduce heat loss and risk of frost heave in cold climates. Typical practice uses 2–4 inches of foam under the slab and vertical perimeter insulation for frost protection.
- Over-slab rigid foam (retrofit): For existing slabs, lay XPS or polyiso over the slab with a capillary break and a moisture-tolerant subfloor (plywood with float method or sleepers). This raises the finished floor height but keeps existing slab intact.
Preparing the Slab: Moisture Test and Capillary Break
Always test slab moisture before covering it. Use a calcium chloride test or relative humidity probes to assess vapor drive; if moisture is high consult a local pro or extension service. The Department of Energy warns that covering a damp slab can lead to floor finish failures; consult the DOE guidance on flooring over slabs at DOE insulation and moisture guidance.
For foundations and slab-edge insulation strategies aligned with passive-house performance, read our insulating slab footings piece and the step-by-step slab construction guide at slab on grade step-by-step.
Detail Installation Steps for Over-slab Insulation and Finish Flooring
- Remove floor finishes and level the slab. Repair cracks and ensure good drainage away from the building.
- Lay a 6-mil polyethylene sheet as a vapour check only if tests support it; tape seams.
- Install rigid foam panels (staggered joints), tape seams, and protect edges with treated plywood or OSB. Use a floating subfloor approach: adhesive under plywood may be needed depending on finish floor.
- Fasten finish flooring according to manufacturer’s instructions. Engineered hardwood, vinyl plank, or tile over an appropriate underlayment are common choices; ensure the floor system is approved for use over insulation and slab conditions.
Edge insulation and perimeter frost protection are important in cold climates. Check local code and the IECC for minimum required depths and R-values, available via energycodes.gov.
Step 6: Finish, Protect, and Choose Flooring Over Insulated Shed Floors
Subfloor Options: OSB vs Plywood and Sustainable Choices
- OSB: Typically less expensive and stable in-plane; performance depends on resin and edge sealing. For humid locations, choose exterior-grade OSB and protect edges.
- Plywood: Easier to screw and often preferred for point-load resistance and durability. Consult our OSB vs plywood advice for a full comparison.
Both materials require fastening into joists or a solid substructure. If using rigid foam under the floor, attach the subfloor with long screws through foam into joists or a nailable substructure.
Protecting Insulation From Pests and Compression
- Install rodent-proof barriers at foam edges: seal gaps and add metal flashing or hardware cloth where foam meets the foundation.
- Avoid placing heavy concentrated loads directly on foam boards unless supported — use pressure-distributing subfloor panels.
- Keep insulation dry: capillary breaks, perimeter drainage, and sealed seams all limit moisture that attracts pests.
Recommended Finished Flooring for Different Uses
- Unheated storage: Durable vinyl plank or interlocking rubber tiles are inexpensive and tolerant of temperature swings.
- Heated workshop: Engineered hardwood or laminate over a well-insulated and level subfloor; use floating systems compatible with the foam/subfloor assembly.
- Conditioned living space: Install underlayments recommended by the finish-floor manufacturer and ensure subfloor meets moisture specs.
For low-impact choices, consider reclaimed hardwood or fast-renewable bamboo; see our sustainable picks at sustainable flooring options. To reduce waste, plan cuts and reuse offcuts per our reduce construction waste guidance. To maintain continuous thermal performance across the building envelope, pair floor insulation with roof insulation strategies from exterior roof insulation ideas.
Step 7: Common Mistakes, Troubleshooting, and FAQ
Top Mistakes to Avoid (moisture, Compression, Poor Air-sealing)
- Leaving unsealed gaps at rim joists and around penetrations.
- Compressing batt insulation in joist bays — compressed batts significantly reduce R-value.
- Skipping moisture testing on slabs before installing over-slab insulation or floor finishes.
- Using the wrong vapor-control layer for the climate — this can trap moisture inside the assembly.
Troubleshooting Checklist for Warm Floors That Still Feel Cold
- Check for air leaks around thresholds, rim joists, and service penetrations — sealing can reduce drafts dramatically.
- Verify actual R-value installed — measure foam thickness and batt depth; confirm they match your target.
- Inspect for compression or gaps in insulation; look for pest activity or settlement.
- For slab floors, test moisture levels under the finish — persistent moisture can undermine insulated assemblies and finishes.
Why is my insulated shed floor still cold?
Cold floors usually indicate either insufficient R-value, thermal bridging, or air leakage. First, verify the installed insulation thickness and type; compare to your climate R-value target. Next, check rim joists, door thresholds, and any gaps for air leaks and seal them with caulk or spray foam. Finally, look for compressed insulation in joist bays or missing continuous insulation at the perimeter, which can create cold spots.
Can I add insulation over an existing concrete slab?
Yes. Over-slab rigid foam plus a floating subfloor is the common retrofit. Before installing, perform a moisture test (calcium chloride or RH probe) because covering a wet slab can cause floor finish failures. Use XPS or polyiso panels rated for slab applications and protect them with plywood or OSB and a suitable finish floor.
Do I need a vapor barrier under a raised floor?
It depends on climate and assembly. In many cold climates, a continuous air barrier and proper ventilation of the crawlspace are more important than a simple polyethylene layer. If you use a vapor retarder, place it on the warm side per local code. For specific airtightness strategies that reduce convective moisture movement, see our airtightness guide: complete guide to passive-house airtightness.
How can I prevent rodents from nesting in foam boards?
Seal all edges and gaps with metal flashing or hardware cloth and use construction-grade sealants at seams. Place foam edges behind blocking or trim to deny rodent access. For rim joists, use spray foam and back it with a rigid barrier where practical. Regular inspections and good drainage also reduce conditions that attract pests.
The Bottom Line
Insulating a shed floor starts with choosing a method that matches your floor type and use: rigid foam or taped continuous insulation for shallow or retrofit situations, and batts with a sealed air barrier for deeper joists. Prioritize moisture control and air-sealing, aim for DOE-recommended R-values for your climate, and seal rim joists and penetrations to keep heat in and pests and moisture out. Use the step-by-step instructions above to insulate shed floor assemblies efficiently and avoid the common errors that undermine long-term performance.