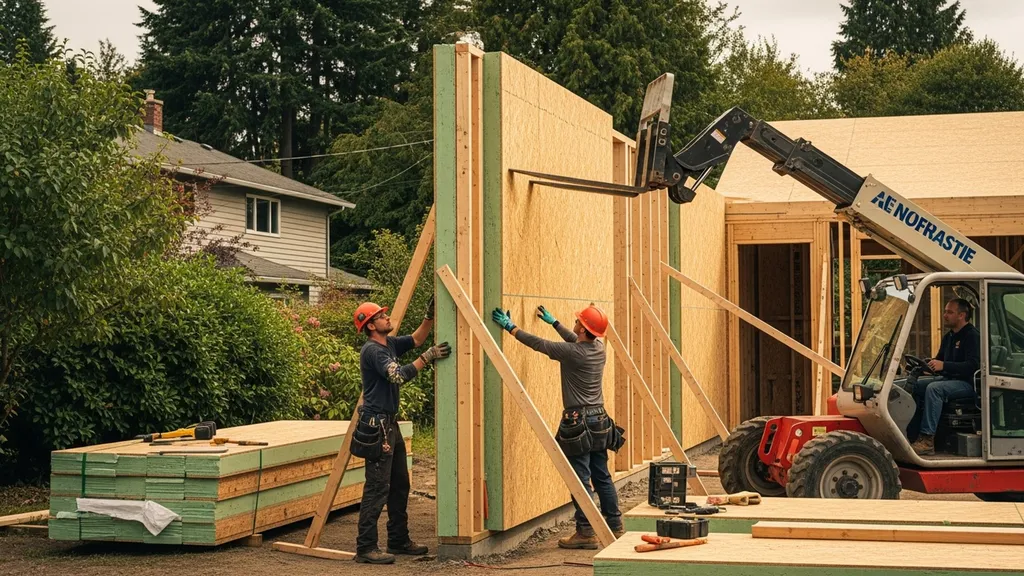
Practical guide to structural insulated panels (SIPs) for budget DIY self-builds — performance, costs, installation tips, and comparisons to other wall systems.
Structural Insulated Panels (SIPs) Guide
Structural insulated panels (SIPs) are factory-made sandwich panels used for walls, roofs, and floors that combine rigid foam insulation with structural facings to speed construction and improve energy performance. For budget-conscious DIY self-builders, structural insulated panels can cut framing hours, reduce thermal bridging, and help reach low-energy or Passive House targets — but they also bring specific detailing, transport, and moisture-management needs. This guide explains how SIPs work, typical materials and sizes, thermal and moisture performance, how SIPs compare to other wall systems, practical design and installation steps for DIY crews, cost ranges and sourcing tips, plus maintenance and repair guidance.
TL;DR:
- SIPs can cut framing time by 30–60% and help reach airtightness targets below 1.0 ACH50 when detailed correctly.
- Typical SIP assemblies use EPS, XPS, or polyiso cores with OSB facings; expect 4"–10" panels and R-values roughly EPS 3.6–4.0, XPS ~5, polyiso ~5.5–6.5 per inch.
- Best for simple geometry, tight energy targets, and crews that can coordinate delivery, splines, and wet-trade sequencing; consider ICF or timber alternatives in heavy-masonry foundations or complex curved designs.
Related guides: Icf foundations insulated concrete forms, How to connect solar panels to a hybrid inverter, Hempcrete or Insulated Concrete Forms — When to Choose Each for Green Building, Ultimate guide to emergency off grid cooking, and The ultimate guide to recycled aggregate concrete for DIY builders 2026.
What are Structural Insulated Panels (SIPs) and how do they work?
Structural insulated panels are factory-produced panels made of a rigid foam core bonded between two structural facings. The result is a lightweight, high-insulation, load-carrying element used for walls, roofs and floors. The sandwich resists bending by placing the facings in tension and compression while the foam core transfers shear.
Core materials and facing options
- EPS (expanded polystyrene): Common, lower cost, R-value per inch typically around 3.6–4.0. Good for many climates and widely available.
- XPS (extruded polystyrene): Higher compressive strength and slightly higher R-value (~5 per inch), but higher embodied carbon and cost.
- Polyiso (polyisocyanurate): Highest R-value per inch (roughly 5.5–6.5), often used in cooler climates where thinner panels are desirable.
- Facings: Oriented strand board (OSB) is the most common facing. Some specialty panels use plywood or cement board facings where moisture resistance or specific finishes are required. For guidance on sheathing choice and tape compatibility see the OSB vs plywood guide.
- Adhesives and bondlines: Factory bonding uses specific adhesives and quality control to avoid delamination; field repairs may require manufacturer-approved adhesives.
Typical panel sizes and thicknesses
- Standard panel thicknesses run from 4" up to 10" for residential use; custom thicknesses exist. Panel widths often match OSB sheet sizes (4' wide) and lengths vary by factory, commonly 8'–24'.
- Typical R-values per assembly depend on core type and thickness. As a rule, EPS panels at 6" offer roughly R-22 to R-24, polyiso at 6" approaches R-33–R-36 (typical ranges — check manufacturer spec sheets).
How SIPs carry loads (structural basics)
- SIPs act as large shear panels. Roof and wall panels must be detailed at joints with splines, plates, or structural headers to transfer axial and shear loads.
- Openings require reinforced framing or laminated headers; manufacturers often supply layout and load tables for common spans. For complex structural questions or large cantilevers, consult a structural engineer or the manufacturer's structural data.
- Panels can be used on bearing walls (up to multi-story in some systems) and for roof diaphragms; connection detailing at foundations and floors is critical to avoid point loads crushing the foam core.
For deeper building science principles and SIP-specific recommendations, the Structural Insulated Panel Association's technical guide is a useful reference: SIP building science - structural insulated panel association.
Thermal performance, air tightness and moisture management with SIPs
SIPs are valued mainly for their continuous insulation and potential airtightness. That said, performance in real life depends on detailing: joints, window installation, and wet trades.
Energy performance and R-value considerations
- Continuous foam cores lower thermal bridging compared with stud walls. A 6" polyiso SIP wall can outperform a typical 2x6 stud wall with cavity insulation plus exterior sheathing in effective R-value once thermal bridging is included.
- Use manufacturer U-values or tested assemblies rather than raw R/inch numbers to size heating loads. For Passive House-level design, many teams pair SIPs with mechanical ventilation (ERV/HRV) and high-performance windows to reach targets.
- Research and field reports show SIP houses often have lower heating loads, but pay attention to core choice: EPS has lower R/inch than polyiso, so you may need thicker panels in cold climates.
Airtightness: ACH50 and real-world results
- Properly sealed SIP joints, taped penetrations, and careful window/door details can produce airtightness better than many stick-framed homes. Field results vary: well-detailed SIP builds can reach 0.6–1.5 ACH50; less careful jobs may be 2–3 ACH50. That range depends on crew skill, trades coordination, and how well joints and penetrations are sealed.
- For mechanical systems, integrate a balanced ventilation unit (ERV or HRV) sized to the house; see our discussion on ventilation in the passive house basics article.
Moisture risks, vapor control, and hygrothermal best practices
- SIP cores (especially EPS and XPS) are moisture-resistant, but the OSB facings can rot if allowed to stay wet. Common failure points are sills, bad flashing, and protracted exposure during construction.
- Vapor control strategies change by climate:
- Cold climates: Provide drying to the interior where possible or use exterior permeable WRB layers so that any moisture can dry outward. Avoid interior vapor barriers that trap moisture against OSB.
- Mixed climates: Use assemblies that allow drying in at least one direction; detail continuous air and water control layers.
- Hot-humid climates: Prevent wetting from outside and avoid trapping moisture; follow local code guidance.
- For installation and storage guidance that reduces onsite moisture exposure, see the Florida Building Commission's installation guidelines: Structural insulated panel installation guidelines.
- Field issues often arise from wet trades (plumbing, stucco, concrete) scheduled before sealing or inadequate temporary covers — schedule trades to minimize panel exposure.
SIPs vs other wall systems: cost, speed, durability and embodied carbon
Choosing a wall system requires balancing upfront cost, labor availability, transport logistics, embodied carbon, and long-term energy savings. The table below compares typical metrics for SIPs, stick-frame with cavity insulation, insulated concrete forms (ICF), and insulated timber/hempcrete options.
| System | Typical R-value (assembly) | Labor hours to erect (per 1,000 sq ft) | Material cost ($/sq ft) | Thermal bridging | Airtightness (typical ACH50) | Use cases |
|---|---|---|---|---|---|---|
| SIPs (6" polyiso) | R-30 to R-36 | 40–100 | $8–$18 | Low | 0.6–2.0 | Fast builds, low-energy homes |
| Stick frame + cavity | R-20 to R-30 (with CI) | 100–250 | $6–$15 | Moderate (studs) | 1.5–5.0 | Complex shapes, low materials cost |
| ICF | R-20 to R-30 (plus mass) | 60–150 | $12–$25 | Minimal | 0.5–1.5 | Below-grade walls, hurricane zones |
| Insulated timber / hempcrete | R-15–R-30 (varies) | 120–300 | $10–$25 | Low (with CI) | 1.0–3.0 | Low-carbon builds, thermal mass focus |
Notes: Costs and hours are regional and project-specific estimates. For embodied carbon comparisons and when to choose earthen or concrete alternatives, see our hempcrete vs ICF guide. The Whole Building Design Guide also summarizes moisture and assembly trade-offs for SIPs: Structural Insulated Panels (SIPs) | WBDG.
When SIPs outperform stick framing
- Speed: SIPs can reduce wall-erection time by 30–60% because panels arrive pre-insulated and pre-cut for openings.
- Tightness: Reduced number of joints and continuous insulation lowers thermal bridging and makes airtightness targets easier.
- Labor savings vs skill: For small crews or volunteer builds, SIPs reduce the need for precise stud layout and large amounts of insulation labor.
When to pick ICF or hempcrete instead of SIPs
- Below-grade walls or flood-prone sites: ICF provides mass and durability below grade and is often preferred in coastal or flood zones.
- Very low embodied carbon priority: Hempcrete or timber-plus-CLT systems may have lower lifecycle carbon if sourced locally, though operational energy may change.
- Complex curves or historic renovations: SIPs are best for straight runs and planar geometry; curved or highly irregular facades favor stick framing or timber systems.
Decide using simple rules: if you need speed, airtightness, and have access to a nearby SIP supplier, SIPs are attractive. If you have complex geometry, heavy masonry finish, or limited budget for prefab transport, consider stick frame or localized timber systems. Use our budget calculator to run project-level comparisons.
Designing and detailing Structural Insulated Panels (SIPs) for DIY builds
Good design and detailing prevent most SIP problems. Design early for openings, joints, service runs and interfaces with the foundation and roof.
Structural design basics: openings, lintels, and panel splicing
- Openings: Size and location of windows and doors should be consolidated where possible to reduce wasted panels. For large spans, use manufacturer-specified laminated headers or engineered timber lintels bearing on solid blocking.
- Splicing: Typical joint methods include spline plates (timber or engineered spline), splines filled with foam or structural adhesive, and through-bolts in high-load connections. Follow manufacturer joint detail drawings; if unsure, have a structural engineer check header spans and uplift loads.
- Bearing points: Avoid point loads directly on foam cores; add timber or engineered bearing plates where concentrated loads occur (e.g., beam seats).
Airtightness and coordinated air-barrier details
- Plan for a continuous air barrier across panels, window flanges, and foundation interfaces. Use tapes and sealants compatible with OSB facings — check the manufacturer's recommendations for adhesive compatibility.
- For comparison on air-barrier continuity and installation techniques, consult the air-barrier detailing guide. That guide helps when SIPs meet other sheathed assemblies and when choosing tapes for OSB.
Penetrations, service chases and insulation continuity
- Service chases: Run electrical and plumbing in service cavities or surface-mounted chase systems where possible. Cutting deep channels in panels reduces insulation and weakens the panel; small retrofit chases are acceptable when sealed.
- Continuity: Keep the insulation plane continuous at corners and transitions; use compatible flashings and tapes to maintain the thermal and air barrier.
- Checklist for design-savvy DIYers: Confirm foundation bearing lines, window rough opening sizes, lintel loads, panel delivery lengths, and crane/lift access before ordering panels. Coordinate with your supplier to pre-cut openings to reduce onsite cutting waste.
For structural background and design approaches, see "Structural Insulated Panels (SIPs) in Residential & Commercial Construction" at Structure Magazine: Structural Insulated Panels (SIPs) in Residential & Commercial ....
Building with SIPs: a practical step‑by‑step installation workflow
This section walks through a sequential workflow from foundation to interior finish with hands-on tips and safety notes. Viewers can see lifting, splining and sealing sequences in the recommended installation video below.
This video provides a helpful walkthrough of the key concepts:
Site prep and foundation interface for SIP walls
- Foundation interface: Install a continuous sill plate on a level, dry surface. Use a compatible sill gasket or foam strip to create a thermal break and seal. See our slab and foundation basics for foundation-to-panel interface details.
- Storage: Keep panels off the ground and covered during storage; prolonged exposure to rain or snow increases the risk of OSB degradation and swelling.
Panel lifting, aligning and joining panels (crew, tools, safety)
- Crew and tools: For a small single-story build, 2–4 people plus a compact lift or mini-crane is common. Tools: cordless impact driver, ratchet straps, level, temporary braces, compatible tape and sealant guns, and panel spline hardware.
- Lifting: Use panel-safe lifting points or slings. Follow manufacturer weight and handling guidelines. Safety gear (helmets, gloves, hi-vis) and stable footing are essential.
- Joining: Align edges, insert structural spline or plate into the joint, apply specified sealant or gasket, and fasten with manufacturer-approved screws or nails. Shim as needed for plumb surfaces. Temporary bracing is required until panels are fully tied together.
Sealing, flashing, windows, and exterior finishes
- Sealing: Use closed-cell foam sealants and high-performance tapes approved for OSB. Avoid solvent-based products that may degrade faces. Test a small area if compatibility is uncertain.
- Flashing: Install window and door flashing in the same plane as the panel face, integrating with the chosen weather-resistive barrier and cladding. Ensure sills are fully flashed to prevent water intrusion.
- Cladding attachment: Use furring strips or direct attachment per cladding manufacturer. For rainscreen assemblies, add ventilated battens to allow drainage and drying.
Interior finishing and service integration
- Interior finishes: Use screws into OSB facings for interior gypsum board; use fasteners spaced per manufacturer recommendations. Consider offset furring for deep junction boxes and services.
- Running services: For electrical, use surface-mounted chase systems or cut shallow channels within limits recommended by the SIP manufacturer. For plumbing, prefer pre-planned wall chases in panel fabrication.
For installation measures and step-by-step guidance, Building America’s SIP guide is a useful resource: Structural insulated panels (sips) - building america solution center.
Safety reminders: brace panels during erection, avoid standing beneath lifted panels, and plan sequences so wet trades don’t expose OSB to prolonged moisture.
Sourcing SIPs, cost breakdown and budgeting for budget-conscious self-builders
Sourcing and budgeting make or break a SIP project. Costs vary widely by region, panel type, thickness, and delivery distance.
Material and delivery cost ranges and influencing factors
- Material-only ranges: Typical material-only prices for SIP walls (delivered to site) often range from about $8 to $18 per square foot of wall area depending on core type, facing, and thickness. Thinner EPS panels are at the low end; thicker polyiso and specialty facings toward the high end.
- Delivery & lead time: Factory panels ship on trucks or flatbeds and can incur heavy transport fees for long distances or remote sites. Delivery charges and off-loading services can add several hundred to several thousand dollars.
- Influencing factors: Panel thickness, number and size of openings, need for pre-cutting, and proximity to a mill strongly affect price. Ask suppliers for line-item quotes, including cutting fees and waste allowances.
Buy prefab panels vs on-site panelization: pros and cons
- Prefab (factory-cut) pros: Accurate cuts for openings, less on-site labor, better quality-control, often faster erection.
- Prefab cons: Higher transport costs, lead-time scheduling, less flexibility for last-minute changes.
- On-site panelization pros: Lower transport volume, potential cost savings if you have skilled carpenters, more flexibility.
- On-site cons: Requires a flat, dry space for assembly, more labor and potential for tighter tolerances leading to air-leak risks.
Ways DIYers can reduce cost
- Group orders: Combine orders with nearby builders or community projects to reduce freight per house.
- Simplify geometry: Reduce odd angles, minimize small leftover pieces, and group openings on common walls.
- Reuse cutoffs: Save and use cutoffs for blocking, gables, or interior partitions.
- Shop fees: Negotiate cutting fees and storage options. Ask suppliers whether they charge for jobsite storage or re-cuts.
Estimate labor vs hiring trade-offs using our DIY vs hiring costs guide and run a full project scenario in the budget calculator.
Maintenance, longevity and common problems with Structural Insulated Panels (SIPs)
SIPs can be long-lived when installed and maintained correctly. Common issues are moisture-related damage, delamination, and insect access.
Typical lifespan and maintenance checklist
- Lifespan: SIP homes have been in service for decades; expected service life is comparable to conventional framed homes when kept dry and well-ventilated.
- Inspection schedule: Visual inspection yearly and after major storms; check flashing, sills, and vents. Watch for OSB soft spots, blistering tape and signs of condensation.
- Maintenance tasks: Maintain cladding and flashing, repair damaged seals, clear gutters, and keep landscaping away from walls to prevent splash-back.
Diagnosing and repairing moisture damage and delamination
- Signs: Soft or sagging OSB, peeling or failed tape at joints, musty odors, or visible mold indicate moisture intrusion.
- DIY repair steps: Remove cladding in the affected area, cut out rotten OSB and replace with manufacturer-approved facings and adhesives, reinstall flashing and tape joints. For significant delamination or structural concerns, hire a SIP-certified contractor or structural engineer.
- When to call a pro: Structural rot near load-bearing points, large delaminated panels, or persistent moisture sources should be evaluated by a professional.
Pest access points and prevention
- Common entry points: Gaps at sill plates, utility penetrations, and poorly sealed joints.
- Prevention: Use pest barrier mesh at vents, seal penetrations with closed-cell foam and tape, and maintain a continuous foundation-to-wall seal.
- Repair: Treat localized insect damage, replace compromised blocking, and reseal gaps as part of routine maintenance.
For guidance on recycling and handling construction waste during repairs, see our checklist for recycling construction materials and consult attic/insulation resources when SIP roofs interact with attic systems: attic insulation how much do you need.
The Bottom Line
Structural insulated panels are a strong choice for budget-conscious self-builds that prioritize speed, airtightness, and lower thermal bridging — especially for simple geometries and projects near a SIP supplier. Choose SIPs when you can plan openings, coordinate delivery, and detail moisture control; consider ICF, hempcrete, or stick-frame where transport, complex forms, or very tight upfront budgets drive the decision.
Decision checklist:
- Climate fit: cold/mixed climates benefit from SIPs’ continuous insulation.
- Budget check: compare material plus transport vs local stick-frame labor.
- Supplier access: get local quotes and lead times.
- Build complexity: keep geometry simple to reduce waste and cost.
Frequently Asked Questions
Are SIPs suitable for DIY builders with limited framing experience?
Short answer: yes, often — provided you plan, get manufacturer guidance, and use a small, coordinated crew. SIPs reduce repetitive stud work and onsite insulation labor, but they require careful measuring, correct lifting methods, and tight sequencing to avoid moisture exposure. For first-time builders, having a SIP-experienced contractor for at least the first day of erection or using factory-cut openings reduces risk.
For structural checks on large openings or unusual loads, consult a structural engineer or the panel supplier before ordering panels.
How do SIPs perform in cold, wet, or humid climates?
SIPs perform well thermally in cold climates when you choose an appropriate core (thicker EPS or polyiso). Moisture management is the main concern: keep OSB facings dry during storage and after installation, and detail sills and flashings to prevent water intrusion. Use a vapor strategy appropriate to your climate and consider permeable WRBs where panels interface with other assemblies. The Florida Building Commission's installation guide covers exposure and storage recommendations in more detail: https://floridabuilding.org/upload/PR_Instl_Docs/FL30056_R3_II_SIPA%20Structural%20Insulated%20Panel%20Installation%20Guidelines%20v2.pdf.
Will SIPs reduce my heating and cooling bills enough to be worth the cost?
It depends on your climate, energy prices, and baseline framing method. SIPs lower thermal bridging and often improve airtightness, which reduces heating and cooling loads; some projects report dramatically lower annual energy use. Run a simple energy model or use the budget calculator to compare lifecycle savings against upfront costs. Include transport, labor, and the cost of high-performance windows and ventilation in your calculation.
How do you handle window and door openings in SIP walls?
Windows and doors are usually either factory-cut before delivery or cut onsite with reinforced headers. Use laminated or engineered headers where required and install continuous flashing integrated with the panel joint seals and cladding. Pre-cut openings reduce onsite cutting and improve airtightness, though they increase lead time and reduce flexibility.
Coordinate exact rough-opening dimensions with the window supplier and order sills and jambs that match the panel thickness to minimize field adjustments.
Can I run plumbing and electrical inside SIP panels?
Yes, but avoid deep chases that undermine structural or thermal performance. Small electrical chases and boxes are common; larger plumbing lines typically run in designated service cavities or in furred chase walls. If you must cut channels, follow the manufacturer's limits for maximum depth and seal with compatible foams and tapes. Where substantial rerouting is needed, plan those services into panel fabrication to keep insulation continuity intact.