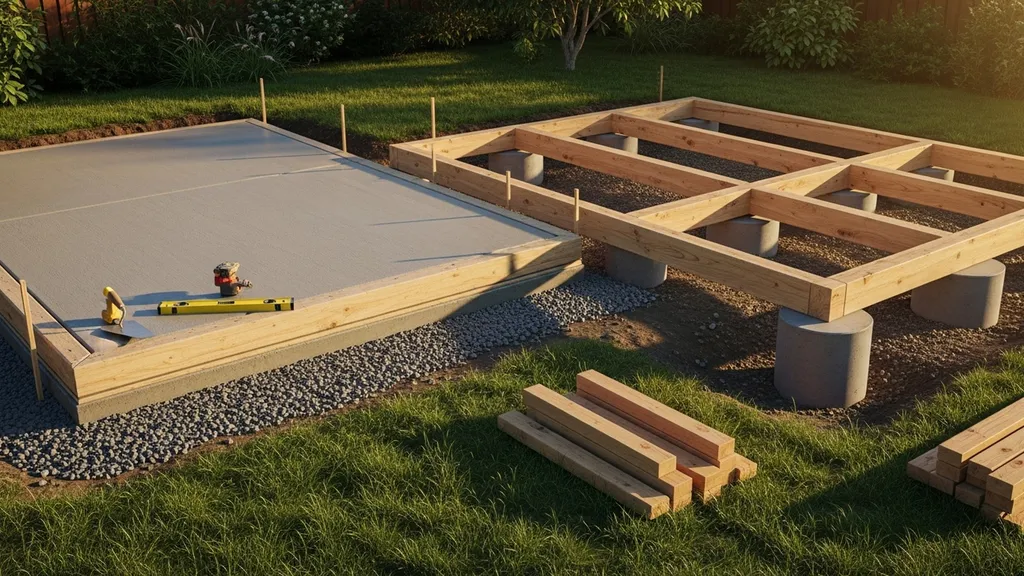
Compare slab, gravel, pier, skids and more to pick the best shed foundation for your site, budget, and climate.
Shed Foundation Options: Which Is Best?
Choosing between shed foundation options matters for budget, durability, and the use you have in mind. This guide on shed foundation options explains the trade-offs between concrete slab, gravel pad, pier-and-beam, skids, and low-carbon alternatives so readers can match foundation type to soil, climate, and intended use. Expect practical cost ranges, installation time estimates, durability ratings, and clear decision steps for DIYers and small contractors.
TL;DR:
- Gravel pad saves about $2–$6 per sq ft and is ideal for lightweight storage; concrete slab costs roughly $6–$12 per sq ft but supports heavy workshop loads.
- Pier-and-beam or helical piles work best on slopes or poor soils and typically take a day to set for a small shed when using contractors; spacing is commonly 4–8 ft.
- Skids are cheapest and easiest to relocate but expect 5–15 years lifespan; plan anchoring and future upgrades if you may convert the shed to habitable space.
For current reference points, review Portland Cement Association resources and Insulating Concrete Forms Manufacturers Association.
Quick Comparison: Shed Foundation Options at a Glance
Fast Pros and Cons List
- Concrete slab (slab-on-grade): Cost ~ $6–$12/sq ft installed for small sheds, DIY takes a weekend with formwork; durability rating 5/5 for permanence and load. Best for heavy equipment, workshops, and habitable sheds. See Portland Cement Association guidance on concrete for design details (https://www.cement.org/).
- Gravel pad foundation (compacted aggregate): Cost ~ $2–$6/sq ft, quick DIY (a day with equipment), durability 3/5. Great for garden sheds, light storage, and sites with good drainage.
- Pier-and-beam (concrete piers or posts): Cost ~ $4–$10/sq ft depending on pier type; typical pier spacing 4–8 ft, installation time ranges from a day (DIY small job) to multi-day with contractors. Durability 4/5 and excellent for slopes and flood-prone lots.
- Helical piles (screw piles): Cost higher per pier but useful on poor soils; contractor-installed; durability 5/5 in corrosive soils if specified by installer. See Helical Pile Institute resources (https://helicalpileinstitute.org/).
- Skids/timber runners: Cost very low — often under $2/sq ft for materials; quick build, portability, durability 2/5 to 3/5 depending on treatment and drainage. Best for temporary structures or tiny greenhouses.
- Frost-protected shallow foundation (FPSF): Cost similar to shallow slab but uses insulation to avoid deep footings in cold climates; lifespan comparable to slab if detailed correctly. Read technical guidance on FPSF from Building Science Corporation (https://www.buildingscience.com/documents/digests/bsd-106-frost-protected-shallow-foundations).
Industry sites categorize foundations as on-grade or frost-proof; for a compact overview of many types, see this practical round-up on How to build 6 different shed foundations.
When Each Option Makes the Most Sense
- Use a concrete slab when the shed will house heavy machinery, will be converted to habitable space, or when a finished floor is wanted.
- Choose a gravel pad for budget storage, good drainage sites, or when ease of DIY matters.
- Pick piers or helical piles for steep or wet sites, flood zones, or when minimal excavation is preferred.
- Opt for skids if portability and low cost are priorities and the shed will remain non-permanent.
- Consider FPSF in cold climates where frost depth makes standard footings expensive or impractical.
Concrete Slab vs Gravel Pad: Which is Better for Small Sheds?
What a Slab Gives You: Load, Longevity, and Finish Options
A concrete slab-on-grade provides a continuous, level floor with high point and distributed load capacity. Typical small-shed slabs are 3–4 inches thick for light-duty use, with thicker perimeter beams or 6-inch thick sections under concentrated loads. For reinforced slabs, 6x6 W1.4xW1.4 welded wire fabric or #3 rebar at 18–24 inches on-center is common for small workshops; consult Portland Cement Association guidance for mix and joint recommendations (https://www.cement.org/). Expected lifespan is decades with minimal maintenance. Slabs make it straightforward to install finished flooring or to attach heavy equipment anchors.
- Typical slab details:
- Thickness: 3–4 in for small storage slabs, 4–6 in for workspaces
- Reinforcement: welded wire mesh or rebar at typical spacing
- Sub-base: 4–6 in compacted crushed stone, vapor barrier for moisture control
Concrete slabs are sensitive to frost if not detailed for cold climates. For cold sites, see our slab-on-grade guide for edge insulation and joint strategies to reduce cracking and frost heave.
When a Gravel Pad is the Smarter, Cheaper Choice
A compacted gravel pad consists of a geotextile filter, 4–8 inches of compacted crushed stone (e.g., 3/4" minus) and a leveled surface under the shed floor. Gravel pads drain well and cost far less to install. They suit lightweight storage, garden tools, and sheds where a finished interior floor is unnecessary. Gravel pads are DIY-friendly with a skid-steer or plate compactor. Typical lifespan depends on drainage and use — expect 10–20 years for a well-drained pad with occasional top-up.
Use a gravel pad when:
- You need the lowest installed cost.
- The shed will be lightweight and not converted to living space.
- Site drainage is good and frost risk is manageable.
Drainage, Frost, and Moisture Considerations
Moisture control matters for both slabs and gravel pads. Slabs should include a vapor barrier (6-mil polyethylene or better) and proper perimeter grading. For gravel pads, a geotextile underlay prevents mixing with subsoil. In frost-prone areas, both systems must consider frost depth: slabs may need edge insulation or deeper footings; gravel pads may heave if moisture accumulates and freezes. Building Science Corporation explains FPSF strategies for shallow footings and insulation that mitigate frost effects (https://www.buildingscience.com/documents/digests/bsd-106-frost-protected-shallow-foundations).
Pier-and-beam (post) Foundations: Lightweight, Adjustable, Good for Uneven Ground
Types of Posts and Footings (concrete Piers, Sonotubes, Helical Piles)
- Concrete piers poured in place (sonotubes): Common DIY method. Drill or dig holes, set a sonotube with concrete, and add a treated post base. Good for small sheds on moderate soils.
- Precast concrete piers: Factory-cast blocks set on compacted pads; faster but require precise leveling.
- Helical piles (screw piles): Mechanically installed by contractors. They transfer load to deeper competent layers and are excellent on poor soils or where vibration must be minimized. Technical resources and installer directories are available from the Helical Pile Institute (https://helicalpileinstitute.org/).
Load Distribution and Spacing Rules
Piers transfer shed loads to point supports. Typical pier spacing for small sheds runs 4–8 ft depending on floor joist span and load. For light garden sheds, spacing at 6–8 ft is common; for workshops with heavier point loads, spacing should be closer (4–6 ft) with larger diameter piers or deeper embedment. Engineers or experienced installers can translate shed floor framing loads into required pier sizes; common practice for hobby sheds is using 8–12 inch diameter piers 18–36 inches deep in good soils.
DIY Tips for Leveling and Anchoring
- Test the soil: Use a stake and probe to check for soft spots or high groundwater. If the auger bites easily and stays solid, shallow piers may work.
- Use post bases: Galvanized adjustable post bases secure timber joists to concrete piers and allow for leveling.
- Maintain ventilation: Provide at least 12–18 inches of crawl space height to allow airflow and inspection.
- Anchor for wind: Use hold-downs or straps for high-wind areas; helical piles often come with engineered anchoring systems.
For larger or complex sites—remote or off-grid—pier foundations often fit project logistics; consult the off-grid build guide for broader site planning considerations.
Skid, Timber, and Temporary Foundations: Cheapest DIY Options and Trade-offs
Common Skid Designs and Materials
Skid foundations typically use pressure-treated timbers (4x6, 4x8) laid as runners beneath the shed, sometimes on cross-sills. Decking attaches to skids, creating a portable platform. Use ground-contact treated lumber (UC4A or UC4B) and design the runners to spread load across several contact points or short stone piers. For interior finish, consider simple decking or an earthen floor option; see earthen floor options.
When a Temporary Foundation is Acceptable
Skids are acceptable for:
- Sheds under local size thresholds that are treated as non-permanent (check local code).
- Greenhouses, temporary studios, or storage on leased land.
- Sites that may require later relocation.
Code compliance varies; small structures without fixed foundations may avoid permitting in some jurisdictions, but this is not universal — always verify local rules.
Upgrading Skids Later: What to Plan For
If the plan is to convert a skid-mounted shed to a permanent building later:
- Anchor points: Pre-install locations for future anchoring to piers or slab.
- Subfloor details: Use a floor built on joists so it can be lifted and set on a permanent foundation later.
- Moisture protection: Use vapor-permeable membrane between skid and decking and ensure good drainage to extend life.
For material guidance on runners and decking choices see the discussion of decking and skid boards. Example: a tiny greenhouse on skids placed on compacted gravel with skids elevated on pavers can last several seasons and be moved seasonally on a homestead.
Cold Climates and Frost Protection: Avoiding Heave and Long-term Damage
Frost Depth, Footings, and Insulation Approaches
Frost depth varies widely; consult local building departments or standard frost-depth tables. The International Residential Code and local amendments specify minimum footing depths in many U.S. jurisdictions. A common rule of thumb in cold regions is to place footings below the local frost line, which might be 12–60 inches depending on latitude and soil. For precise soil and depth data, check local codes or consult frost-depth resources.
Frost-protected Shallow Foundations (FPSF) for Small Buildings
FPSF uses perimeter insulation to keep soil beneath a shallow foundation above freezing, allowing shallower footings. This method reduces excavation and concrete use for cold climates and is well documented in technical digests (see Building Science Corporation overview: https://www.buildingscience.com/documents/digests/bsd-106-frost-protected-shallow-foundations). FPSF is effective for small, low-rise buildings when properly detailed with continuous perimeter insulation and adequate drainage.
Practical Winterization Steps for Diyers
- Slope grade away: Keep at least 5% slope away from the foundation for the first 5–10 ft.
- Install perimeter insulation: Rigid foam (extruded or expanded polystyrene) can reduce frost effects at edges.
- Provide drainage: Avoid standing water around the foundation — install swales or French drains when needed.
- Seal and ventilate crawl spaces: Vent and insulate crawl spaces where applicable; use a vapor barrier under slabs to limit moisture migration. For slab moisture control see vapor barrier installation.
Comparison Table: Load Limits, Cost, Lifespan, and Best Uses
How to Read the Table
The table summarizes typical installed costs, expected lifespan, general load capacity, frost performance, DIY difficulty, and common best uses. Costs are ballpark national averages; local prices vary with labor, material, and access.
| Foundation type | Typical installed cost per sq ft | Expected lifespan (years) | Load capacity (qualitative) | Frost performance | DIY difficulty | Best use case |
|---|---|---|---|---|---|---|
| Concrete slab | $6–$12 | 30–100 | High | Medium (needs frost detail) | Medium–High | Workshops, habitable sheds |
| Gravel pad | $2–$6 | 10–20 | Low–Medium | Low (can heave) | Low | Lightweight storage, quick installs |
| Pier-and-beam (concrete piers) | $4–$10 | 20–50 | Medium–High | Good (with deep piers) | Medium | Slopes, flood zones, uneven sites |
| Helical piles | $8–$20 (per sq ft equivalent) | 30–100 | High | Excellent (deep transfer) | Low (contractor) | Poor soils, remote sites |
| Skids/timber runners | <$2–$4 | 5–15 | Low | Poor (unless elevated/drained) | Low | Temporary sheds, moveable units |
| Limecrete (lower-carbon slab) | $8–$15 | 20–60 | Medium | Medium | Medium | Eco builds; see limecrete foundations |
Quick Selection Checklist
- Site type: Is the lot sloped, flood-prone, or level with good drainage?
- Budget: Do you want lowest upfront cost or long-term durability?
- Permanence: Will the shed be converted to livable space later?
- Floor loads: Will you store heavy equipment or vehicles?
Use the cost breakdown for budgeting context.
Site Conditions That Decide Which Shed Foundation is Best
Soil Bearing, Drainage, Slope and Access
Soil bearing capacity is the single most important factor after intended load. Use the USDA Web Soil Survey to get basic soil maps and ratings for many U.S. sites (https://websoilsurvey.sc.egov.usda.gov/). In the field, simple tests (probe rod resistance, digging test pits) reveal organic layers, peat, or saturated soils that require deeper footings or helical piles. Poor drainage or a high water table favors elevated piers or helical piles over slabs.
Local Codes, Permits, and Flood Risk
Local building departments set rules for what constitutes a permanent foundation. Structures on continuous footings or slabs often require permits; skids under a certain footprint may be exempt. Check flood maps from FEMA to identify floodplain restrictions and elevation requirements (https://msc.fema.gov/portal/home). Always verify permit thresholds before committing to a foundation.
Sustainability and Waste-minimizing Choices
Sustainable choices include minimizing concrete volume, using reclaimed timber for skids, or considering low-carbon alternatives like limecrete. For practical construction waste reduction tactics see reduce construction waste. Moisture and airtight detailing around the foundation also affect long-term energy use; see air-tight detailing tips for envelope strategies that interact with foundation choices.
Step-by-step: Choosing and Building the Right Shed Foundation
Decision Flow: Size, Use, Site, Budget
- Measure the shed footprint and intended internal loads.
- Check local codes and flood/frost maps.
- Assess soil using probes or Web Soil Survey (https://websoilsurvey.sc.egov.usda.gov/).
- Choose foundation type based on permanence, budget, and site.
- Plan anchoring, drainage, and vapor control.
Basic DIY Build Steps for Each Option
- Gravel pad: Mark and level footprint, install geotextile, place 4–8 inches compacted crushed stone, re-check level, install pressure-treated sleepers or shed floor directly.
- Concrete slab: Excavate 6–8 inches, compact subgrade, add 4–6 inches crushed stone, lay vapor barrier, set forms and reinforcement, pour and finish concrete, saw control joints, cure per manufacturer directions. See Portland Cement Association resources for mix and curing best practices (https://www.cement.org/).
- Concrete piers (sonotubes): Lay out pier grid, dig holes to required depth, insert sonotubes, pour concrete, set post bases, attach treated beams and joists once concrete cures.
- Helical piles: Engage a local installer, set piles to specified torque and capacity, attach pile heads and jack/level beams. Use contractor due to special equipment; see Helical Pile Institute resources (https://helicalpileinstitute.org/).
- Skids: Set treated runners on compacted pads or pads/pavers, build floor framing on skids, attach shed walls. Anchor with straps or ground anchors for wind resistance.
Insert quick video: What viewers will learn: site prep, compacted gravel pad installation, slab edge formwork, and a pier installation walk-through.
Watch this step-by-step guide on building a gravel pad shed foundation by yourself:
Checklist: Tools, Materials, and Safety
- Call 811 (or local "call before you dig") before excavation.
- Tools: shovel, level, laser level or transit, plate compactor, saws, concrete mixer (or ready-mix truck), personal protective equipment.
- Materials: crushed stone, geotextile, rebar/mesh, sonotubes, treated lumber, vapor barrier, concrete mix.
- Safety: wear eye, ear, and dust protection; use gloves and steel-toe footwear when handling heavy materials.
For roof and envelope finishing related to a future habitable conversion see roof insulation methods. Interior floor finish options for non-concrete floors are described in earthen floor options.
The Bottom Line
For simple storage, a compacted gravel pad is the best balance of cost and ease. For workshops or potential living conversion, a concrete slab or limecrete slab provides the load capacity and finished floor. For slopes, high water table, or poor soils, choose pier-and-beam or helical piles. Run the checklist, confirm local codes, and pick the foundation that matches site conditions, budget, and long-term plans. For more reading, see our other foundation guides.
Frequently Asked Questions
Do I need frost protection for a small garden shed?
It depends on your local frost depth and how permanent the shed will be. If the shed is lightweight and removable, skids or a gravel pad may be acceptable without frost protection, but they can heave in freezing soils. For permanent structures especially with heavy loads, follow local footing depth rules or use frost-protected shallow foundation (FPSF) techniques to avoid deep excavations; see technical FPSF guidance (https://www.buildingscience.com/documents/digests/bsd-106-frost-protected-shallow-foundations).
Do sheds typically require a building permit?
Permit requirements vary by jurisdiction. Many places exempt small, non-permanent structures under a certain square footage, while permanent foundations or habitable conversions almost always require permits. Check with the local building department before beginning work and verify floodplain or setback rules using resources such as FEMA flood maps (https://msc.fema.gov/portal/home).
What is the cheapest durable foundation for a shed?
A well-built gravel pad is the cheapest durable option for non-habitable sheds. Properly installed with a geotextile and adequate compaction it can last a decade or more for light loads. For longer-term durability under heavier use, a small slab or pier-and-beam will cost more upfront but reduce maintenance over time.
Can I move a skid foundation later if I change my mind?
Yes. Skid-mounted sheds are intended to be movable. Design considerations: keep the structure light, use continuous runners, avoid permanent anchors that would need cutting, and document attachment points if you plan to reuse or relocate the unit. Skids work well for seasonal or temporary uses but will generally need upgrading for permanent, habitable use.
Will a concrete slab crack in freeze-thaw conditions?
Concrete will crack if not detailed for movement or freeze-thaw cycles. Control joints, proper reinforcement, adequate sub-base drainage, and correct curing significantly reduce cracking. In cold climates, edge insulation or FPSF techniques can prevent freeze-related movement. Consult Portland Cement Association guidance for mix, joint spacing, and curing to minimize cracking (https://www.cement.org/).