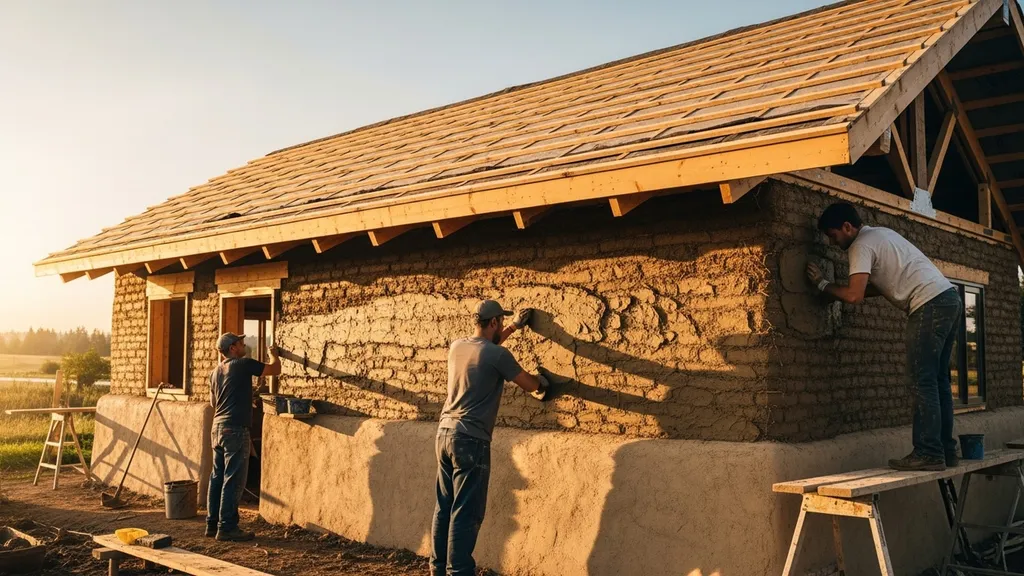
Step-by-step, practical guide to planning and building a cob house for DIY eco-home builders. Materials, mixes, costs, moisture control, and next steps.
Cob House Building: Complete Beginner's Guide
A cob house is a hand-built earthen structure formed from clay, sand and straw that can produce sculptural, low-cost walls with strong thermal mass. This guide explains what a cob house is, how to test soils and mix cob, a practical step-by-step build sequence from foundations to roof, moisture and insulation strategies for energy-efficient homes, realistic costs and timelines, and how cob compares with other natural building methods. Readers will learn specific cob mix recipes, foundation options, common failure modes to avoid, and next steps for a DIY cob build.
TL;DR:
- Cob walls: 350–600 mm (14–24 in) thick, low-material cost but high labor; expect 60–80% of onsite material needs from local soil.
- Test and adjust: Use a jar-sediment and ribbon test, then make trial cob patches; common structural mix is roughly 1 part clay : 2–3 parts coarse sand with straw.
- Protect from moisture: deep eaves (600–900 mm), raised foundations (rubble trench or insulated pad), and breathable lime plaster; pair cob with mechanical ventilation for airtight, efficient homes.
What is a Cob House? Origins, Principles and Why Diyers Choose Cob
Cob Defined: Materials and Basic Properties
Cob is an earthen building material made by mixing clay-rich soil, coarse sand or grit, water and straw to form a malleable, monolithic wall. Walls are typically hand-applied in lifts and sculpted while damp. Typical wall thickness ranges from 350–600 mm (14–24 in). That thickness gives thermal mass: cob absorbs heat during the day and releases it slowly, helping stabilize indoor temperatures in temperate climates. Cob is breathable and has low embodied energy compared with fired brick or concrete when materials are locally sourced.
A Short History and Modern Revival
Cob has millennia of history in Europe, Africa and the Americas. Contemporary DIYers and communities draw on traditional techniques and modern testing. For a practical primer on foundation and door details used in many cob builds, see The Cob Builder's Handbook (pdf guide with tamping and foundations). The Natural Building Alliance documents modern cob practice and resources for builders and inspectors.
Practical Benefits and Trade-offs for DIY Builders
Benefits:
- Low material cost when suitable soil is on-site.
- Sculptural aesthetics and simple repairability.
- High thermal mass for temperate climates and stable indoor comfort.
Trade-offs:
- Labor intensive; build time is slower than modular systems.
- Vulnerable to moisture without strong roof and foundation details.
- Permitting can be uncertain in some jurisdictions.
Key maintenance tasks include periodic inspection of plasters, reapplying breathable lime coats, and ensuring gutters and eaves remain effective. For related methods and case studies, see the site's natural building overview.
Is a Cob House Right for Your DIY Eco Home? Site, Climate, Permissions and Skills
Site and Climate Suitability Checklist
- Well-drained site with a slope or ability to install perimeter drainage.
- Space to build wide eaves (600–900 mm) to protect walls.
- Access for moving soil, straw and tools.
- Avoid sites with chronic groundwater or splash-prone soil close to wall lines.
Cob performs best in temperate climates where thermal mass reduces temperature swings. In hot-arid zones, mass can moderate day–night swings. In cold, wet climates, cob needs either exterior insulation or a hybrid timber-insulated assembly to maintain year-round performance and avoid moisture problems.
Building Codes, Permits and Inspections
Local codes vary widely. Some jurisdictions accept cob as a masonry or adobe system; others require engineered designs or will only allow cob for non-habitable structures. Industry sources and community guides recommend early contact with building officials. For permit research and examples relevant to off-grid or nonstandard homes, see the site's permit requirements for off-grid homes. Expect to reference IECC or local energy codes and to provide structural details for lintels, foundations, and roof tie-ins.
Skills, Team Size and Tools You'll Need
Basic skills: masonry-like workmanship, mixing and placing cob, simple carpentry for lintels and roof framing. Recommended tools:
- Wheelbarrow and shovels
- Mechanical or rotary soil mixer (optional) or hand-stomping area
- Levels, framing squares and string lines
- Scaffold or secure working platforms
- Timber saws for lintels and formwork
- Plastering trowels and floats
Labor: a small team of 3–6 people can build a small cob house, but labor hours depend heavily on size and sculptural detail. Begin with a practice wall or small outbuilding to learn mixing, lift heights and curing. The Natural Building Alliance offers practical notes on cob mix preparation and team workflows (cob technique overview).
Core Materials, Soil Testing and Cob Mix Recipes
How to Test and Source Suitable Soil
Simple field tests:
- Jar-sediment test: place a soil sample in a jar, fill with water, shake, let settle 24 hours; layers show sand, silt, clay percentages.
- Ribbon test: press damp soil between thumb and forefinger—clay-rich will form a long ribbon before breaking.
For uncertain sites, send soil to a university extension or geotechnical lab for particle-size analysis. The Cob Research Institute provides technical resources on acceptable soil ranges and lab tests (cob research institute).
Common Cob Mix Recipes and Proportions
Because soils vary, trial patches are essential. Two sample recipes:
- Structural (leaner, sandier): 1 part clay : 3 parts coarse sand, small amount of straw (about 5–7% by volume), water to workable consistency. Use for load-bearing walls where clay content is moderate.
- Strong binder (richer clay): 1 part clay : 2 parts coarse sand, mixed with longer straw (50–150 mm lengths) for tensile reinforcement. Use where soil has lower natural sand.
Adjust by testing: make 300 mm bricks or a 300 mm test wall, let dry 2–4 weeks, test for cracking, erosion and compressive behavior. Add coarse grit or crushed rock (2–6 mm) to improve shear resistance where needed.
Additives, Plaster and Breathable Finishes
- Straw: use chopped straw or long barley/wheat straw. Clean, dry straw resists rot; avoid hay with seeds/weed contamination.
- Lime or natural pozzolans: adding hydrated lime (5–10% by volume of mix) or volcanic pozzolan can improve weather resistance and reduce erosion—use cautiously and test.
Plasters: breathable lime or lime-clay plasters are preferred because they let moisture pass through slowly. Avoid impermeable paints or cement-rich external renders that trap moisture. For sourcing eco-friendly binders and complementary products, consult the site's sustainable materials guide and sustainable products guide.
Step-by-step Cob House Build Process (foundations, Walls, Openings, Roof)
Foundations and Base Details (rubble Trench, Raised Stone, Insulated Options)
Foundations are critical because moisture is cob's primary enemy. Options:
| Foundation type | Typical cost | Complexity | Moisture risk |
|---|---|---|---|
| Rubble trench with perforated pipe | Low | Medium | Low if drained |
| Compacted gravel pad with damp-proof course | Low–Medium | Low | Medium |
| Raised stone plinth with mortar | Medium | High | Low with capstone |
| Insulated concrete footing | High | High | Low but higher embodied energy |
Rubble-trench foundations with a perforated drain pipe and compacted gravel bedding are common for cob; they keep capillary moisture away. In cold climates, consider insulated concrete footings or a hybrid solution meeting frost-depth requirements.
For academic discussion of environmental impact and earth construction phases, see this case study on cob building technique (case study pdf).
Building Cob Walls: Banking, Cobbing, Lifts and Quality Control
- Prepare a solid, dry plinth and damp-proof course at or above finished grade.
- Build in lifts of 300–450 mm (12–18 in) maximum; allow each lift to firm slightly before adding the next to avoid slumping.
- Work using "banked cob" where a continuous supply of cob on ground-level banks is scooped and applied.
- Tamping or light compressing removes air pockets. Dress joints between lifts with a finishing tool for weather-shedding profiles.
Quality control: make test patches for each day's mix; mark and record mix ratios. Watch for hairline cracking—small shrinkage cracks are normal, but wide cracks indicate too much clay or rapid drying.
Openings, Lintels, and Window/door Details
Use strong lintels: engineered timber, steel or reinforced concrete sized to span openings and carry bond beams if needed. Protect the head of openings with a drip detail and breathable flashing. Recess sills back from the external face and form a drip edge to prevent splashback. For airtightness and flashing guidance at roof-wall junctions, see the zip sheathing air barrier guide and air sealing techniques.
Plastering, Curing and Finishing
- Apply a scratch coat (clay-lime or lime plaster) once the wall is sufficiently dry—typically weeks to months depending on climate.
- Cure lime plasters slowly; protect from rapid drying and frost.
- Finish with multiple thin breathable coats rather than one thick coat.
Roof Options and Moisture Protection
A robust roof is non-negotiable. Options: timber trusses with deep eaves, metal roofing with breathable underlayment, or green roofs with careful waterproofing (green roofs need robust detailing and are not typical for cob without a waterproof structural roof). For practical roof framing steps, consult the site's roof trusses and sheathing guide.
Tools checklist for build stage:
- Mixing: soil mixer or stomping area, wheelbarrow
- Shaping: trowels, wooden floats, metal rakes
- Safety: gloves, masks, eye protection
- Scaffolding: adjustable scaffold with guard rails
Watch this step-by-step guide on building a permitted cob house - cob code 2021 irc:
Moisture Control, Insulation and Passive-house Integration for Cob Homes
Managing Moisture: Drainage, Overhangs and Breathable Finishes
Moisture is the single biggest failure mode for cob. Common mechanisms: capillary rise from the ground, splashback from rain, and driven rain. Remedies:
- Perimeter drainage and gravel trenches under foundations.
- Raised plinths and damp-proof courses where local code permits.
- Deep eaves (600–900 mm) and gutters to direct water away from walls.
- Breathable lime plasters that allow vapor diffusion and shed liquid water.
For a practical overview of breathable finishes and earth wall maintenance, Network Earth's natural building summary is a useful resource (overview of techniques).
Insulation Strategies: External vs Internal and Hybrid Assemblies
Cob's thermal mass works best when coupled with an insulation strategy that prevents the wall from getting too cold and wet. Options:
- Exterior continuous insulation (CI): place breathable insulation boards or mineral wool externally, then apply a ventilated rainscreen or breathable finish. This preserves mass while giving thermal performance. See the site's exterior insulation guide.
- Internal insulation: simpler for retrofits, but it isolates the mass and can create moisture trapping risks unless ventilation and vapor control are properly detailed.
- Hybrid: insulated timber frame or structural insulated panels with cob infill for finish and mass where desired.
Translate insulation goals to numbers using R-value basics: see the site's R-value basics for target R-values by climate zone. For airtight, high-performance homes, pair cob with mechanical ventilation such as HRV/ERV to control humidity and indoor air quality.
Cost, Timeline and Common Pitfalls for DIY Cob Builds
Typical Cost Drivers and a Sample Budget Breakdown
Cob materials can be inexpensive when soil and straw are on-site, but other costs add up:
- Foundations and drainage: 20–35% of budget
- Roof and framing: 20–30%
- Windows, doors and lintels: 10–20%
- Plastering and finishes: 10–15%
- Labor and subcontractors: 30–50% (even self-builds have hired costs)
Hidden expenses include engineered lintels, testing fees, and specialized inspections. The USDA and community rebuild programs document ways natural building projects manage costs and partnerships (USDA natural building blog). For a deeper look at hidden costs and small-home budgeting, see the site's hidden DIY building costs and tiny house budget build. If aiming for passive-house level performance, consult the passive house cost breakdown to estimate extra insulation, windows and HVAC.
Realistic Timelines and Labour Estimates
- Small outbuilding (10–20 m²): 2–6 months with a small volunteer team and practice walls.
- One-room cob home or studio: 6–12 months depending on weather and team size.
- Full cob family house: 12–24 months for novice DIY teams, longer with complex detailing.
Factors affecting time: weather windows, drying/curing time, availability of skilled helpers, and the decision to sculpt detailed forms.
Common Mistakes and How to Avoid Them
- Insufficient roof overhangs or guttering → leads to splash erosion. Fix: design 600–900 mm eaves and robust guttering.
- Poor foundation drainage → capillary rise. Fix: rubble trench or compacted gravel pad with perimeter drainage.
- Wrong soil mix or lack of testing → cracking or weak walls. Fix: perform jar tests and trial patches.
- Rushing curing and plastering → structural and finish failures. Fix: allow staged drying and use breathable plasters.
- Neglecting ventilation → high indoor humidity and mold risk. Fix: install HRV/ERV when aiming for airtight assemblies.
Practical troubleshooting: minor cracks in internal cob are often cosmetic; erosion on external faces signals moisture issues needing immediate roof/flashing attention.
Cob Versus Other Natural Building Methods — a Practical Comparison Table
Head-to-head: Cob, Strawbale, Hempcrete, Rammed Earth
| Method | Thermal mass | Insulation potential | Typical wall thickness | Build speed | Moisture vulnerability | Typical cost range |
|---|---|---|---|---|---|---|
| Cob | High | Low–medium (mass) | 350–600 mm | Slow | Medium–High without protection | Low–Medium |
| Strawbale | Low | High | 400–600 mm | Medium–Fast | Medium (must protect bales) | Low–Medium |
| Hempcrete | Low–Medium | Medium–High | 300–400 mm | Medium | Low with proper mix | Medium–High |
| Rammed earth | Very high | Low | 200–400 mm | Slow (formwork) | Medium (needs cap protection) | Medium–High |
When to pick which:
- Choose cob for sculptural forms and thermal mass where local soil is abundant.
- Choose strawbale for high insulation needs and faster wall erection.
- Choose hempcrete for lightweight, mold-resistant infill with good hygrothermal properties.
- Choose rammed earth when mass and solid, flat walls are desired and heavy formwork is acceptable.
For a direct comparison between hempcrete and insulated concrete forms (ICF), see the site's hempcrete vs ICF comparison.
Quick Decision Guide: Which Method Fits Which Project
- Small off-grid studio with available soil and time → Cob.
- Cold climate, tight timeline, high R-value target → Strawbale or insulated frame.
- Want lightweight, breathable insulation with commodity binder → Hempcrete.
- Large, flat walls with industrial scale and high mass → Rammed earth.
The Bottom Line
Cob houses offer low-material-cost, sculptural walls with excellent thermal mass for temperate climates, but they demand careful moisture protection, patient labor, and good soil testing. For beginners: test your soil, build a small practice wall, and design strong roof and foundation drainage before you commit.
Frequently Asked Questions
How long does a cob house last?
With proper foundation, roof protection and maintenance, cob houses can last centuries. Historical examples in the UK and Europe show longevity when walls are kept dry and plasters maintained. Modern builds using lime-based exterior renders, good eaves and regular inspections commonly expect 50+ years with ongoing maintenance.
Can cob be used in cold climates?
Yes, but details matter. Cob's thermal mass helps in temperate climates, but in very cold climates you should either add exterior continuous insulation or use a hybrid timber-insulated framing with cob infill. Exterior insulation preserves the thermal benefit of the mass while keeping the wall warm and dry. Refer to R-value targets for your climate zone and consider pairing with mechanical ventilation and sealed windows.
How do you protect a cob house from rain?
Primary protections are a raised, well-drained foundation, deep eaves (600–900 mm), continuous gutters, and breathable lime plaster finishes. Avoid exposing raw cob to direct splash and driven rain. Ensure flashings at windows and doors are breathable or designed to shed water without trapping moisture.
Do cob houses need foundations?
Yes. Foundations prevent capillary rise and ground moisture from reaching cob walls. Common foundation choices include rubble-trench footings with perforated drain pipe, compacted gravel pads with a damp-proof course where code allows, or raised stone plinths. Select a foundation type appropriate to local frost depth and site drainage.
What permits do I need for a cob build?
Permit requirements vary by jurisdiction. Many areas accept cob under masonry or alternative building material provisions, but you may need engineered structural details, inspections, and proof of compliance with local energy codes (IECC or equivalent). Start early with building officials and consult the site's permit requirements for off-grid homes for guidance on documentation and common hurdles.