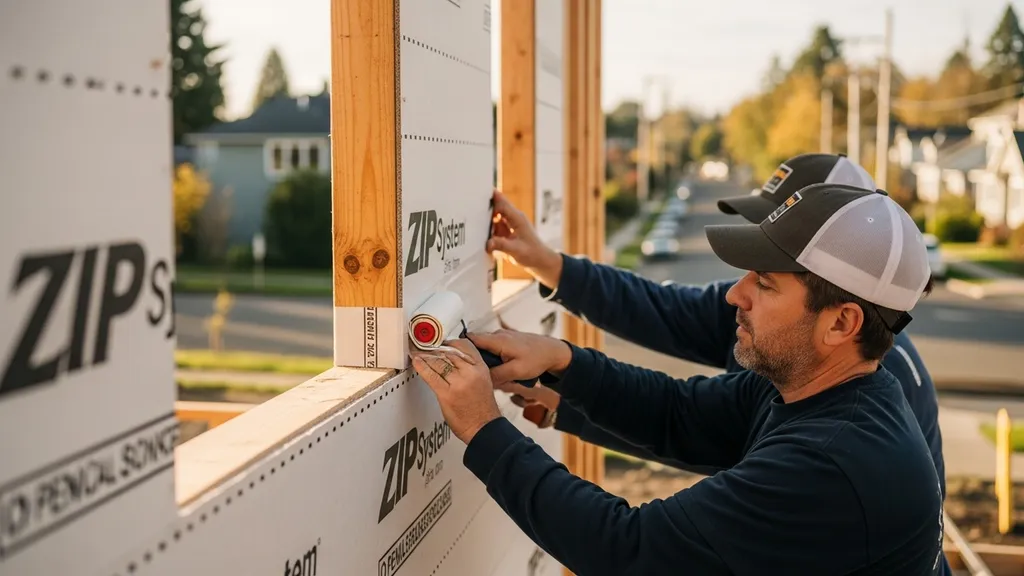
Step-by-step guide to using ZIP sheathing as a continuous air barrier — planning, taping, flashing, testing, and common mistakes to avoid.
ZIP Sheathing as Air Barrier: Installation Guide
ZIP sheathing air barrier systems are a popular choice for builders who want the structural strength of sheathing combined with an integrated weather-resistive layer and an air-control surface. This guide explains how to plan, install, tape, flash, test, and troubleshoot ZIP System sheathing when used as a continuous air barrier, with practical specs, material lists, and cost/time estimates for DIY eco home projects.
TL;DR:
- ZIP system panels can reduce air leakage to roughly 20–40% less than untaped OSB + housewrap when seams and penetrations are properly taped; target ACH50 is 0.6 for Passive House, 1–3 for tight retrofits.
- Use manufacturer tape on seams, a 100–150 lb roller for firm adhesion, and primer or liquid flashing for complex corners and rough openings; typical tape cure and adhesion windows are above 40°F (4–5°C).
- Choose ZIP when building new, straight-walled homes that need fast WRB + air-barrier installation; consider hybrid air-barrier strategies (liquid-applied or interior membrane) for retrofits or very complex geometry.
Related guides: Vapor barrier installation for walls step by step guide, Air sealing existing homes DIY guide, How to install airtight membrane walls roofs, DIY mini split installation step by step guide, and Air sealing tools and materials what you need.
Why Use ZIP Sheathing as an Air Barrier?
ZIP System panels combine structural sheathing (oriented strand board base) with a factory-applied water-resistive barrier (WRB) and an air-control surface. Panels typically come in 4x8 sheets in thicknesses of 7/16", 1/2", and 5/8". Huber and independent evaluations describe the product as a combined sheathing + WRB solution that can serve as a practical continuous air barrier when seams and penetrations are taped per manufacturer instructions and local code.
Air-barrier basics that matter to DIY builders:
- Continuity: An air barrier must be continuous across seams, transitions, and penetrations to control bulk airflow. ZIP panels provide a continuous exterior plane so long as tape and flashings are correctly applied.
- Permeability: ZIP System's surface is designed to shed bulk water while allowing some vapor transmission; manufacturer literature and ICC evaluation reports (e.g., ESR-3373) document compliance for specific assemblies.
- Durability: Factory-applied WRB and taped seams avoid many field-applied errors, but durability depends on correct fastener use, tape adhesion, and cladding ventilation. Typical service life is tied to the sheathing substrate and cladding — expect decades of service if installed properly and protected by cladding.
Performance targets DIY builders care about:
- Passive House standard: 0.6 ACH50
- Tight retrofit target: 1–3 ACH50
- Typical production homes: 3–8 ACH50
ZIP system works well with common claddings (fiber cement, wood siding, brick veneer with proper drainage) and with continuous exterior insulation (CI) such as polyiso. For guidance on CI interactions, see the planning notes below and manufacturer data on R-values for ZIP R-sheathing.
For an overview of integrated sheathing performance, see this independent walkthrough of the ZIP System installation and considerations: Expert guide to huber's zip system sheathing installation and ....
Quick key points: what every DIY builder should know about ZIP sheathing air barriers
- Continuity matters: Tape every panel seam, corner, and transition. Untaped gaps are the largest single source of leakage in taped sheathing assemblies.
- Use compatible tape: ZIP System tape (acrylic-backed) is designed for the surface; butyl tapes or higher-tack butyl-acrylic hybrids can work for cold or dusty conditions.
- Prep surfaces: Clean, dry, and free of dust or frost. Primer is sometimes required on OSB edge or dusty conditions.
- Window and door tie-in: Flash and tape to the rough opening and window flange per AAMA 711 guidance for best water- and air-tight performance.
- Fasteners matter: Avoid over-driven screws that tear the WRB; follow manufacturer fastener schedules to preserve the air barrier.
- Testing is part of the process: Plan for blower-door testing before cladding and again after cladding where possible.
- Common failure modes: Missed seams at corners, taped over dusty/wet panels, and poor sequencing with CI leading to delayed repairs.
- Know when to add a second layer: For complex geometries or high-performance airtight targets, add an interior air barrier (airtight drywall + gaskets) or a fluid-applied membrane for redundancy.
- Perms and vapor control: ZIP is semi-permeable; vapor control strategy must consider climate and insulation stack.
For code-specific claims about ZIP System R-sheathing in combination with framing and insulation, see the ICC evaluation: ESR-3373.
Planning a ZIP sheathing air-barrier installation
Project checklist: tools, tapes, flashings, fasteners
- Tools: Cordless screw gun, staple gun, utility knife, 100–150 lb roller (min), tape measure, chalk line, circular saw, broom/air blower for cleaning, blower-door access.
- Tapes and flashings: ZIP System tape (manufacturer acrylic tape), backup butyl or modified-bitumen tape for cold-weather starts, liquid flashing (Prosoco R-Guard or Henry 208R are common), sill pan flashing, and self-adhered flashing for through-wall penetrations as needed.
- Fasteners: Corrosion-resistant screws or nails sized per ZIP instructions. Follow the manufacturer’s fastening schedule for edge and field spacing.
- Testing gear: Plan blower-door access during the project or hire a rater. Bring smoke pencils or infra-red camera rental for leak detection.
Sequence planning: framing, sheathing, windows, openings, and CI
Plan the sequence to minimize rework:
- Finish framing and block any large openings where sheathing will run continuously.
- Lay ZIP panels horizontally with seams staggered; avoid seams intersecting at corners or rough openings where possible.
- Fasten panels per pattern, then immediately tape all seams before window installation if weather permits.
- Install window flashing and tape to ZIP per AAMA 711-compatible methods. If using CI, plan where CI will terminate relative to ZIP (outside of ZIP vs inside).
- Keep a weather window for taping: panels taped in dry conditions (surface temps above approx. 40°F) achieve best adhesion.
For framing tips that reduce seams and simplify panel layout, see the advanced wall framing guide.
Compatibility and material selection (tape types, liquid flashings, adhesives)
- Tape types: ZIP System tape is acrylic-based and designed for the panel surface. Butyl tapes (e.g., butyl hybrid products) stick better in cold or dusty settings. Adhesion performance varies by temperature and surface cleanliness.
- Liquid flashings: Use a compatible liquid-applied flashing for inside corners, sills, and complex details. Liquid flashing cures to a flexible membrane — typical tack-free times range from 1–24 hours depending on product and conditions.
- CI interactions: When using continuous exterior insulation like polyiso, confirm whether ZIP will be applied over the insulation or behind it. For guidance on polyiso and CI choices, see our article on polyiso insulation methods.
Budget planning: ZIP panels typically cost more than plain OSB plus housewrap, but you save time on WRB installation. A rough range in U.S. markets: $25–$45 per 4x8 ZIP panel and $15–$35 per 3"–4" wide tape roll, though prices vary regionally and over time. Always get current quotes before ordering.
Step-by-step ZIP sheathing air barrier installation
This section explains the practical sequence and offers specific technique tips to get taped seams to behave like a continuous air barrier.
Preparing the framing and installing panels
- Check framing: Ensure studs are straight and plates are flush; shim as needed at sills. Trim rough openings so the ZIP panels butt cleanly at the opening perimeter.
- Panel layout: Stagger vertical seams at least one stud bay apart. Horizontal layout with 4x8 sheets is common; orient panels to minimize seams at corners.
- Fastening: Use corrosion-resistant nails or screws sized per ZIP specifications. Common practice is 6" on center at edges and 12" in the field, but confirm with the product datasheet for your panel and local code. Avoid over-driving fasteners.
- Cutting details: Cut openings for windows and vents with a utility knife or circular saw; support bottom edges of openings with blocking as required.
Taping seams and detailing corners
- Surface prep: Brush or blow dust from seams. Taping over dusty or frosted OSB reduces adhesion significantly.
- Temperature window: Taping works best when surface temperature is above about 40°F (4–5°C); adhesive tack drops at lower temps.
- Application technique: Center tape on seams, remove backing gradually, and press by hand to seat. Use a 100–150 lb roller and make two passes per tape run (one with moderate pressure, a second for firm firming). Ensure tape covers 100% of the seam and presses into any slight panel gaps.
- Corners: Use pre-cut corner patches or wrap tape into inside corners. For complex corners, apply a liquid flashing first, allow correct cure, then tape over cured flashing.
- Overlaps and terminations: Tie tape into foundation intersections, roof-wall intersections, and window sills with continuous flashing. Seal the top and bottom of penetrations with tape and backing as required.
Sealing penetrations, windows, doors, and roof-wall intersections
- Window flanges: Follow AAMA 711: apply sill pan flashing at sill, tape the flange to the sheathing panel edges, then tape jambs and head. Some installers use a bead of compatible sealant at the flange before taping.
- Doors: Treat like windows: sill pan, tape jambs, and head flashing. Back-block at the sill to support the door threshold.
- Mechanical penetrations: Use pre-formed gaskets for pipes and vents where possible. For electrical boxes, either use sealed shallow boxes with foam gaskets or install a continuous interior air barrier that bypasses box penetrations.
- Roof-wall intersections: Tie ZIP tape to roofing underlayment or use compatible flashing to ensure a continuous plane.
Watch a step-by-step application to see roller technique, flange tie-ins, and sequencing: .
For ZIP System R-sheathing technical specs and installation details, consult the product spec sheet: ZIP system wall sheathing specs.
Testing, verification, and common performance metrics for ZIP sheathing air barriers
Blower-door testing: interpreting ACH50 and CFM50
- ACH50: Air changes per hour at 50 Pascals. Passive House target: 0.6 ACH50. Many tight retrofits aim for 1–3 ACH50.
- CFM50: Cubic feet per minute at 50 Pa, useful for comparing different-size buildings. Convert CFM50 to ACH50: ACH50 = (CFM50 × 60) / volume(ft³).
- Expected results: Properly taped ZIP assemblies can meaningfully reduce CFM50 versus untaped assemblies. Industry case studies show reductions of 20–40% when seams and penetrations are correctly taped and windows are flashed.
Visual inspection checklist and pressure-pan testing
- Pre-test checklist: Verify all tape runs are continuous, window/door flanges are taped or flashed, and mechanical vents are temporarily sealed or measured.
- Pressure-pan testing: Use a pressure pan to isolate leakage at windows and doors. This helps prioritize fixes, especially when the blower-door shows high whole-building leakage.
- Localization tools: Smoke pencils and infrared cameras identify thermal anomalies and air paths. Use smoke for real-time leak tracing at obvious seams.
For integrated sheathing performance and testing guidance, see the PHRC handouts on integrated sheathings: Integrated sheathings handouts. Also consider ventilation changes after tightening the envelope; consult the ventilation design guide when planning mechanical ventilation.
Long-term durability checks and maintenance
- Inspect tape adhesion at bumpy seams after 6–12 months and again after cladding installation.
- Check seal integrity after severe weather events and prior to cladding termination.
- Re-tape any lifted edges using primer and full-width tape. Replace areas with sustained water exposure or mechanical damage.
Common mistakes, troubleshooting, and field fixes for ZIP sheathing air barriers
Top 7 installation errors and how to avoid them
- Taping over dusty or wet panels — Clean surfaces or use primer; do not tape on frost.
- Poor roller pressure — Use a heavy roller and make two firm passes.
- Missed corner tie-ins — Pre-plan corner detail and install corner patches or liquid flashing.
- Overdriven fasteners tearing the WRB — Follow fastener torque limits; countersink lightly if needed.
- Not tying in window flanges — Flash and tape flanges to the sheathing at the time of install.
- Sequencing problems with CI — Determine whether ZIP sits inside or outside of CI and plan transitions.
- Ignoring electrical and mechanical penetrations — Use gaskets, sealed boxes, or interior air-barrier strategies.
Field repairs: patching torn panels, re-taping aged tape, flashing fixes
- Patching torn panels: Cut out damaged area and install a patch of the same thickness with tape around the perimeter. For large repairs, replace the panel section.
- Re-taping aged tape: Remove old, loose tape, clean the surface, apply primer if needed, then apply new tape with firm rolling.
- Flashing fixes: Apply liquid flashing to small gaps, allow curing, and tape over the cured membrane for redundancy.
For below-grade vapor and barrier tie-ins, especially where different barrier systems meet, refer to our basement vapor barrier advice for compatible connection methods.
When to add a secondary air barrier or use hybrid strategies
Hybrid approaches are common:
- Interior airtightness: Airtight drywall (taped and gaskets at junctions) provides a second line of defense and simplifies mechanical-penetration detailing.
- Fluid-applied membranes: Useful for complex shapes, curved walls, or historic renovations where taped board-seams would be impractical.
- Self-adhered membranes: For critical transitions or very cold climates, a peel-and-stick membrane at problem areas can add redundancy.
A small case example: On a 1,500 ft² DIY build, one crew discovered a persistent leak at a complex bay window. The repair sequence was removing siding at that bay, applying liquid flashing to the rough opening, re-taping flange-to-sheathing, and adding an interior airtight drywall seam at the affected wall. Post-repair, blower-door leakage dropped by roughly 15% in that zone.
ZIP sheathing vs alternatives: comparison table and decision guide
| Attribute | ZIP System sheathing | OSB + housewrap | Taped OSB | Fluid-applied air barrier |
|---|---|---|---|---|
| Air-barrier continuity (practical) | High when fully taped | Low unless taped | Medium–High if taped carefully | High with proper application |
| Water-resistive performance | Integrated factory-applied | Depends on install quality | Depends on tape quality | Very high when applied correctly |
| Perm rating | Moderate (semi-permeable) | Varies by housewrap type | Varies | Product-specific (can be low-perm) |
| Installation speed | Faster (single-step WRB) | Slower (separate housewrap) | Slower due to careful taping | Slower, skilled labor required |
| Material cost per 4x8 | $25–$45 | OSB $10–$20 + housewrap cost | OSB + tape costs | $8–$20/ft² applied (varies) |
| Skill required | Medium | Low–Medium | Medium | High (training often required) |
| Compatibility with CI | Good; R-sheathing available | Good | Good | Requires detailing for attachment |
| Best for | New builds, simple geometry | Very low-budget projects | Budget builds with care | Complex geometry or high targets |
When to pick what:
- Cold climates and high-performance builds: ZIP plus CI or taped OSB plus exterior CI both work; choose ZIP for speed and integrated WRB, but confirm vapor strategy.
- Mixed climates: ZIP performs well; consider hybrid approaches if moisture concerns exist (see NAHB moisture performance research: Moisture performance of high-r wall systems).
- Retrofits and complex geometry: Fluid-applied membranes or interior airtightness systems often reduce on-site complexity.
For help selecting CI and insulation boards with ZIP, see the foam-board comparisons: polyiso vs eps vs xps foam board energy efficiency.
Materials list, estimated costs, and time budget for a typical small house ZIP air-barrier install
Bill of materials for a 1,200–1,800 ft² exterior wall area
- ZIP panels (4x8 = 32 ft² each): 38–56 panels (1,200/32 = 37.5; 1,800/32 = 56.25)
- Tape rolls (2"–3" wide): 6–12 rolls depending on seam length and waste
- Liquid flashing (5-gallon pails): 1–3 pails for sills/corners/complex areas
- Fasteners: 1,000–2,000 screws/nails depending on fastening schedule and waste
- Sill pan flashing and membrane: 1–2 rolls/sets depending on openings
- Gaskets and sealants for penetrations: assorted
Cost ranges (materials and typical DIY labor hours)
- Materials total estimate: $1,200–$3,000 for panels and tape for a small house exterior (~pricing at time of writing varies).
- Panels: $950–$2,520 (38–56 sheets × $25–$45)
- Tape: $90–$300 (6–12 rolls × $15–$30)
- Flashing/liquid: $100–$300
- Fasteners and sundries: $100–$300
- Labor hours: One person: 40–80 hours (framing-ready to taped); two persons: 20–40 hours. Skilled two-person crew typically accomplishes wall sheathing and taping in 2–4 days for a small house.
Time-saving tips and checklist for first-time installers
- Pre-cut panels near the staging area to speed wall runs.
- Bring a 2-person tape and roller team — one to place tape, one to roll.
- Stage materials by wall face to eliminate trips.
- Identify weather windows for taping (dry, >40°F surface).
- Keep a blower-door scheduled slot in planning to avoid delays in verification.
For downloadable calculators, supplier lists, and printable checklists, see the project resources page.
The Bottom Line: Should you use ZIP sheathing as your air barrier?
ZIP System sheathing is a practical, time-saving choice for new builds with straightforward geometry where an integrated WRB and air control plane reduce install steps. It generally beats untaped OSB + housewrap for airtightness, but performance hinges on correct taping, flashing, and sequencing. For retrofits, very complex geometry, or historic homes, consider hybrid strategies (fluid-applied membranes or interior airtightness) instead. Plan blower-door testing and ventilation upgrades when tightening the envelope; aim for measurable ACH50 targets that match your project's performance goals.
Video: ZIP AIR BARRIER at CEILING
For a visual walkthrough of these concepts, check out this helpful video:
Frequently Asked Questions
Can ZIP sheathing be used as the primary interior air barrier?
No. ZIP is designed as an exterior sheathing and continuous WRB/air-control layer. Many high-performance projects pair ZIP with an interior air barrier (taped drywall, membrane, or sealed plywood) to provide redundancy and simplify detailing for electrical and mechanical penetrations. Using both exterior and interior air barriers reduces risk and helps achieve low ACH50 targets.
How long does ZIP sheathing tape last before it needs replacement?
Tape longevity depends on exposure, UV, and mechanical wear. Manufacturer tapes are rated for long-term performance when covered by cladding; exposed tape should be replaced if adhesion is compromised. If tape lifts within the first year, remove the old tape, clean or primer the area, and apply new tape, rolling firmly to re-establish adhesion.
Is ZIP compatible with rain-screen cladding systems?
Yes. ZIP System sheathing works with rain-screen claddings provided drainage and ventilation cavities are maintained. Keep a continuous WRB plane and add furring or battens as required for the cladding to ensure airflow behind the siding. Ensure fastener lengths account for furring plus sheathing thickness.
How should penetrations like vents and electrical boxes be sealed?
Prefer pre-formed gaskets or self-adhered collars for round penetrations; for electrical boxes, use sealed, gasketed box covers or locate junction boxes on the interior side of the air barrier and seal the exterior box entry with tape and a compatible sealant. For complex or large penetrations, apply liquid flashing and then tape over the cured membrane for redundancy.
Does ZIP eliminate the need for housewrap?
ZIP is an integrated WRB and can replace housewrap in most new construction applications. However, it does not remove the need for proper flashing, tape at transitions, and correct cladding installation. In some retrofit or repair scenarios, a separate housewrap may still be the practical choice depending on existing conditions and access.