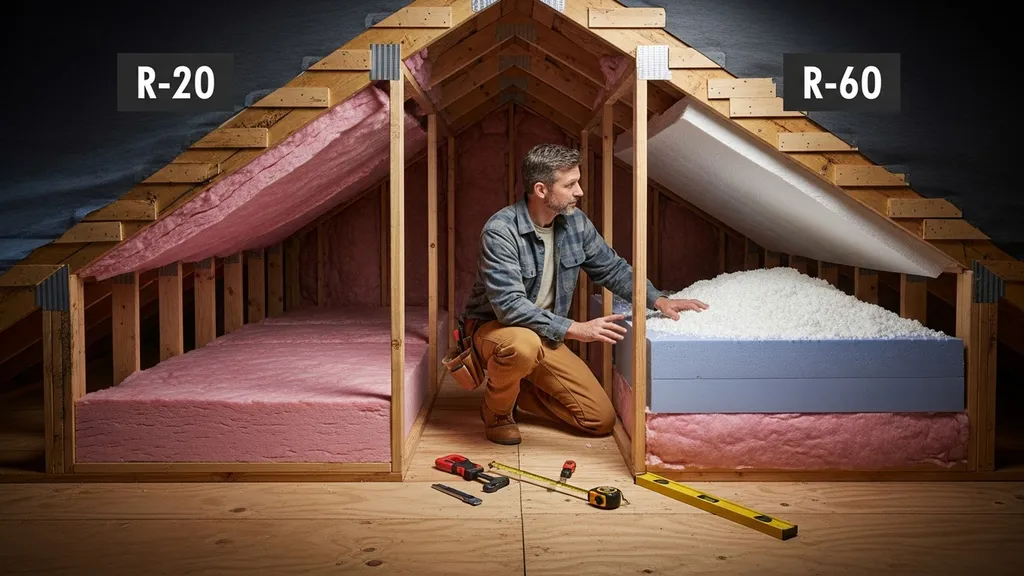
Compare R-20 and R-60 insulation, costs, performance, installation methods, and which option fits your climate and DIY budget.
R-20 vs R-60 Insulation: Which Do You Need?
Choosing between R-20 and R-60 insulation is a common decision for budget-conscious DIY builders who want to balance upfront cost, space, and long-term energy bills. This article compares the two targets, explains how R-value affects heat loss, shows common assemblies and installation methods, and gives scenario-based recommendations so you can pick the right approach for your climate, budget, and build type. The primary search term "r20 vs r60 insulation" appears throughout to help you find the most relevant guidance.
TL;DR:
- Upgrading an attic from R-20 to R-60 cuts steady-state conductive heat flow by about 67% (heat flow scales with 1/R).
- For mild climates or tight budgets, R-20 cavity insulation plus air sealing and some continuous exterior insulation often gives the best cost-to-comfort ratio.
- For cold-climate new builds or deep retrofits, aim for R-60 in the attic (or equivalent continuous strategies) plus airtightness for long-term energy savings.
R-20 vs R-60 Insulation: Quick TL;DR and Comparison Table
Short Recommendation
R-20 is a moderate, space-efficient target commonly achieved in 2x6 cavities and suits mild climates, small builds, and many retrofits when paired with good air sealing. R-60 is a high attic target used in cold climates and deep-energy retrofits where reducing heating loads and downsizing HVAC matters. Use the table below to compare typical use, materials, thickness ranges, and the role of air sealing.
| Feature | R-20 | R-60 |
|---|---|---|
| Typical use (wall/attic) | 2x6 wall cavities, some attic retrofit minimums | Deep attic insulation, layered attic assemblies |
| Common materials | Fiberglass batts, cellulose, mineral wool | Loose-fill cellulose, layered batts, spray foam + bulk fill |
| Approx. thickness ranges | 5–6 inches (fiberglass), 4–6 in. (high-density) | 16–24+ inches loose-fill, multiple layers or spray foam combos |
| Typical climates where sufficient | Mild to mixed climates | Cold climates and deep-energy retrofits |
| Relative cost per ft² | Lower | Higher |
| Air-sealing importance | High | Very high (airtight attic envelope multiplies benefits) |
| Typical payback direction | Shorter in mild retrofit cases | Longer payback but larger lifetime savings in cold climates |
For authoritative guidance on cost-effective recommended R-values by climate, see the Energy Star recommended home insulation R–values.
R-20: What It Is, Typical Assemblies, Strengths and Weaknesses in the R-20 vs R-60 Decision
Overview and Common Uses
R-20 is commonly the insulating value found in a 2x6 stud cavity filled with conventional batts or dense-packed cellulose. Builders reach R-20 regularly in framed exterior walls and some attic retrofits where ceiling joist depth is limited. For many DIYers with modest budgets or small-footprint builds, R-20 is a practical target that balances material cost and space.
R-20 is also a typical retrofit minimum in milder climate zones per federal guidance and trade association tables; see the DOE/Insulation Institute recommendations PDF from the Insulation Institute for maps and recommended retrofit ranges.
Strengths: Cost, Space-efficiency, Common Materials
- Fiberglass batts and dense-packed cellulose are widely available and DIY-friendly. Dense-pack cellulose provides better cavity coverage and air infiltration reduction than batts in many cases.
- R-20 fits in standard 2x6 framing without changing structural work, keeping construction simple and material costs lower.
- Lower material thickness preserves interior space and avoids the need for larger foundations, trim changes, or complex flashing.
Weaknesses: Limited in Cold Climates, Thermal Bridging
- R-20 in walls alone will not be sufficient in cold climate zones to prevent high heating loads. Thermal bridging through studs reduces effective wall R-value unless continuous exterior insulation (CI) is added.
- In attics, a single R-20 layer leaves substantial conductive heat flow; adding only cavity insulation without addressing air leaks yields modest savings.
- To address bridging and improve whole-assembly performance, consider pairing R-20 cavity fills with a thin layer of exterior continuous insulation.
For small builds and cabins, you can find specific strategies in the tiny house insulation guide and see how cavity and continuous layers interact in compact assemblies. For examples of framed wall assemblies using cavity insulation, consult the cabin wall assembly guide. For a quick material comparison that explains why cellulose and fiberglass behave differently, see our insulation material comparison.
Best For: Use Cases Where R-20 is Sensible
- Mild or mixed climates where heating demand is moderate.
- Tiny houses or small cabins where wall thickness and floor area are constrained.
- Budget retrofits that prioritize air sealing and targeted top-ups rather than a complete envelope overhaul.
- Conditioned crawlspaces or sheds where extreme R-values have diminishing returns.
R-60: What It Is, Typical Assemblies, Strengths and Weaknesses in the R-20 vs R-60 Decision
Overview and Common Uses
R-60 is an attic-focused target that many builders aim for in cold climates or when performing deep-energy retrofits to cut heating loads. Achieving R-60 typically requires large thicknesses of loose-fill (cellulose or fiberglass) or layered approaches combining spray foam and bulk insulation.
The U.S. Department of Energy's guidance on insulation explains the relationship between R-value and insulating effectiveness; higher R-values reduce conductive heat flow proportionally to 1/R, which is central to why R-60 matters in cold zones: see the DOE insulation overview.
Strengths: Deep Thermal Resistance, Lower Heat Loss in Cold Climates
- High attic R significantly reduces transmission heat loss, which can lead to smaller heating systems and lower fuel costs over time.
- In tight, well-sealed houses, R-60 helps stabilize indoor temperature and reduces peak heating loads—useful for heat-pump systems and passive-house goals.
- Layered approaches (e.g., spray foam air barrier + cellulose) can combine airtightness and bulk R efficiently.
Weaknesses: Cost, Space Requirements, Installation Complexity
- Material and labor costs for R-60 are considerably higher than R-20; you’ll often need more depth than standard joists provide, which can mean raised-heel trusses or additional framing.
- Attaining R-60 by adding depth in existing homes can cause ventilation and fire-safety challenges if top plates, soffits, or vents are buried without proper baffles.
- Spray foam can reduce thickness needs because it has higher R/inch, but closed-cell spray foam is expensive and often requires professional installation.
Builders looking to combine deep wall R with continuous exterior approaches will find useful options in our guide to exterior roof insulation tips and in the discussion of deep wall options such as Larsen truss options.
Best For: Use Cases Where R-60 is Sensible
- New builds in cold climate zones aiming to minimize annual heating energy and allow smaller HVAC sizing.
- Retrofits targeting passive-house levels of performance or long-term fuel reduction where the owner plans to occupy the house for many years.
- Projects where roof framing can be adapted (raised heels, deeper trusses) or where exterior continuous insulation is feasible.
R-20 vs R-60: Energy Performance, Heat Loss Examples, and Payback Considerations
How R-value Reduces Heat Flow (simple Example)
R-value resists conductive heat flow; heat loss through a component is approximately proportional to 1/R. That means moving from R-20 to R-60 reduces steady-state conductive heat flow by a factor of three. Put another way, the same area that loses 1 unit of heat at R-20 will lose about 0.33 units at R-60 — roughly a 67% reduction in conductive transfer.
This simple ratio explains why bulk attic R has outsized impact: attics often represent a large contiguous area with high exposure to outdoor temperatures, so increasing attic R yields substantial reductions in whole-house heating load.
Climate and Heating Fuel Change the Savings Story
Savings from increasing R depend heavily on climate and heating fuel. Electric heating (resistance) or inefficient baseboard systems make each kWh saved more valuable compared with inexpensive natural gas in some markets. Heat pumps change the equation: because they deliver more useful heat per kWh, insulating to higher R can reduce runtime and improve system coefficient of performance (COP). For guidance on matching insulation to heat-pump sizing and savings, see the heat pump buying guide.
Summer cooling and solar gains matter too. A highly insulated attic reduces both winter losses and summer gains; pairing insulation upgrades with roof strategies like cool roofs can reduce peak cooling costs—see our cool roofs primer for details.
Typical Payback Drivers and a Sample ROI Thought Experiment
Key drivers that determine payback include:
- Local energy prices and fuel type
- Existing insulation and airtightness baseline
- Climate heating degree days (HDD)
- Installation cost and whether you DIY or hire pros
- Interaction with HVAC system efficiency and sizing
A simple thought experiment: if heat loss through the attic is 40% of total transmission loss and raising attic R from 20 to 60 cuts that path's heat flow by 67%, total building heat loss might drop by ~27% (0.4 × 0.67). Whether that yields a short payback depends on your fuel cost and upgrade cost. Industry sources and DOE/Insulation Institute tables can help you quantify that for your climate; consult the Insulation Institute DOE R-value recommendations for regional guidance. For a practical buyer's perspective on materials and R/inch trade-offs, see the 2026 buyer guide on insulation options (analysis and R charts) at Leyton: Insulation buyer guide 2026.
R-20 vs R-60: Installation Methods and Materials
Bulk-fill Options: Batts and Loose-fill Cellulose
- For R-20: Install fiberglass or mineral wool batts neatly fitted into 2x6 cavities, or dense-pack cellulose for better air-handling performance.
- For R-60 attics: Layer loose-fill cellulose or fiberglass in the attic until the target depth is reached. Use baffles at eaves to maintain soffit-to-ridge airflow if the roof is vented.
Cellulose is DIY-friendly, resists settling when dense-packed, and performs well at filling irregular cavities. Fiberglass batts are cheaper and faster, but more sensitive to gaps and poor fit.
Spray Foam and Hybrid Systems
Closed-cell spray foam provides high R/inch and serves as an air barrier and moisture retarder when used correctly. Combining a thin spray foam layer (to establish an air seal) with a bulky, low-cost loose-fill layer achieves high assembly R while controlling air leakage. Note: spray foam installation often requires professional equipment and safety controls.
For a direct material comparison and practical pros/cons, see our spray foam vs cellulose discussion.
Rigid Foam and Exterior Continuous Strategies
Using rigid polyiso or EPS as continuous exterior insulation over sheathing reduces thermal bridging and lets you reach higher effective wall R without massive stud depths. Exterior continuous insulation is a proven path to high whole-wall R and pairs well with moderate cavity fills (e.g., R-20 cavity + CI to meet higher total wall R).
If you’re re-roofing or building new, exterior roof or wall CI can simplify reaching target R; read more in our exterior roof insulation tips.
Air Sealing, Vapor Control, and Thermal Bridging Considerations
Air sealing amplifies the value of added R. A leaky attic reduces the effective benefit of extra insulation because convective airflow bypasses the material. Sequence work so that air-barrier work (tapings, gaskets, spray foam at key penetrations) is complete before adding bulk insulation.
For guidance on vapor control and correct sequencing in typical wall assemblies, see vapor barrier placement. For ventilation strategies important when you deepen insulation or tighten the building, our off-grid ventilation tips explain mechanical ventilation choices and trickle vents.
Watch this step-by-step guide on installing blown-in or loose fill insulation:
R-20 vs R-60: Cost, Framing and DIY Considerations for Budget-conscious Builders
Relative Material and Labor Cost Factors
Material cost per ft² rises with R-value and with the choice of material (spray foam >> cellulose >> fiberglass loose-fill). Labor can dominate if you hire professionals for spray foam or dense-pack cellulose. DIYers often save on labor by installing loose-fill or batts themselves, but that requires time, tools, and attention to detail.
A staged approach often gives the best return for limited budgets:
- Stage 1: Prioritize air sealing and top up existing attic to a moderate level.
- Stage 2: Add additional bulk fill or CI when budget allows.
Our article on basement energy finishing shows a similar staged decision process: prioritizing air sealing and targeted insulation upgrades can yield fast wins with limited funds.
Framing, Depth, and Structural Impacts
To fit R-60 in an attic without exterior work, you usually need deep joists or raised-heel trusses. In walls, choosing 2x8 or advanced framing like Larsen trusses increases cavity depth and allows higher cavity R without thick CI. For guidance on choosing stud sizes and trade-offs, see the framing size comparison and the Larsen truss options.
Tools, Skills and Safety for DIY Installations
- Basic DIY attic top-up with loose-fill cellulose: attic blower rental, dust mask/respirator (N95 or better), gloves, daylight work, and baffles at eaves.
- Dense-pack cellulose or spray foam: specialized equipment and training; consider hiring pros.
- Electrical and mechanical penetrations: always seal around chimneys, flues, and recessed lights per code; check for combustion appliance safety before tightening the envelope.
For overall pre-build planning, our building basics checklist helps DIYers budget time and identify when a pro call is worth the expense.
R-20 vs R-60 Insulation: Which Should You Choose? Scenario-based Recommendations
Mild Climate Retrofit on a Budget
Recommendation: R-20 for wall cavities plus attic top-up to a moderate R (e.g., R-38) and thorough air sealing. Reason: Lower incremental returns for very high attic R in mild climates; air sealing and targeted attic upgrades often pay back faster. Next steps: Start with an attic audit and prioritize sealing penetrations and duct leakage.
Cold Climate New Build Aiming for Low Bills
Recommendation: R-60 in the attic plus wall strategies that combine cavity fill with continuous exterior insulation. Reason: High attic R reduces heating load substantially and supports smaller HVAC sizing and improved occupant comfort. Next steps: Design raised-heel trusses or plan for exterior continuous insulation during framing. See exterior strategies in exterior roof insulation tips.
Tiny House or Small Footprint Off-grid Build
Recommendation: Prioritize airtightness and wall R; use R-20 cavity fills paired with high-performance windows and targeted CI when possible. Reason: Small volumes respond well to airtightness; achieving R-60 in a tiny roof may be impractical, but lowering infiltration and adding wall CI gives similar comfort with less bulk. Next steps: Consult the tiny house on a budget article and the tiny house insulation guide.
Passive-house or Deep Retrofit Target
Recommendation: Aim for R-60 or higher in attic plus continuous wall insulation and aggressive airtightness. Reason: Passive-house performance depends on combining high R, thermal breaks, and very low air change rates to minimize active heating. Next steps: Pair insulation upgrades with mechanical ventilation and heat-recovery ventilation; run a whole-house energy model or consult a certified passive-house designer.
The Bottom Line
R-20 vs R-60 insulation is a trade-off between lower cost and limited performance (R-20) and higher upfront investment for much deeper attic resistance (R-60). For many DIYers in mild climates, R-20 with thorough air sealing and selective continuous insulation is the most cost-effective choice; in cold climates or deep-retrofit projects, R-60 (or equivalent assembly strategies) is justified for long-term savings. Search term "r20 vs r60 insulation" is useful when comparing these approaches for your climate and budget.
Frequently Asked Questions
Can I mix R-20 and R-60 in one house?
Yes. Mixing R-values across assemblies is common. Prioritize the building elements with the largest heat-loss area and worst exposure first—typically the attic and any uninsulated foundations. For example, a practical path is to bring walls to an R-20 cavity level and increase attic insulation toward R-60, or combine R-20 cavities with exterior continuous insulation on walls to offset thermal bridging.
Make sure transitions between assemblies are detailed to avoid thermal or moisture traps where different materials meet.
Will R-60 in the attic make wall insulation less important?
No. Attics and walls control different heat paths. Adding R-60 in the attic reduces overall heating load, but poorly insulated walls can still create cold spots, uncomfortable interior surfaces, and moisture risk. A balanced upgrade strategy—addressing attic, walls, and air sealing—delivers the best comfort and energy results.
How thick is R-60 and will it fit in my attic?
Thickness depends on material: loose-fill cellulose or fiberglass may require roughly 16–24+ inches to reach R-60, while high-performance spray foam needs far less thickness (closed-cell has higher R/inch). Many older attics lack the depth for R-60 without adding framing or using a spray-foam hybrid. Inspect attic joist depth and ventilation before planning; raised-heel trusses are a common new-build solution to allow full-depth insulation at eaves.
Is spray foam the only way to get to R-60?
No. You can reach R-60 with layered loose-fill (cellulose or fiberglass), batts stacked in layers, or by combining a thin spray-foam air barrier with a thick loose-fill top-up. Spray foam reduces thickness but increases cost. For DIYers, dense-pack cellulose or layered loose-fill is a common, cost-effective route to R-60 attic performance.
Do building codes require R-60 anywhere?
Code requirements vary by jurisdiction and climate zone. The International Energy Conservation Code (IECC) and local amendments set minimums by climate; some cold-zone codes expect higher attic R-values. Always check local code and inspector guidance before major work. For national-level guidance on cost-effective R targets by climate, consult Energy Star and DOE resources such as the Energy star recommended r-values and DOE insulation guidance at energy.gov.