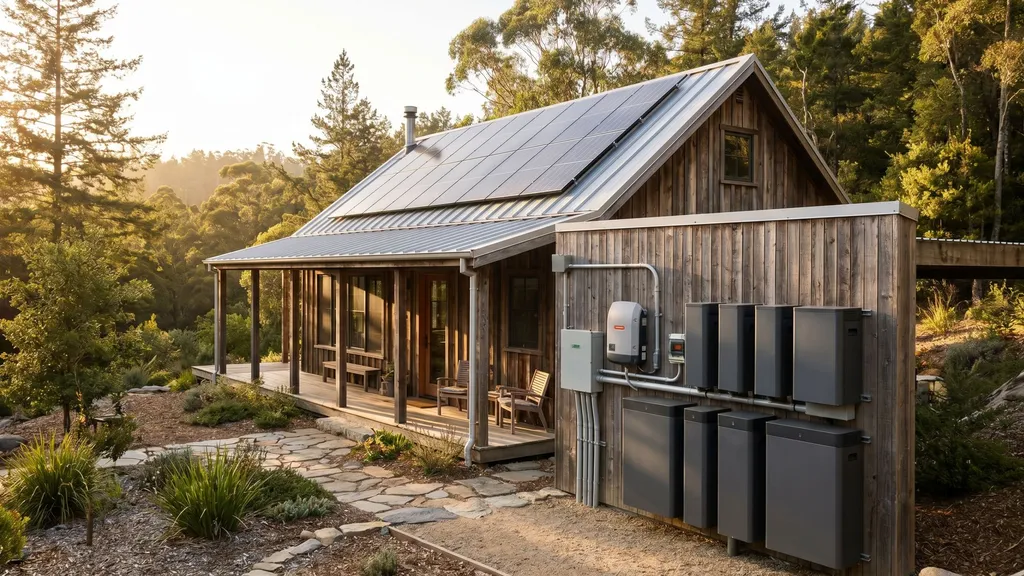
Step-by-step guide to sizing a 3kW solar system for an off-grid or grid-tied cabin — production estimates, batteries, inverter sizing, and installation tips.
3KW Solar System for Cabin: Complete Sizing Guide
A 3kw solar system for cabin use is a common, budget-friendly choice for small off-grid or grid-tied cabins. This guide shows how much energy a 3 kW array typically produces, how to size batteries and the inverter, panel layout options, and a DIY-ready parts checklist so you can decide if 3 kW meets your needs. Expect concrete numbers, worked examples for different sun climates, and practical trade-offs for weekend retreats, tiny full-time cabins, or basic off-grid systems.
TL;DR:
- A 3 kW array produces roughly 9.6–12 kWh/day in many climates (3 kW × 4–5 peak sun-hours × ~0.8 system efficiency).
- For 1–2 days autonomy, plan battery capacity of 6–24 kWh depending on loads and chemistry (LiFePO4 needs less raw capacity due to higher usable depth).
- Start with a load profile, run a PVWatts or PVGIS estimate, then choose a 48 V inverter/charger and MPPT controller sized for panel open-circuit voltage and array current.
Quick Answer: is a 3kw Solar System Right for Your Cabin?
A 3 kW solar array is a good match for cabins with modest daily energy needs: LED lighting, phone and laptop charging, a small energy-efficient fridge, occasional electric cooktop use (brief), and basic water pump duty. Use simple math with peak sun-hours to get a quick estimate: 3 kW × 4 peak sun-hours × 0.8 derate = ~9.6 kWh/day; 3 kW × 5 × 0.8 = ~12 kWh/day. These numbers assume system derate (soiling, wiring losses, inverter efficiency) of about 20%.
Typical use-cases:
- Tiny cabins or tiny homes: lights, phone/laptop, small 12V fridge — often under 6–8 kWh/day, a 3 kW array is generous.
- Weekend retreats or seasonal cabins: intermittent refrigeration, lighting, occasional pump use — 9–12 kWh/day is common; 3 kW can work if batteries are sized for overnight.
- Full-time off-grid living with electric heating, full-size electric cooktop, or large well pumps: likely need more than 3 kW and larger battery banks.
Research and consumer guides also show 3 kW systems are a popular entry point for small properties and can reduce grid consumption substantially; see an overview on the 3kW system benefits in this Jackery guide.
For broader sizing context, see the cabin solar sizing guide on DIY Eco Homes.
How a 3kw Solar System Produces Power: Components and Basic Flow
A 3 kW system converts sunlight to usable AC or DC power across several core components:
- Panels: Photovoltaic modules (typically 300–400 W each) collect solar energy.
- Charge controller or MPPT: Regulates panel output to charge batteries efficiently in off-grid or hybrid systems.
- Battery bank: Stores energy for night or cloudy days (optional for grid-tied systems).
- Inverter/charger: Converts DC battery/panel power to 120/240 V AC for loads and handles grid interaction or generator charging.
- Disconnects, fuses, and grounding: Safety hardware for protection and code compliance.
Power flow basics: sunlight → PV modules → DC cabling → MPPT charge controller (if batteries present) → battery bank (charge) → inverter → AC loads. In grid-tied systems without batteries, panels feed an inverter that synchronizes with the grid and exports surplus energy.
System Topologies:
- Grid-tied: Simpler, lower upfront cost, no batteries required — best where grid is reliable and net metering or time-of-use rates exist.
- Off-grid: Batteries and generator backup required; system must supply all loads independently.
- Hybrid: Grid connection plus battery bank and inverter/charger allow self-consumption and backup during outages.
Panel count and orientation: with 300–380 W modules, a 3 kW array is about 8–10 panels. Mount them in the fewest strings that fit your charge controller and inverter voltage constraints. Choose south-facing (Northern Hemisphere) or north-facing (Southern Hemisphere) azimuth and tilt near your latitude for winter-balanced output.
For a visual demonstration, check out this video on complete hybrid solar inverter wiring installation:
For wiring and topology differences, consult the DIY Eco Homes article on off-grid vs grid-tied setups.
MPPT Controllers vs Simple Charge Controllers
- MPPT (Maximum Power Point Tracking): Harvests more energy from panels, especially in cold or variable light; recommended for 3 kW systems paired with batteries.
- PWM (Pulse Width Modulation): Cheaper, suitable for small 12 V systems only; not ideal for larger arrays.
Inverters: String vs Microinverters
- String inverter: One inverter for the array — cost-effective and common.
- Microinverters/AC modules: Convert each panel to AC; useful where shading or mixed orientations are present but add cost.
Step-by-step: Calculate Expected Daily and Monthly Energy From a 3kw Array
Use this formula: kW_system × peak_sun_hours × system_efficiency (derate) = daily kWh. Choose a derate between 0.75 and 0.85 to account for losses.
- Find local peak sun-hours (PSH) from PVWatts, PVGIS, or local solar maps.
- Apply the formula and scale to monthly figures: daily kWh × 30 = approximate monthly kWh.
Worked examples (3 kW system):
- Low-sun site (3 PSH): 3 × 3 × 0.8 = 7.2 kWh/day → ~216 kWh/month.
- Average-sun site (4 PSH): 3 × 4 × 0.8 = 9.6 kWh/day → ~288 kWh/month.
- High-sun site (5.5 PSH): 3 × 5.5 × 0.8 = 13.2 kWh/day → ~396 kWh/month.
| Sun-hours (PSH) | Daily kWh | Monthly kWh (30 days) |
|---|---|---|
| 3.0 | 7.2 kWh | 216 kWh |
| 4.0 | 9.6 kWh | 288 kWh |
| 5.5 | 13.2 kWh | 396 kWh |
Seasonality: Expect 30–60% variation between winter and summer depending on latitude and tilt. Use a steeper tilt for winter-lifted output in cold climates. Shading and module temperature also change real-world performance; tools like PVWatts and the Department of Energy's homeowner guide can refine estimates — see the Department of Energy's guide to solar.
For consumer cost and production context, surveys show typical 3 kW systems can produce 300–400 kWh/month in favorable locations; cost ranges vary by market — see the ConsumerAffairs cost summary for recent figures and production estimates: Solar energy.
Also consult solar panel temperature performance for heat-related losses in hot climates at the DIY Eco Homes piece on panel performance in heat.
Matching a 3kw System to Your Cabin Loads: Load Profiling and Sizing Tips
Start with a simple load profile: list appliances, wattage, and hours per day. Calculate daily kWh as watts × hours ÷ 1,000.
Sample appliance estimates:
- LED lights: 8–50 W each — 2–4 lights at 3–6 hours = 0.1–1.2 kWh/day.
- Small fridge (12–24 V efficient): average draw ~100–200 W cycling → ~2–3 kWh/day.
- Well pump: 500–1,000 W run-time varies — 10 minutes per draw can add 0.08–0.17 kWh per start; frequent use adds quickly.
- Induction cooktop: 1,500 W while used — short duration but high instantaneous draw.
- Hot water: electric water heating is heavy (3–4 kWh per shower) — prefer propane or small point-of-use electric on limited solar.
Two worked examples:
- Tiny weekend cabin (low loads): LED lights (0.5 kWh), small fridge (2 kWh), phone charges (0.2 kWh), occasional pump (0.3 kWh) → ~3.0 kWh/day. A 3 kW array is oversized here.
- Small full-time cabin (moderate): fridge (3 kWh), lighting and electronics (1 kWh), pump (1 kWh), small appliances (2 kWh) → ~7 kWh/day. A 3 kW array with a 6–12 kWh battery bank can support this with conservative usage.
Load reduction strategies to stretch a 3 kW system:
- Use propane for cooking or heating to avoid large electric loads.
- Choose ENERGY STAR refrigerators sized for off-grid use.
- Install LED lighting and timed controls.
- Time high-draw tasks to midday production when panels are producing peak power.
Include pump timing in load profiles — see the guide to off-grid water systems and cabin plumbing tips in /blog/cabin-plumbing-off-grid-water-systems for typical pump duty cycles and energy impacts.
For advice on avoiding electric hot-water loads, read the emergency cooking options at /blog/ultimate-guide-to-emergency-off-grid-cooking.
Battery and Inverter Sizing for a 3kw Cabin System (with Comparison Table)
Sizing battery capacity: battery_kWh_needed = daily_kWh × days_autonomy ÷ usable_DOD
Examples:
- If daily load = 10 kWh and you want 2 days autonomy:
- With lead-acid (50% usable): 10 × 2 ÷ 0.5 = 40 kWh nominal battery capacity.
- With LiFePO4 (85% usable): 10 × 2 ÷ 0.85 ≈ 23.5 kWh nominal.
Usable Depths:
- Lead-acid (flooded): ~50% recommended DOD.
- AGM: ~50% usable.
- LiFePO4: ~80–90% usable, higher cycle life, higher upfront cost.
Inverter sizing:
- Continuous rating: should at least match expected continuous AC load — a 3 kW inverter is a baseline for a 3 kW array but select 3–5 kW to allow for loads.
- Surge rating: Inverters must cover surge loads for motor starts (pumps, compressors). Choose an inverter with 2–3× surge capacity or add a soft-start device for large motors.
System voltage and panel stringing:
- Common battery system voltages: 12 V, 24 V, 48 V. For cabins, 48 V is popular because it reduces current, lowers cable cost, and matches many inverters/chargers.
- Match panel Voc and system voltage per the charge controller and MPPT limits. See the DIY Eco Homes article on how to match solar panel voltage and battery voltage.
Battery Chemistry Comparison:
| Chemistry | Usable depth | Cycle life | Charging efficiency | Temp sensitivity | Typical voltage |
|---|---|---|---|---|---|
| AGM lead-acid | ~50% | 500–1,200 cycles | 85% | Moderate | 12/24/48 V |
| Flooded lead-acid | ~50% | 400–1,000 cycles | 80–85% | High (needs ventilation) | 12/24/48 V |
| LiFePO4 | 80–90% | 3,000–8,000 cycles | 95%+ | Low (but needs BMS) | 12/24/48 V |
Trade-offs:
- Flooded batteries are cheaper per kWh but require maintenance, ventilation, and replacement sooner.
- LiFePO4 costs more up front but needs less capacity for the same usable energy and lasts far longer.
For off-grid sizing steps and examples, reference Unbound Solar's off-grid sizing methodology: Sizing off grid solar system.
Consider inverter brands and options such as Victron Energy, SMA, and OutBack for hybrid/inverter-charger needs — compare continuous and surge ratings, peak efficiency, and integrated charge control.
Panel Layout, Mounting Options, and Wiring Best Practices
Roof-mount vs Ground-mount:
- Roof-mount: Saves space, integrates with existing structure, lower visual impact. Check roof pitch, structural capacity, and shingle or metal roofing compatibility.
- Ground-mount: Allows optimal tilt and azimuth, easier maintenance, better cooling, and ideal for shaded roofs.
Tilt rules:
- A good starting rule is tilt ≈ latitude for year-round balance. For winter-focused output, increase tilt by 10–15°; for summer output, decrease tilt by 10–15°.
Shading mitigation:
- Perform a shading survey with sun-path apps or a simple smartphone app to map seasonal sun angles. Even small shade on one panel can reduce a string’s output.
- Use microinverters or power optimizers when partial shading or mixed orientations are unavoidable.
Wiring and safety notes:
- Use MC4 connectors for outdoor panel connections and proper PV-rated, UV-stable cable.
- Size PV and battery cables to limit voltage drop — a 48 V system is efficient for longer runs.
- Place combiner boxes near the array when more than one string is used and install DC disconnects between array and controller.
- Install AC disconnects and overcurrent protection at the inverter per local code.
- Mount batteries in a ventilated, dry cabinet away from living spaces; flooded batteries need dedicated venting.
For mounting on log or timber cabins and structural considerations, see the DIY Eco Homes guide on log cabin techniques and check roof condition and insulation first via roof insulation methods.
If panel heat is a concern in hot climates, review cooling tactics in the cooling solutions for panels article and read the Sunsave overview of 3 kW systems for installation tips: 3kw solar system.
Parts List and DIY vs Professional Trade-offs (key-points Checklist)
Minimum Parts Kit for a 3 Kw Cabin System:
- Solar panels (8–10 modules, 300–380 W each)
- Racking and mounting hardware (roof or ground)
- MPPT charge controller sized for array current
- Inverter/charger (3–5 kW continuous, adequate surge)
- Battery bank (capacity by calculation above) and BMS for LiFePO4
- AC and DC disconnects, combiner box, fuses, breakers
- PV-rated cable, MC4 connectors, grounding kit
- Monitoring meter or inverter monitoring platform
- Basic tools: multimeter, crimper, torque wrench
Key DIY vs pro decision points:
- Reasonable DIY tasks: panel racking and layout, running DC cable, battery placement, mounting AC loads after permit-approved panels are installed.
- Tasks to hire a pro: final AC grid-tie connection, meter and grid interconnection paperwork, structural roof alterations, and when local code requires a licensed electrician for AC wiring and sign-off.
Permits and inspections checklist:
- Building permit for roof-mounted arrays in many jurisdictions
- Electrical permit for inverter and AC connections
- Utility interconnection agreement for grid-tied systems
- Inspection of racking attachments and electrical work
Use a parts cost estimator to create a budget and payback analysis — try the DIY Eco Homes solar cost calculators tool before ordering parts. Also consider sustainable choices for racking and materials from the sustainable materials guide.
Daylighting options such as solar tubes can reduce lighting loads — see the solar tube installation guide to lower daytime electricity demand.
Maintenance, Common Problems, and Troubleshooting Tips for a 3kw Cabin System
Routine maintenance:
- Clean panels once or twice a year or after heavy pollen/soiling events.
- Inspect MC4 connectors and tighten module clamps; torque racking bolts to manufacturer spec.
- Monitor battery voltages and state-of-charge; if flooded, check and top electrolyte levels.
- Review inverter error logs monthly and verify daily production against expected kWh from PVWatts or your inverter monitoring.
Common Failure Modes and Fixes:
- Low production: check for shading, soiling, or incorrect tilt; confirm array open-circuit voltage and MPPT operation.
- Blown fuses or tripped breakers: inspect circuit sizing and motor start currents.
- Battery imbalance: review BMS logs and perform cell-level maintenance or replacement for lead-acid cells.
- Loose connectors: retorque MC4s and check for corrosion.
Monitoring and simple checks:
- Use a multimeter to verify panel Voc in the morning and compare to nameplate, accounting for temperature.
- Use a clamp meter to check array current and inverter input.
- Compare daily kWh from inverter logs with PVWatts estimates; a persistent deficit may indicate shading or equipment degradation.
For step-by-step problem diagnosis see the DIY Eco Homes troubleshooting solar systems article.
The Bottom Line: is a 3kw System the Right Investment for Your Cabin?
A 3kw solar system for cabin setups is often the right balance of cost, simplicity, and daytime production for tiny cabins and many weekend or modest full-time cabins — expect roughly 8–13 kWh/day depending on sun-hours. Decide by estimating your daily kWh, choosing battery autonomy, and comparing the upfront cost vs benefits; next steps are to run a PVWatts estimate, draft a load profile, and get 2–3 quotes or parts lists.
Frequently Asked Questions
How many kWh per day will a 3 kW system produce for my cabin?
Production depends on local peak sun-hours and system efficiency. A simple rule: 3 kW × peak sun-hours × 0.75–0.85 derate. That yields about 7–13 kWh/day for 3–5.5 peak sun-hours respectively. Use PVWatts or PVGIS for location-specific monthly outputs.
Can a 3 kW system run a fridge, well pump and heating backup?
Yes, a 3 kW array can run a small energy-efficient fridge and occasional pump if batteries and inverter are sized correctly. Heating is the big limiter: resistive electric heat consumes many kWh and usually exceeds what a 3 kW array plus reasonable batteries will support. Consider propane or wood heat for primary heating and reserve electric for controls or small backups.
What size battery do I need for two days of autonomy on a 3 kW system?
Calculate battery_kWh = daily_kWh × 2 ÷ usable_DOD. For a 10 kWh daily load: lead-acid (50% DOD) → 40 kWh bank; LiFePO4 (85% usable) → ~23.5 kWh bank. LiFePO4 usually reduces needed capacity and lifecycle costs despite higher upfront price.
Should I go grid-tied or off-grid with a 3 kW cabin system?
Grid-tied reduces battery costs and is simpler if reliable grid power exists. Off-grid requires batteries and generator backup and is better for remote sites. Hybrid systems allow both: grid connection plus batteries for backup. Weigh outage frequency, budget for batteries, and local interconnection rules when deciding.
Can a small roof handle panel racking, and how do I layout panels on a small cabin roof?
Most small roofs can handle a 3 kW array but check structural capacity and rafter spacing. Space panels into 2–3 strings to match MPPT limits and use portrait or landscape layout to fit roof geometry. If the roof is shaded or small, use a ground-mount for better tilt and output.