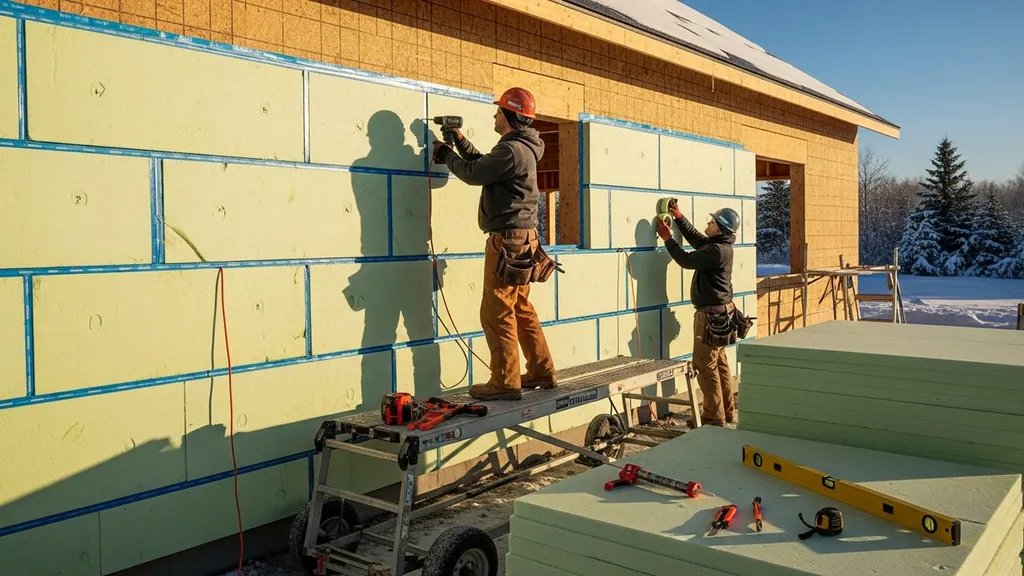
Practical design strategies for building energy-efficient, durable homes in climate zone 6 — insulation, airtightness, foundations, HVAC, and DIY cost-savers.
Building in Climate Zone 6: Cold Design Guide
Building in climate zone 6 demands choices that keep a home warm, dry, and affordable to heat through long, cold winters. This guide on climate zone 6 shows targeted insulation, airtightness, foundation, window, and HVAC details that a budget-conscious DIY self-builder can apply to reduce fuel use and avoid moisture problems. You'll get specific R-value and airtightness targets, practical wall and slab assemblies, vapor-control guidance, and hands-on cost-saving moves for a 1,200–2,000 sq ft tight house in northern U.S. or high-elevation towns.
TL;DR:
- Aim for wall assemblies around R-23 cavity + R-5–R-10 continuous insulation, attic R-49 or better, and slab edge R-10; blower-door of 1.0–3.0 ACH50 depending on budget.
- Prioritize continuous exterior insulation and airtight air-barrier continuity (top plates, rim joists, window transitions) before upsizing HVAC equipment.
- Use an ERV or HRV sized per ASHRAE 62.2, choose cold-climate heat pumps with backup, and plan PV/battery only after reducing heating load.
Why Climate Zone 6 Matters for DIY Homebuilders
What Defines Climate Zone 6 (map and Degree Days)
Climate zone 6 is a "very cold" zone under many U.S. energy maps. The IECC and ASHRAE maps classify counties using winter design temperatures and heating-degree days; zone 6 sites typically see winter design temps roughly −5°F to −20°F and heating-degree-days in the mid to high ranges compared with southern zones. The Department of Energy's overview explains how maps and degree days define these regions (Department of Energy's guide to climate zones). Builders should consult local county maps to confirm exact classification before design and permitting.
How Cold Winters Change Design Priorities
Cold climates shift the budget and detailing priorities: reduce heat loss through the envelope, prevent condensation in assemblies, and protect foundations from frost. Freeze-thaw cycles and ice dams are common risks; durable cladding and well-designed roof edges are important. Design indoor temperatures for comfort — 68°F to 71°F typical for heating design — and size systems to maintain that at the local winter design temperature. This affects insulation thickness, airtightness goals, and the choice of mechanicals. Key points for quick - Prioritize continuous insulation (CI) to reduce thermal bridging.
- Seal the air barrier early on; leaks increase heating loads and moisture risk.
- Protect foundation frost depth and provide perimeter drainage.
Key Performance Targets for Zone 6: Insulation, Airtightness, and U-values
Baseline R-value and U-value Targets for Walls, Roofs, and Slabs
Use the following starting targets for a cost-sensitive high-performance build in zone 6. These align with IECC guidance and are practical for DIY assemblies.
| Element | Recommended target (economy → high-performance) |
|---|---|
| Walls (2x6 cavity + CI) | R-23 cavity + R-5 CI (economy), R-23 + R-10 CI (high-performance), Passive House > R-30 total |
| Roof / Attic | R-49 (vented attic), R-60+ for very tight homes |
| Floors over unheated spaces | R-30–R-38 |
| Slab edge / perimeter | R-10 to R-15 continuous around frost line |
| Windows (U-value) | U ≤ 0.30 (double/triple glazed), consider U ≤ 0.20 for Passive House |
| Doors | R-5 to R-8 (insulated doors) |
For comparison to code and high-performance standards, see a county-by-county approach in the IECC tables and building science resources such as the Guide to determining climate regions by county.
Airtightness Targets (ACH50) That Balance Cost and Comfort
Blower-door targets:
- Basic high-performance: 2.5–3.0 ACH50 — achievable with careful framing and common air-barrier techniques.
- Premium tight: 1.0–1.5 ACH50 — requires meticulous detailing (taped sheathing, continuous membrane) and testing.
- Passive House: ≤ 0.6 ACH50 — typically requires specialized trades and quality-control processes.
Cost-effectiveness favors achieving 2.0–3.0 ACH50 for most DIYers and then balancing mechanical ventilation and insulation. Each incremental reduction in ACH50 becomes progressively more expensive; evaluate returns by estimating annual heating savings.
Where to Invest First: Marginal Gains Analysis
Spend first on continuous exterior insulation and air-barrier continuity. These reduce heat loss across thermal bridges and are often cheaper per saved BTU than adding a much larger heat pump. After that, prioritize attic insulation and sealing rim joists. Only then should spend shift to higher-cost items like triple glazing or ground-source heat pumps unless specific constraints make them necessary.
See our companion piece on choosing insulation targets for detailed trade-offs: choosing insulation R-values.
Thermal Envelope Strategies for Cold Climates
Wall Assemblies: Recommended Builds (cavity + Exterior Continuous)
Practical DIY wall options:
- 2x6 stud cavity with full-depth cellulose or mineral wool (R-23), plus 1–2 in. of polyiso or mineral wool CI (R-5–R-10). This reduces thermal bridging at studs and improves condensation safety.
- Larsen truss or 2x furring over existing sheathing to add thick CI and dense-packed cellulose; good for retrofit and new builds. See cold-climate installation tips for continuous-insulation details: cold-climate installation tips.
- ICF or structural insulated panels (SIPs) as higher-cost alternatives offering continuous insulation and lower labor for airtightness. Consider local contractor availability and skill requirements.
- Natural alternatives like hempcrete can be used, but compare with ICF in thermal performance: hempcrete vs ICF comparison.
Trade-offs: mineral wool and cellulose are vapor-open and forgiving; spray polyurethane foam (SPF) reduces air leaks but can trap moisture if not detailed correctly. For DIYers, CI over the sheathing plus a clear air barrier is often the best balance of performance and buildability.
Roof/attic Solutions: Vented vs Unvented and Insulation Placement
Vented attic with deep ceiling insulation (R-49–R-60) is the simplest DIY route. For cathedral ceilings or unvented assemblies, place continuous insulation above the roof deck or use raised-heel trusses to allow full-depth rafter-bay insulation at the eaves. Avoid compressing insulation at eaves; maintain ventilation pathways where required by code. When using unvented assemblies, use closed-cell SPF or sufficient CI to keep roof sheathing warm enough to avoid condensation per code and manufacturer guidance. Use taped seams on sheathing for an integrated air barrier where practical.
Slab and Floor Insulation Approaches
Insulate slab edges with rigid foam (XPS or polyiso) to R-10–R-15 around the perimeter. For frost-protected shallow foundations (FPSF), perimeter CI reduces required depth of excavation and prevents frost heave; FPSF is a good option on many zone 6 sites and reduces concrete volume. Under-slab insulation is useful where in-floor heating is used or for very low-load homes. For suspended wood floors over unheated crawlspaces, insulate joist bays and seal floor air leakage at top plates and rim joists.
Refer to ICC and IECC guidance for assembly compliance: IECC climate zone mapping and requirements.
Airtightness and Vapor Control: Detailing to Avoid Moisture and Mold
Air Barrier Best Practices and Common Leak Locations
An air barrier is any continuous material that stops unintended airflow. Common leak spots:
- Top plates and connections between walls and ceilings.
- Rim joists and band joists.
- Window and door rough openings.
- Penetrations for plumbing, electrical, and HVAC.
Common solutions include taped exterior sheathing, housewrap continuous seams, interior taped gypsum with gaskets at service locations, and spray foam at complex penetrations. Conduct a mid-construction blower-door test to find and fix leaks before finishes hide them.
Vapor Control Strategies for Zone 6 (smart Vs. Vapor Barrier)
In zone 6, using a smart vapor retarder (variable-permeance membrane) on the warm-in-winter side reduces risk of trapping moisture. A smart retarder admits drying to the exterior during summer and increases resistance during winter. Polyethylene (6-mil) fixed vapor barriers can be used but must be continuous and paired with assemblies that dry to the exterior; misuse can trap moisture. For step-by-step installation tips, consult the vapor barrier installation guide.
Testing and Commissioning: Blower Door and Infrared Checks
Blower-door testing at rough-in and finish stages catches leaks early. Use infrared scanning or a smoke pencil to locate areas of convective bypass. Aim for the ACH50 target chosen earlier; if test results exceed targets, focus remediation on the largest leakage areas first (rim joists, top plates, windows). For final commissioning, verify ventilation system flows and heat pump performance at design conditions.
Some installers recommend third-party testing and commissioning to validate both airtightness and HVAC sizing and to avoid over-sizing equipment.
Foundation, Crawlspace, and Slab Design for Freeze and Moisture Management
Choosing Between Full Basement, Frost-protected Shallow Foundation, and Slab-on-grade
Compare options for DIYers:
- Full Basement: Provides conditioned, usable space and easier mechanical routing but higher excavation and wall insulation needs.
- Frost-Protected Shallow Foundation (FPSF): Reduces excavation depth and concrete; requires perimeter insulation and appropriate site conditions.
- Slab-on-Grade: Lower cost and quicker build, but requires careful slab-edge insulation and soil moisture control.
Decide based on site frost depth, water table, and intended use of below-grade space. For county-specific frost depths and classification, see state maps such as New York's climate zone breakdowns: New York State climate zone map.
Insulation Details: Slab Edge, Under-slab, and Perimeter
Recommended practice:
- Install continuous rigid foam at slab edges to the recommended R-value (R-10–R-15).
- Use a capillary break (compacted gravel and dimple membrane) beneath slabs and around foundation walls to control moisture.
- For FPSF, place CI vertically at the perimeter and extend horizontally under the slab where applicable to reduce frost penetration.
Crawlspace Ventilation vs Conditioned Crawlspace
Conditioned crawlspaces (air-sealed and insulated at the perimeter, with mechanical ventilation) place plumbing and ducts inside the thermal envelope and reduce freeze risk. If choosing a conditioned crawlspace, insulate rim joists and bring mechanicals inside or insulated duct work. Vented crawlspaces are less favorable in zone 6 due to cold infiltration and moisture. Ensure proper drainage around the foundation and follow roof-to-drainage guidance: water collection basics.
Windows, Doors, and Passive Solar Considerations in Zone 6
Choosing U-values, SHGC, and Frame Types for Winter Performance
Target glazing U-values ≤ 0.30 for most cold-climate homes; consider triple glazing (U ≈ 0.20–0.25) where budget allows and south-facing gains are limited. South-facing glazing should have a higher SHGC (0.40–0.60) to capture winter solar gain; north and east glazing should have low SHGC to reduce heat loss. Frame types matter: fiberglass and thermally broken aluminum frames offer good performance; wood or wood-clad frames provide excellent thermal performance and detailing flexibility.
Industry discussion on best wall and window choices for zone 6 offers practical comparisons: Best wall design for Climate Zone 6 - GreenBuildingAdvisor.
Passive Solar: Orientation, Shading, and Thermal Mass
Use solar orientation to place most glazing on the south facade. Provide fixed overhangs sized by latitude and glazing height to admit winter sun and shade summer sun. Add interior thermal mass (concrete slab, masonry) to store daytime heat and release it at night. For shading strategies that balance light and overheating control, see the guide on light shelves: light shelves for passive homes.
Detailing Window Flashing and Jamb Insulation
Proper flashing and sill pan installation prevents water intrusion. Insulate and air-seal jambs with low-expansion spray foam or backer rod and sealant; add exterior continuous insulation to reduce thermal bridging at frames. Always follow the manufacturer's rough-opening instructions and local code for stormwater management.
Heating, Ventilation, and Off-grid Energy Systems for Cold Sites
Heat Sources: Cold-climate Heat Pumps, Mini-splits, and Backup Strategies
Cold-climate air-source heat pumps (ccASHP) now offer reasonable performance at −10°C to −20°C with COPs often above 2.0 at −10°C depending on model. Ground-source heat pumps provide consistent COPs but have higher installation costs. For many DIY-friendly builds, multi-head mini-split systems with models rated for cold climates provide high efficiency and zoned control. Plan a small backup (electric-resistance, propane, or wood) for extended extreme cold or grid outages.
When sizing, derate manufacturer capacity for low temperatures and size to avoid frequent short cycling. Example: a tight 1,500 sq ft house with the envelope targets above may need 12–18 kBtu/h at design temp; verify with load calculations rather than rule-of-thumb.
Ventilation: ERV vs HRV and Sizing for Occupants
Heat-recovery ventilators (HRV) or energy-recovery ventilators (ERV) balance indoor-air quality and heat recovery. In cold, dry climates an HRV is standard to transfer sensible heat; ERVs also transfer moisture and can be helpful in sites with high exhaust humidity or tight building envelopes. Size ventilation per ASHRAE 62.2 (roughly 0.35 ACH or a set cfm per occupant and per square foot). Ensure duct routing is inside the thermal envelope when possible and insulate ducts in cold spaces.
Off-grid Power and Solar Sizing Considerations for Heating Loads
If planning off-grid, perform load-first design: lower heating demand by insulating and tightening the envelope, then size PV/battery accordingly. For reference PV system examples for small cabins, see solar sizing for cabins and the broader off-grid planning guide: off-grid home start-to-finish. For lighting and low loads, review energy-saving fixtures: solar lighting options.
Materials, Detailing, and Durability: What to Use and Where to Spend Money
Material Comparisons: Mineral Wool vs Spray Foam vs Cellulose
Compact comparison table of common insulations:
| Material | R/inch (typical) | Vapor behavior | Cost per R (qualitative) | DIY friendliness |
|---|---|---|---|---|
| Mineral wool | 3.7–4.2 | Vapor-open | Moderate | Good |
| Cellulose | 3.6–3.8 | Vapor-open | Low | Good (dense pack needs blower) |
| Closed-cell spray foam | 6.5–7.0 | Vapor-impermeable | High | Low (requires contractor) |
| Polyiso rigid foam | 6.0–6.5 | Low permeance | Moderate | High (panels) |
| XPS rigid foam | 5.0 | Low permeance | Moderate | High |
Choose spray foam where air sealing and high R-value per inch are required in confined cavities, but be mindful of cost and potential moisture trapping. For continuous exterior layers, polyiso or mineral wool boards are practical and DIY-friendly when paired with taped seams.
Deeper dives into sustainable material options are available: sustainable building materials.
Exterior Cladding and Roof Choices for Freeze-thaw Durability
Materials that perform well in freeze-thaw cycles include metal roofing, fiber-cement siding, and well-finished engineered wood. Metal roofs shed snow and reduce ice-dam formations when paired with proper insulation and ventilation; see roofing installation tips: metal roofing installation. Use robust flashings, drip edges, and snow guards where needed.
Long-term Maintenance and Common Cold-climate Failure Modes
Watch for ice dams (roof insulation and ventilation deficiency), rim-joist condensation (air leaks at band joists), and buried drainage failures. Prioritize airtightness and continuous insulation before upsizing heating equipment; oversizing can mask envelope issues without solving them. For concrete options and sustainability, consider recycled aggregate mixes: recycled aggregate concrete uses.
Construction Sequencing, DIY Tips, and Cost-saving Strategies
Sequencing Checklist to Reduce Rework and Moisture Risk
- Foundation and drainage: complete perimeter drains and capillary breaks.
- Install air barrier at foundation-wall transition and ensure continuity up to the roof.
- Install continuous exterior insulation and tape seams before window installation where possible.
- Rough-in mechanicals inside the thermal envelope.
- Blower-door test at rough-in; fix leaks.
- Final insulation, finishes, and commissioning.
Follow a tight sequence to reduce hidden access issues and rework caused by late-found leaks.
Top DIY-friendly Details That Deliver Biggest Performance Gains
- Insulate and seal rim joists with rigid foam and canned spray foam.
- Install continuous exterior insulation on walls, even 1–2 in. provides thermal-bridge relief.
- Install proper window flashing and sill pans.
- Use pre-cut insulation packages to reduce waste and install time.
- Conduct mid-build blower-door testing to avoid costly fixes later.
- Employ conditioned crawlspaces to keep plumbing inside the thermal envelope.
Helpful tool lists for natural-building and envelope work: tools for natural building.
Common Mistakes to Avoid and Quick Troubleshooting Tips
- Sealing vapor barriers on the wrong side of assemblies; verify assembly dew-point control before installing.
- Blocking roof ventilation with insulation; create proper baffles.
- Relying on a larger furnace or heat pump to fix a leaky envelope.
- Not routing ducts inside the thermal envelope; retrofit if ducts are in unconditioned spaces.
For off-grid water systems and sequencing integration, consider reuse and storage strategies early: greywater reuse options.
Quick Reference: Design Targets and Specification Table
At-a-glance R-values, U-values, and Airtightness Targets
| Assembly | Economy target | High-performance target |
|---|---|---|
| Wall (2x6 + CI) | R-23 cavity + R-5 CI | R-23 + R-10 CI |
| Attic (vented) | R-49 | R-60+ |
| Floor over unheated | R-30 | R-38 |
| Slab edge | R-10 | R-15 |
| Windows (U) | ≤ 0.30 | ≤ 0.20 |
| Airtightness (ACH50) | 2.5–3.0 | 1.0–1.5 |
Material Choices Matrix (cost, DIY Skill, Durability)
| Budget level | Recommended assembly | DIY skill |
|---|---|---|
| Economy | 2x6 cavity + dense-packed cellulose, 1 in. polyiso CI | Moderate |
| Mid-range | 2x6 cavity + R-10 CI, taped sheathing | Moderate–High |
| High-performance | SIPs or ICF, triple glazing, ERV + ccASHP | Low (specialty trade needed) |
Sample Detail Call-outs (wall Section, Rim Joist, Slab Edge)
- Wall: exterior sheathing + taped seams, 1–2 in. CI, breather membrane, rainscreen, insulated jambs.
- Rim joist: continuous foam against perimeter, spray foam at penetrations, taped membrane overlap to floor sheathing.
- Slab edge: vertical rigid foam to frost depth or per FPSF guidance, horizontal foam under slab where used, capillary break.
The Bottom Line
For climate zone 6, prioritize continuous insulation and airtightness, protect foundations and drainage, and choose heat pumps sized to a measured envelope load. Test with a blower door early, detail vapor control with smart retarders where appropriate, and only size PV and batteries after minimizing heating demand. Check local code (IECC/ASHRAE) and site-specific frost data before final designs.
Frequently Asked Questions
What R-values should I target for walls and roofs in zone 6?
Target R-23 cavity plus R-5 to R-10 continuous insulation on walls, and R-49 or higher in the attic for cost-effective performance. For very tight or passive-house-level builds, increase continuous insulation and attic R-values further and aim for lower ACH50 targets.
Is triple glazing worth it for a DIY build in zone 6?
Triple glazing reduces heat loss and can be worth it on north-facing facades or in very tight homes, but it costs more. Often, investing first in continuous insulation and airtightness yields larger annual savings per dollar than upgrading from high-quality double glazing to triple glazing.
Which foundation type is best for a DIYer in a cold climate?
Slab-on-grade with properly insulated slab edges or a frost-protected shallow foundation (FPSF) often balances cost and buildability for DIYers, while full basements add usable space at higher excavation cost. Choose based on frost depth, drainage, and whether below-grade living space is needed.
How much ventilation do I need and should I pick an ERV or HRV?
Size ventilation to ASHRAE 62.2 requirements for occupants and floor area. Use an HRV to recover sensible heat in cold, dry climates; choose an ERV if indoor humidity control or moisture exchange is also desirable. Ensure ducts and unit are inside the conditioned envelope when possible.
Can I run a heating system off-grid in zone 6 with solar alone?
Off-grid heating is possible but expensive if relying on electric resistance or heat pumps without significant load reduction. Start by minimizing heating demand through insulation and airtightness, then size PV and batteries to meet remaining loads; consult off-grid system guides and solar-sizing examples for small cabins.