Compare R-23 and R-49 insulation for space, cost, and climate. Practical guidance to choose the right R-value for your DIY home project.
R-23 vs R-49 Insulation: Which Do You Need?
Choosing between R-23 and R-49 insulation affects material selection, wall or attic depth, installation time, and long-term energy use. This guide compares r23 vs r49 insulation so a budget-conscious DIY builder can match R-value to space, climate, and project goals. Read on to learn where each R-value makes sense, typical material thicknesses, DIY vs pro trade-offs, and scenario-based recommendations for retrofits and new builds.
TL;DR:
- R-23 is often enough where cavity depth is limited (2x6 walls or rim joists) or for moderate climates; it typically requires ~6–8" in batt form or a moderate blown depth.
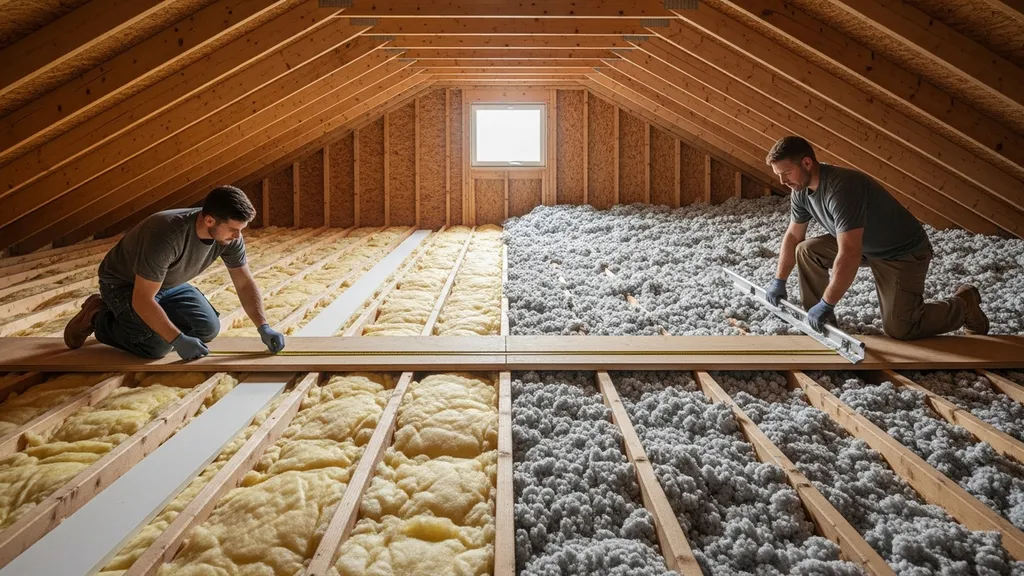
- R-49 makes sense for cold climates and attics where deep loose-fill or layered assemblies are possible; expect ~15–20" loose-fill cellulose or 7–8" closed-cell foam equivalents.
- Before adding depth, prioritize air sealing and thermal-bridge reduction; see the DOE and industry guidance on cost-effective R-values for climate zones.
Quick TL;DR + Comparison Table: R-23 vs R-49 Insulation: Which Do You Need?
Short recommendation (one-sentence TL;DR): R-23 is a practical target for limited-depth assemblies and many retrofit budgets; R-49 pays off in unvented attics and colder climate zones when you can meet depth and ventilation/air-sealing needs.
| Feature | R-23 | R-49 |
|---|---|---|
| Typical materials | Batts (fiberglass/mineral wool), dense-packed cellulose, cavity spray foam | Deep loose-fill (cellulose/fiberglass), layered cavity + continuous foam, thick spray foam |
| Typical installed thickness (ballpark) | 6–8" (batt), 8–12" (blown cellulose variable) | 15–20"+ (loose-fill cellulose), 7–8" (closed-cell spray foam) |
| Space required | Shallow to moderate | Deep attic cavities or multi-layer assemblies |
| Installation difficulty | DIY-friendly for batts; careful cavity work for dense-pack | Often needs blower/installer for deep loose-fill; spray foam usually pro |
| Relative cost | Low–Medium | Medium–High |
| Where it performs best | Mild to mixed climates; 2x6 walls, small cabins | Cold climates (IECC zones 6–8); whole-roof or deep attic targets |
| Guidance sources | DOE R-value tables, industry installers | Energy Star recommendations, retrofit studies |
This table gives ballpark ranges; actual thickness and R-per-inch depend on material and product. For national guidance on recommended R-values by climate and assembly, see the Insulation Institute's and Department of Energy's R-value maps and tables (DOE insulation guidance PDF).
R-23 Insulation: What R-23 Means and When R-23 is Enough
Overview: Common Materials That Deliver R-23
R-23 is a mid-range R-value often achieved in 2x6 stud cavities or as part of a layered assembly. Common ways to get R-23:
- Fiberglass batts or mineral wool sized for 2x6 studs (some products labeled R-21–R-23; actual R depends on thickness and density).
- Dense-packed cellulose in wall cavities or moderate attic depths.
- Open-cell spray foam around 6–8" can approach R-23 in some applications (varies with product).
Products vary in R-per-inch: fiberglass batts typically deliver ~R-3 to R-3.5 per inch, while mineral wool can hit R-3 to R-4 per inch. For a primer on R-value basics, see understanding R-value.
Strengths of Choosing R-23
- Fits 2x6 wall cavities or modest attic joist depths without changing framing.
- Lower material cost and often DIY-installable when using batts.
- Faster install and smaller impact on interior room space than thicker assemblies.
- Easier to retrofit into rim joists, partitions, and tiny-house walls.
Weaknesses and Hidden Limits
- Less effective in very cold climates where additional R reduces heat loss more significantly.
- Batt installations can underperform if cavities are not air-sealed or if compressed during framing.
- Vapor and condensation risks increase for exterior-cold walls if no continuous exterior insulation exists; proper vapor control and detailing matter. The Department of Energy explains how R-value needs shift with climate and system type (DOE insulation guide).
Best For: Use Cases Where R-23 is the Sensible Choice
- 2x6 exterior walls in temperate or mixed climates.
- Rim joists, knee walls, and shallow cathedral ceilings where depth is constrained.
- Budget-conscious retrofits where improving air sealing plus moderate added R gives better payback than chasing deep attic depths.
For detailed batt vs blown choices and material trade-offs consult the site's attic guidance: attic insulation guide and the batt material comparison in rockwool vs fiberglass. Also refer to vapor control steps in vapor barrier steps.
R-49 Insulation: What R-49 Means and When R-49 Pays Off
Overview: Common Ways to Reach R-49
R-49 is usually an attic target or part of a high-performance wall/roof assembly. Typical approaches:
- Loose-fill cellulose or fiberglass blown into attics to depths commonly in the 15–20" range to hit R-49.
- Layered systems: moderate cavity R plus continuous exterior foam (polyiso, XPS) to reach equivalent performance with less interior depth.
- Thick spray foam (closed-cell at ~R-6–6.5 per inch) needing ~7–8" to reach R-49 if using a single layer.
Energy Star provides recommended attic R-values by climate zone and is a useful reference when deciding whether R-49 is necessary for your location (Energy star recommended r-values).
Strengths of Choosing R-49
- Significant reduction of heat loss through ceilings and uninsulated attic areas in cold climates.
- When paired with proper air sealing and ventilation, it reduces peak heating demand and makes heating systems smaller.
- Works well for detached cabins, cold-climate new builds, and houses that will be occupied long-term.
Weaknesses and Practical Constraints
- Requires attic space and access to add deep loose-fill; cathedral ceilings and low-profile attics may not have room.
- Loose-fill depths can interfere with wiring, ventilation channels, and attic equipment unless carefully planned.
- Spray foam to this thickness is expensive and often requires professional application for safety and warranty reasons.
- Diminishing returns: energy savings from R-23 → R-49 are climate-dependent and taper off; cost-effectiveness varies with fuel price and occupancy patterns. For trade-offs between spray foam and dense-pack cellulose in deep assemblies, see spray foam vs cellulose and cold-climate design notes in cold-climate cabin tips and climate zone 7 design.
Best For: Use Cases Where R-49 is Worth the Investment
- Unvented attics in IECC climate zones 6–8 or locations with long, cold winters.
- New builds where framing depth can be set to accept deep assemblies or where continuous exterior insulation is costed-in.
- Projects aiming for very low annual heating loads or preparing for heat-pump sizing reductions.
R-23 vs R-49: Installation, Thickness, and Space Trade-offs
Typical Thicknesses by Material
Below are ballpark thickness ranges to reach R-23 and R-49. R-per-inch varies by product; these numbers are estimates for planning.
| Material | R-per-inch (typical) | Inches for R-23 | Inches for R-49 |
|---|---|---|---|
| Fiberglass batt | 3.0–3.5 | 6.5–8" | 14–16" |
| Mineral wool batt | 3.0–4.0 | 6–8" | 12–16" |
| Loose-fill cellulose | 3.2–3.8 | 6–8" | 13–16" |
| Loose-fill fiberglass | 2.5–3.0 | 8–9" | 16–20" |
| Open-cell spray foam | ~3.5 | 6–7" | 14–15" |
| Closed-cell spray foam | 6.0–6.5 | 3.5–4" | 7.5–8" |
| Polyiso rigid foam | 5.5–6.5 | 3.5–4" | 7.5–9" |
These figures are approximate; products differ. For roofing-specific methods and how assembly choices change achievable R-values, see roof insulation methods. Before installing, measure cavity depth carefully and account for shrinkage or compression.
Installation Methods: DIY-friendly vs Professional
- Batts (fiberglass, mineral wool): DIY-friendly if cavities are standard depth and air-sealing is done first. Common mistakes include compression and gaps.
- Dense-pack cellulose: DIY with a rented blower and careful practice; best for walls when removing siding or via injection ports. For attics, many DIYers rent blowers and can achieve R-49 in open attics.
- Loose-fill fiberglass: Similar to cellulose but requires more depth for the same R; DIY possible but less forgiving.
- Spray foam: Closed-cell and high-density products usually require certified installers and equipment. Open-cell may have limited DIY kits but quality and safety concerns remain.
- Rigid exterior foam: Installable by experienced DIYers but requires flashing, sealing tape, and detail work to maintain air and moisture control.
Before insulating, prioritize sealing major air leaks at the attic ceiling line, rim joists, and penetrations. For common leakage locations to check, refer to common air leaks.
Retrofit vs New-build Considerations
- In retrofits, attic access, existing wiring, and ductwork location determine whether adding loose-fill to R-49 is practical.
- In new builds, set framing depth or add exterior continuous insulation to meet performance targets with less cavity thickness.
- For thin-framed builds or tiny houses, consider high-R board sheathing or structural insulated panels (SIPs) to avoid deep cavities.
Watch this step-by-step guide on installing ceiling insulation in a basement or crawlspace & why you should. r30, r21, r19, r13.:
R-23 vs R-49: Energy Savings, Climate Impact, and Payback Scenarios
How Climate Zone Changes the Value of R-49 vs R-23
Climate is the top factor in deciding whether the extra depth is worth it. In colder IECC zones (6–8), adding insulation to reach R-49 in attics often yields larger heating savings than in mild climates. Energy Star and DOE tables recommend higher attic R-values for colder zones; compare your site's recommended target to estimate marginal benefit (Insulation Institute DOE R-value map).
Sample Payback Scenarios (qualitative Examples)
- Short payback (likely): Cold-climate home with poor existing attic insulation and high heating fuel costs; raising attic to R-49 after air sealing reduces fuel use noticeably.
- Medium payback (possible): Mixed-climate retrofit where attic already has some insulation; adding from R-23 to R-49 helps but gains are smaller.
- Long payback (unlikely): Mild-climate house with efficient heating and low fuel costs; deep R may never repay within a homeowner’s tenure.
Market analyses of insulation options and R-value economics can help; consult industry buyer guides for up-to-date R-per-inch and cost comparisons (Insulation buyer guide and R-chart). Keep in mind that air sealing, reducing thermal bridges, and upgrading windows often change the incremental savings more than an added layer of insulation alone. For tools and materials to air-seal before insulating, see air sealing tools.
How Air Sealing and Thermal Bridging Alter Expected Savings
Insulation is far more effective when combined with a tight air barrier. Thermal bridging through studs or rafters lowers whole-wall performance; the fix is continuous exterior insulation or thermal breaks. A modest additional investment in a continuous layer can reduce the need for extremely deep cavity insulation.
Alternatives and Hybrid Strategies Instead of Choosing Strictly R-23 or R-49
Layered Approaches (cavity + Exterior Foam)
Pairing moderate cavity insulation (R-23) with 1–2" of continuous polyiso or mineral wool board can bring whole-assembly performance close to higher cavity R without increasing interior thickness. This is useful for retrofits where interior space and finishing are constraints. See the site's exterior foam guide for detailing and moisture control.
Higher-performance Materials and Assemblies
- SIPs (structural insulated panels) and SIP roofs combine structure and continuous high R in thinner assemblies—good for small builds where depth is limited.
- Dense-pack cellulose reduces convective losses and has lower embodied energy than petrochemical foams; it’s a strong retrofit option.
- Rigid mineral wool or cork can be part of hybrid assemblies where fire resistance or lower embodied carbon is desired—see cork insulation uses for examples.
When to Prioritize Air Sealing, Windows, or Ventilation Over More R-value
If the house has major air leaks, thin windows, or poor ventilation, adding insulation alone will deliver less value than sealing leaks or upgrading glazing. For wall and roof air-barrier best practices, consult the site's guide to wall sheathing and consider sealing strategies in airtight membrane how-to.
Which Should You Choose? Scenario-based Recommendations for DIY Builders
Limited-space or Tiny-house Projects
Recommendation: Aim for R-23 in cavities and add 1–2" of exterior rigid foam if possible. DIY batt or mineral wool installation is realistic; switch to polyiso if you need a slimmer profile. Prioritize airtightness and vapor control; see airtight membrane how-to.
Budget Retrofit with Moderate Savings Goals
Recommendation: Seal air leaks first, then add loose-fill cellulose until the attic reaches a realistic depth (often R-38–R-49 depending on attic height). Dense-pack wall retrofits can bring walls closer to R-23 without removing finishes.
Cold-climate New Build Aiming for Low Energy Bills
Recommendation: Design framing depth to accept deep cavities or use a hybrid of cavity insulation plus continuous exterior foam to meet or exceed R-49-equivalent. Consider professional spray foam for rim joists and critical penetrations and pair insulation with mechanical ventilation.
Passive-house or Net-zero Oriented Projects
Recommendation: Target much higher whole-assembly performance than R-49 alone by combining high cavity R, continuous exterior insulation, and rigorous air sealing. Passive House projects frequently use continuous exterior layers plus high-performance glazing and balanced ventilation to minimize heating loads.
Decision flow for DIYers:
- Measure cavity depth and existing insulation.
- Prioritize sealing major air leaks and addressing thermal bridges.
- Choose material based on moisture risk, budget, and DIY skill.
- If depth is limited, use continuous exterior insulation or high-R boards.
When in doubt on structural changes or major vapor control work, consult a qualified installer or building scientist.
The Bottom Line
For many DIY projects, r23 vs r49 insulation is a question of space, climate, and priority: choose R-23 when cavity depth and budget are limited; choose R-49 for cold-climate attics or when pursuing long-term heating reductions. Start with air sealing, check your climate's recommended attic r-value recommendations, and then select materials that fit your framing and moisture-control needs.
Frequently Asked Questions
Is R-49 always better than R-23?
No. Whether R-49 is "better" depends on climate, existing insulation, and project constraints. In cold climates the incremental heat-loss reduction from R-23 to R-49 is larger, so payback is faster. In mild climates or where the building already has good air sealing and efficient heating, the extra cost and space for R-49 may not be justified.
Before upgrading, assess air leakage, window performance, and thermal bridging; those factors often change the cost-effectiveness of adding thick insulation.
How do I measure existing insulation to compare?
Measure thickness with a ruler at multiple attic locations and identify material (fiberglass, cellulose, batt). Multiply measured inches by the material's typical R-per-inch (rough estimates: fiberglass loose-fill ~2.7, cellulose ~3.5, closed-cell foam ~6). For walls, use inspection holes or an infrared camera to estimate depth and continuity. If unsure, hire a blower-door or insulation assessor for a precise evaluation.
Can I combine R-23 in cavities with exterior foam to get R-49-equivalent?
Yes. A layered approach—moderate cavity R plus continuous exterior rigid foam—often achieves the same whole-wall performance as a very deep cavity while avoiding interior depth loss. Detail connections carefully to maintain an uninterrupted air barrier and manage vapor flow; the site's exterior foam guide covers detailing and material choices.
Will adding insulation cause moisture or ventilation problems?
It can if you change the assembly's drying paths or block ventilation. Adding thick insulation to an attic while leaving vents and bypasses unresolved may trap moisture. For roof assemblies, switching to an unvented assembly with spray foam or adding exterior foam changes condensation risk and requires careful vapor-control planning. Consult the Department of Energy guidance for assembly-specific recommendations (DOE insulation guide).
What are simple next steps for a DIYer unsure which to pick?
Start by measuring cavity depth and current attic insulation level, perform a basic air-seal of attic penetrations, and consult climate-based R-value recommendations. If you need help prioritizing, rent a blower for a quick test or hire a local energy auditor. For installation how-to and product comparisons, review the site's guides on attic insulation and air sealing: attic insulation guide and air sealing tools.