Practical guide to insulated slab edge details, materials, costs, and DIY steps to stop thermal bridging at slab-on-grade foundations.
Insulated Slab Edge: Preventing Thermal Bridging
An insulated slab edge stops heat flowing directly from a warm interior slab into cold soil and air — the main pathway for thermal bridging in slab-on-grade foundations. This guide on the insulated slab edge shows which materials and details reduce heat loss, recommended R-values and thicknesses by climate, step-by-step installation for DIY builders, and common durability and moisture traps to avoid. Readers will walk away with concrete specs, a materials comparison, and a ready-to-follow checklist for building or retrofitting a slab edge that performs.
TL;DR:
- Use 2–4 in of rigid foam (R-6 to R-20 total) at the slab edge in temperate climates and 4–8 in in cold climates to cut foundation-related heat loss by 20–40%.
- Choose EPS/XPS/polyiso by comparing R/inch, moisture resistance, and compressive strength; consider ICFs for full-depth insulated walls or where formwork and insulation are combined.
- Seal foam joints, protect the insulation during the pour, tie the edge foam into under-slab insulation and the wall air barrier, and grade and drain water away to avoid moisture-related failures.
Why the Insulated Slab Edge Matters for Preventing Thermal Bridging
Thermal bridging occurs when a high-conductivity path connects warm and cold regions — at a slab edge that path is concrete. Concrete has much higher thermal conductivity than soil or foam, so an uninsulated slab edge creates a continuous route for heat to flow out of the building. Research and field guides show slab edges can be a significant source of heat loss on slab-on-grade homes, especially in colder climates where the indoor/outdoor delta-T is large. The Building America Solution Center notes slab-edge insulation helps meet or exceed code-required R-values for slab-on-grade foundations and reduces condensation risk at the slab perimeter (Building America Solution Center slab edge insulation guide).
Typical energy impacts vary: studies find properly insulated slab edges reduce annual site energy use for heating by single-digit to mid-teens percent for small buildings, while targeted designs (deep insulation or frost-protected shallow foundations) can produce larger savings in cold zones. Passive House designers place strong emphasis on linear thermal transmittance or Psi-values at junctions; an insulated slab edge lowers the Psi-value at the wall-to-slab junction and helps in certification because it minimizes cold spots and condensation risk. For readers aiming at Passive House performance, consider continuous perimeter insulation and verified junction details — see our reference on Passive House roof insulation for how continuous external insulation pays off across the whole envelope (Passive House roof details).
Cold climates magnify slab-edge losses because deeper frost depths and longer heating seasons raise the significance of a foundation thermal break. Temperate or mild climates see smaller heating penalties, but slab-edge insulation still improves floor comfort and reduces drafty edges where finishes meet exterior walls.
How Heat Flows at Slab Edges
Heat transfer is conduction through the slab and concrete footing, with a smaller component from air leakage at unfinished junctions. Concrete transfers heat faster than soil and insulation, so the slab edge concentrates losses. Adding continuous rigid foam along the perimeter interrupts that concrete-to-outside path and increases the effective R-value of the foundation edge.
Typical Energy and Comfort Impact of Uninsulated Slab Edges
Uninsulated slab edges can lead to:
- Colder floor perimeter temperatures, causing occupant discomfort and potential condensation.
- Higher heating loads: studies and code analyses show modest but measurable annual energy penalties; one regional analysis modeled R-10, 4-ft deep slab-edge insulation saving roughly 1–3% of annual energy in some building types (see Montana analysis below).
- Risk of moisture accumulation in finishes where cold surfaces meet warm, humid interiors.
Passive House and Code Perspectives on Slab-edge Thermal Bridges
Codes such as the IECC and programs like ENERGY STAR provide exemptions and alternatives for slab-edge insulation depending on slab depth and local conditions (ENERGY STAR slab edge guidance). Passive House standards stress reducing linear heat loss and verifying junction details. For certification, designers often use continuous perimeter foam or ICFs combined with careful air-barrier continuity to achieve low Psi-values.
Types of Insulated Slab Edge Systems and How They Stop Thermal Bridging
There are several common approaches to insulating a slab edge. Each interrupts the thermal path in a different way and has trade-offs in cost, durability, and installation difficulty.
Perimeter Rigid Foam Strips (EPS, XPS, Polyiso)
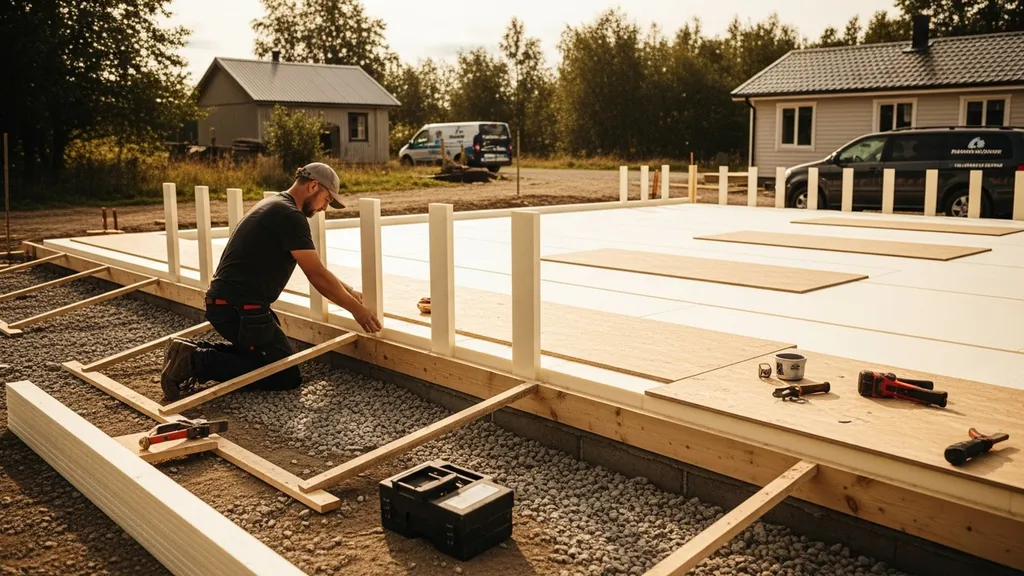
Perimeter rigid foam is cut into vertical strips and fastened to form boards or the compacted subgrade so the foam stands beside the slab form before the pour. Advantages include low cost, easy DIY installation, and compatibility with many slab details. Watch for compressive strength limits on thin foam; protect from UV and physical damage during the pour.
Continuous Vertical/perimeter Insulation (full-depth Insulation)
This approach installs a continuous layer of rigid or semi-rigid insulation from grade down beside the footing or wrapped around the slab perimeter to a specified depth. It reduces linear thermal transmittance more effectively than thin strips and can be used with frost-protected shallow foundation (FPSF) designs. Requires careful moisture detailing and sometimes deeper excavation.
Insulated Concrete Forms (icfs) and Combined Systems
ICFs combine the form and insulation into one system, leaving foam in place after the pour. They offer high compressive resistance and seamless coverage; they are a good option when building full-height insulated walls or when the foundation and walls are handled as one continuous insulated assembly. For a comparison of ICFs and alternatives, see ICF vs hempcrete.
Thermal Break Strips and Composite Solutions
Composite systems use a thin high-strength foam or engineered thermal break strip between the footing and the slab or use rigid foam tied into a higher-capacity material (like phenolic or mineral wool) to resist both thermal flow and mechanical loads. These are chosen when space is limited or when termite or moisture risk limits use of typical foams — the Pennsylvania Housing Research Center discusses common problem areas and termite exceptions in slab-edge detailing (PHRC slab insulation webinar PDF).
| System | R-value per inch | Moisture resistance | Compressive strength | Ballpark cost per linear ft | Best-use scenario |
|---|---|---|---|---|---|
| EPS (expanded polystyrene) | ~3.6–4.0 | Moderate | Low–medium | $1–$3 | DIY perimeter foam, low-cost projects |
| XPS (extruded polystyrene) | ~5.0 | Higher than EPS | Medium | $2–$5 | Higher moisture areas, sloped sites |
| Polyiso | ~6.0–6.5 (at moderate temps) | Lower in very cold, facers add moisture resistance | Medium | $2–$6 | Temperate climates, tight spaces |
| Phenolic | ~4.5–5.5 | Good | High | $4–$8 | High-performance, thin profiles |
| Mineral wool | ~3.0 | Good for vapor but absorbs water | Low | $3–$6 | Where fire resistance or vapor performance prioritized |
| ICF | R-value depends on foam thickness | High (foam protected) | High | $10+ | Full-depth insulated walls, DIYers using integrated forms |
Refer to our sustainable materials guide when selecting materials for embodied carbon and environmental performance (sustainable materials guide). If avoiding spray foam, review safer options in our alternatives piece (spray foam alternatives).
Design Details and R-value / Thickness Recommendations by Climate
R-value targets and thickness depend on climate zone, frost depth, and project budget. ENERGY STAR and model codes give baseline guidance (for example, slab-edge insulation requirements or exemptions vary with slab depth and finish height) — see ENERGY STAR’s slab-edge guidance for code-oriented rules (ENERGY STAR slab edge exemptions and alternatives).
R-value Targets and Recommended Thicknesses by Climate Zone
General rules of thumb:
- Warm/Mild Climates (IECC zones 1–3): 1–2 in of rigid foam (R-5 to R-12) can be sufficient for comfort and condensation control.
- Mixed Climates (zones 4–5): 2–4 in of rigid foam (R-10 to R-20) at the perimeter, with continuous under-slab insulation where possible.
- Cold/Very Cold Climates (zones 6–8): 4–8 in (or more) of foam for significant energy savings; consider FPSF or deep perimeter insulation to reduce frost-related issues.
For precise sizing, use a slab-on-grade thermal calculator to model how slab thickness and soil thermal mass interact with insulation depth (slab-on-grade calculator). Passive House projects often target wall-plus-foundation detail R-values that minimize linear losses rather than a single slab-edge R-value number.
Depth, Cap Height and Continuity at Grade and Slab Edge
Key dimensional rules:
- Extend perimeter insulation down to at least the effective frost line for cold climates if using insulation for frost protection, or follow FPSF guidelines that place horizontal insulation outward from the slab edge.
- Cap height: leave 1–2 in of concrete cover above the top of foam where the slab edge meets finishes, or protect the foam with a thin curb or protective board during construction.
- Continuity: tie the slab-edge insulation into under-slab insulation and the wall’s exterior insulation or sheathing insulation to avoid thermal bypass. Continuous coverage reduces linear Psi-values at junctions.
Protecting Insulation From Moisture, Rodents, and UV
Rigid foams exposed at grade need protection:
- Use drainage board or exterior waterproofing membranes where foam meets vertical walls.
- Install rodent barriers where termites or burrowing pests occur; PHRC notes code exceptions in heavy termite areas and recommends alternate strategies (PHRC slab insulation webinar PDF).
- Keep polyiso facers and exposed foam covered from UV during storage and after installation.
- Ensure exterior grading directs water away from the foundation.
For guidance on very cold climates and higher R-value targets, consult the cold-climate insulation guide (cold-climate insulation).
Construction Step-by-step: Installing an Insulated Slab Edge
This section provides a DIY-friendly sequence for most slab-on-grade projects that use perimeter rigid foam strips or continuous vertical foam.
Site Prep, Subgrade and Formwork Considerations
- Site prep: Excavate to the required depth, compact gravel subgrade, and install capillary-break material (compact sand or crushed stone) per local code.
- Formwork: Set slab forms to the finished slab edge line. If using perimeter foam, attach foam to the inside face of forms or pin foam to compacted subgrade so foam stands vertical beside the form.
- Checks: Verify level, check for correct slope away from building, and mark control joints.
See a real-world example of site prep in our build update for driveway slab work (driveway slab prep). To reduce on-site waste when cutting foam and forms, follow tips in our construction waste guide (reduce construction waste).
Placing and Fastening Perimeter Insulation
- Cutting and placement: Cut foam to full-height strips that reach the bottom of the slab or to the required depth. Fit tightly to the form; stagger joints to avoid continuous seams.
- Fastening: Use masonry anchors, foam-compatible screws, or adhesive recommended by the foam manufacturer. For ICFs, the forms are self-supporting.
- Sealing: Tape or caulk joints with compatible foam tape or low-expansion foam to maintain thermal continuity and limit air movement.
Pouring Concrete, Protecting the Insulation, and Finishing
- Protection: Install temporary protective boards on the foam face to avoid damage from concrete trucks or screed boards. Where the foam stands inside the form, a thin sacrificial plywood face helps.
- Pour: Pour and finish the slab per usual. Avoid scraping or shaving the foam during screeding.
- Curing: Allow the concrete to cure fully before removing protective boards. If foam remains exposed after finishing, install a protective coat or skirt.
The Department of Energy’s Building Science Consortium provides practical installation notes and common pitfalls for slab-edge work that complement this sequence (BSC slab edge information sheet).
Trimming, Cladding Junctions, and Sealing for Airtightness
- Trim: After removal of forms, trim foam flush as required and install perimeter flashing or exterior cladding.
- Air barrier continuity: Tie the wall air barrier down to the slab edge and seal to the top of the foam with tape or compatible sealant. See our airtight membrane guidance for joining membranes to rigid foam (airtight membrane guide).
- Final checks: Inspect for gaps, gaps at corners, and areas where foam may have been displaced during the pour.
Watch this step-by-step guide on insulating your slab with kingspan slab insulation:
Addressing Drainage, Moisture, and Frost Heave Risks with Insulated Slab Edges
Water management is as important as thermal performance. A wet slab perimeter will shorten foam life and can create frost issues if poorly detailed.
Capillary Break and Perimeter Drainage Details
- Capillary break: Place 4–6 in of compacted coarse gravel under the slab as a capillary break.
- Perimeter drainage: Install drainage board or a drainage mat where vertical insulation meets grade if the site has high horizontal water flow. Maintain 5%+ slope away from the building for the first 5–10 feet.
- Membranes: Pair exterior insulation with foundation waterproofing membranes where necessary, and ensure membranes don’t trap water against foam without a drainage path.
Frost Heave: Where Slab Edge Insulation Helps or Hurts
Insulating the slab edge can either reduce or increase frost risk depending on configuration. Frost-protected shallow foundations (FPSF) use horizontal insulation extending outward to raise the frost depth under the slab, reducing excavation and frost heave risk. However, thin vertical foam that does not extend to a suitable depth can create a cold pocket that encourages frost movement. Design rules of thumb:
- Extend vertical foam to a depth appropriate for local frost line or use FPSF horizontal insulation per local code and engineering guidance.
- In sites with poor drainage or variable soils, consult an engineer before deep insulation changes.
A regional analysis of slab-edge insulation for code adoption found that R-10 at 4-ft depth produced modest energy savings but noted frost and drainage interactions that require careful design (Montana slab edge analysis). For moisture-control practices when finishing below-grade or near-grade spaces, see our basement finishing guide (basement energy finishing).
Integration with Foundation Waterproofing and Grading
- Sequence: Apply foundation waterproofing or drainage board to the structure side of foam when foam is installed outside the waterproofing plane; don’t trap water between layers.
- Grading: Ensure final grade and gutters move water away from the slab edge. Surface runoff must not be allowed to pond near insulation joints.
Cost, Durability and Maintenance: Lifecycle View of Insulated Slab Edges
Decisions about material selection should balance upfront costs, longevity, and energy savings over the building’s life.
Comparing Upfront Cost vs Long-term Energy Savings
Ballpark per-linear-foot estimates (material + basic install for perimeter foam only):
- Low-cost (EPS, thin strip): $1–$4/ft
- Mid-range (XPS or polyiso with protection): $3–$8/ft
- High-end (phenolic, high-density systems, ICF): $10–$25/ft
Energy savings depend on climate and airtightness. Simple modeling shows slab-edge insulation often returns its cost in 5–15 years in cold climates; in mild climates it can take longer. For lifecycle analysis and bench data on condensation and slab surface temperature improvements, review the NIST research on edge insulation effects (NIST effect of edge insulation study).
Durability Considerations by Material (crushing, Moisture, Pests)
- EPS: Cheap, lower compressive strength; can crush if exposed to heavy loads or traffic during construction.
- XPS: Better moisture resistance and compressive strength than EPS, but higher embodied energy.
- Polyiso: High nominal R/inch but reduced performance at low temperatures; facers may help moisture protection.
- Phenolic: Thin profiles, good compressive and moisture performance but higher cost.
- ICF: Foam well-protected, highly durable, but pricey and needs correct detailing at slab-floor transitions.
Termites and rodents: PHRC and some code bodies caution about slab-edge insulation in heavy termite areas and require specific inspection or material choices (PHRC slab insulation webinar PDF). Choose foam with termite-resistant details or non-foam alternatives where required.
Maintenance Checklist and Inspection Schedule
- Inspect perimeter after the first winter and annually thereafter for gaps, foam compression, or persistent water near edges.
- Re-seal any failed tape or sealant at air-barrier junctions.
- Replace protective skirting or cladding if damaged by landscaping or maintenance equipment.
- For guidance on sourcing local materials and reducing transport emissions, see sourcing local materials.
Integrating Slab-edge Insulation with Airtightness and Floor Assemblies
Thermal performance improves only when slab-edge insulation is combined with an effective air barrier and floor detailing.
Continuity of Air Barrier From Wall to Slab Edge
An effective air barrier must run from the wall down to and across the slab edge. Typical strategies:
- Continue the wall air barrier down onto the top of the perimeter foam and seal with compatible tape or adhesive.
- For walls with exterior continuous insulation, tie the exterior air barrier to the slab-edge foam to avoid a thermal bypass path.
See the airtight membrane guide for techniques on bonding membranes to rigid foam (airtight membrane guide). Also reference our guide to wall sheathing selection to coordinate materials and fastening strategies (guide to wall sheathing).
Floor Insulation and Vapor Control Connections at the Edge
- If the slab includes under-slab insulation, ensure the vertical edge foam overlaps or butts tightly against it.
- For radiant in-slab systems, confirm tubing layout clears foam and does not compress insulation.
- Use a vapor control layer appropriate for your climate — in some cases interior vapor retarders are unnecessary and may trap moisture; consult local code and a humidification strategy.
For basic floor insulation methods relevant to small builds and sheds, see insulating floor basics.
Typical Detail Sketches and Common Junction Fixes
Common fixes include:
- Running a strip of high-density foam beneath the edge to spread load and avoid point compression.
- Adding a thin poured concrete curb over foam to protect it where exposed.
- Taping and sealing all vertical foam joints and where foam meets membrane with manufacturer-approved tape.
Key Points Checklist for DIY Builders (materials, Measurements, and Pitfalls)
- Materials checklist: Rigid foam type (EPS/XPS/polyiso), adhesive/fasteners, drainage board, protective boards, tape/caulk for joints.
- Measurement and layout checklist: Measure frost depth, slab thickness, desired R-value, foam height above slab finish, and under-slab insulation plans.
- Common pitfalls and quick fixes: Avoid exposed foam without protection; seal joints to maintain thermal continuity; prevent water from pooling at the edge.
Sample dimensions for small cabins:
- Cabin 20' x 20' in mixed climate: 2–3 in perimeter polyiso, 2 in under-slab insulation, 4 in slab thickness.
- Tiny home on slab in cold climate: 4–6 in perimeter EPS/XPS, extend to frost line or use FPSF horizontal insulation, protect foam with a skirt and grade slope.
Use this checklist when planning and bring these items to permit review: foam specs, PSI/compressive ratings, site drainage plan, and connection details to walls.
The Bottom Line
An insulated slab edge is a cost-effective way to reduce thermal bridging at slab-on-grade foundations and improve floor comfort. Choose the system based on climate, moisture and termite risk, and how it will tie into under-slab insulation and the building air barrier; then follow proper drainage and protection steps to ensure long-term performance. For modeling slab thickness and thermal mass impacts before you build, use the slab-on-grade calculator and check local code and ENERGY STAR guidance for slab-edge requirements (ENERGY STAR slab edge exemptions and alternatives).
Frequently Asked Questions
What is the best insulation for a slab edge?
There is no single "best" option; EPS is low-cost, XPS offers better moisture resistance, and polyiso has high R/inch in moderate climates. Choose based on site moisture, compressive load, and local code or termite restrictions, and consider ICFs where combined form-and-insulation benefits justify higher cost.
What minimum r-value should I use for slab-edge insulation?
Minimum R-value depends on climate: mild zones may use R-5–R-10, mixed zones R-10–R-20, and cold zones R-20+ for meaningful savings; check ENERGY STAR and local code for baseline requirements and use modeling with a slab-on-grade calculator for precise sizing (ENERGY STAR slab edge exemptions and alternatives).
How do I protect foam from pests and moisture?
Install drainage and waterproofing membranes where required, use protective skirting or rigid boards during construction, and follow local termite control guidance; in heavy termite areas use non-foam barriers or engineered details described by PHRC (PHRC slab insulation webinar PDF).
Can I retrofit insulation to an existing slab edge?
Yes, but retrofits require excavation or using exterior insulation skirts and careful sealing of wall-to-slab joints; evaluate grading and drainage first and consult a contractor or engineer if the slab is close to frost depth or has known moisture problems.
Does slab-edge insulation affect radiant in-slab heating?
Properly installed slab-edge insulation improves the efficiency and responsiveness of in-slab radiant systems by reducing heat loss to the ground; ensure tubing layout and slab thickness account for foam position and maintain required concrete cover over tubing.