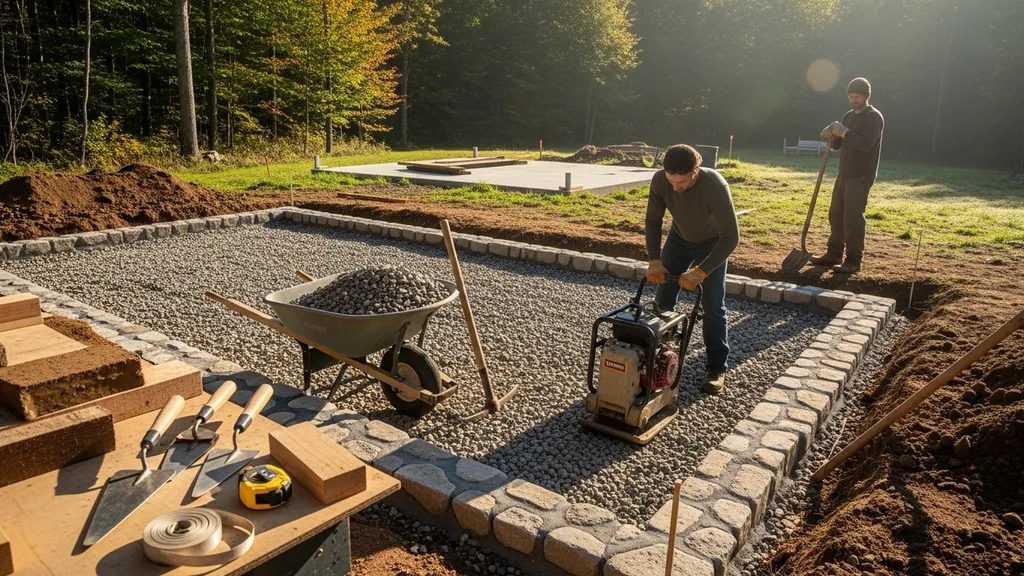
Compare rubble-trench, earthbag, pier, and other natural building foundation options — plus site, code, and construction best practices for DIYers.
Natural Building Foundations: Options and Best Practices
Natural building foundations are the starting point for durable, low-embodied-energy homes. A well-chosen natural building foundation supports loads, manages water, reduces thermal bridging, and can lower material and labor costs for DIYers. This guide compares rubble-trench, earthbag, pier, rammed-earth, and shallow insulated slabs, and lays out site, code, and construction best practices so a budget-conscious self-builder can choose and build a long-lasting foundation.
TL;DR:
- Choose a foundation that matches soil type and loads: rubble-trench or earthbag for light to medium loads, piers for very small structures, and insulated shallow slabs for habitable homes in mild climates.
- Prioritize drainage and a capillary break; proper gravel compaction and a continuous thermal break cut long-term repair and energy costs by 20–40% in many cases.
- Consult local code early, document soil compaction (often 90% required), and call an engineer for full-size or masonry buildings.
What is a Natural Building Foundation and Why It Matters
Definition and Scope: What Counts as 'natural' Foundations
A natural building foundation uses locally available, low-embodied-energy materials and simple construction methods while meeting structural and moisture-control requirements. Typical approaches include rubble-trench foundations, stone or rock footings, stone or concrete-less piers, earthbag footings, rammed-earth footings, and insulated shallow slabs that minimize concrete use. These systems rely on compacted granular fill, masonry, or stabilized earth rather than large poured footings, and they often incorporate recycled materials such as crushed concrete.
Industry resources emphasize adapting techniques to local climate and soils; for a practical primer on local-material approaches and passive-solar siting, see this natural building course guide.
Performance Goals: Load, Moisture Control, Thermal Performance, Longevity
A foundation must meet four core performance goals:
- Bearing capacity: deliver even load distribution within local soil bearing limits to avoid excessive settlement.
- Moisture control: stop capillary rise and surface runoff from reaching wooden elements or earthen walls.
- Frost protection or mitigation: prevent frost heave in cold climates, either by depth or by frost-protected shallow design.
- Thermal performance: minimize thermal bridges and provide a continuous insulation strategy for energy-efficient or Passive House-style builds.
Designers use metrics such as allowable bearing pressure, settlement limits (typically a few millimeters for light structures), and R-values for any slab insulation. Building codes and Passive House guidance both pay special attention to continuous insulation at foundation-to-wall junctions to avoid cold bridges that can condense and cause mold.
Common Natural Foundation Types (overview and How They Work)
Rubble-trench Foundations: Concept and Typical Build
A rubble-trench foundation is a drained trench filled with well-graded crushed stone or rubble, often capped with a concrete grade beam or treated sill plate. The trench acts as a continuous strip footing that distributes loads to deeper, competent soil and provides a capillary break. Typical uses: small cabins, earthen-wall homes, and lightweight timber-framed houses. Labor is moderate; the technique scales well for DIYers who can rent a plate compactor.
Pier, Pier-and-beam, and Stone Pier Foundations
Piers transfer loads from posts to competent subsoil via discrete columns of stone, concrete, or packed crushed rock. They work well for tiny houses, decks, and cabins on sloped sites. Piers minimize excavation and material use but need careful lateral bracing for seismic or wind loads. For heavy masonry walls, piers generally require engineered design.
Earthbag and Rammed-earth Footings
Earthbag foundations use polypropylene bags filled with compacted subsoil or gravel to make raised footings or retaining walls; rammed-earth footings compress stabilized or native soils in formwork. Both are suitable for low-rise earthen walls and can be very durable when protected from moisture. See our detailed earthbag building guide for method and use-case specifics.
Insulated Slab-on-grade and Frost-protected Shallow Foundations (FPSF)
Insulated slabs and FPSFs reduce or eliminate the need to dig below frost depth by using perimeter insulation and thermal isolation that keeps soil temperatures high enough to avoid heave. These systems are common for habitable dwellings in mild climates and when Passive House-style continuity of insulation is required.
| Foundation type | Typical depth | Frost considerations | Materials needed | Labor intensity | Pros / Cons | Passive-House friendliness |
|---|---|---|---|---|---|---|
| Rubble-trench | 0.6–1.0 m typical trench (varies) | Can work above frost with deep gravel and drainage; check local code | Crushed stone, geotextile, timber or concrete sill | Medium | Low embodied energy, excellent drainage; needs proper compaction | Good if continuous insulation at sill is provided |
| Stone/piers | Shallow pads or discrete footings | Piers must be on competent below-frost strata or use insulated collars | Stone, packed gravel, concrete pads (optional) | Low–Medium | Minimal excavation, cheap for small builds; limited for heavy loads | Moderate if thermal collars used |
| Earthbag footings | 0.3–0.8 m built up | Vulnerable in very wet areas unless sealed and drained | Bags, native soil or gravel, barbed wire, plaster | High labor | Low-cost, accessible materials; needs moisture protection | Variable; add exterior insulation where needed |
| Rammed-earth footings | Varies by design | Require moisture control and foundation isolation | Stabilized soil, formwork, compaction tools | High | Strong and monolithic with walls; more labor and expertise | Moderate; combine with insulated slab for best results |
| FPSF / Insulated slab | 0.15–0.5 m slab, shallow perimeter insulation | Designed to avoid frost depth entirely in many climates | Rigid insulation, gravel, concrete slab, vapor barrier | Medium–High | Good thermal performance, familiar to inspectors; embodied energy higher | Excellent when detailed for continuous insulation |
Caveats: "Typical depth" varies with local frost lines and soil bearing capacity. Always confirm local requirements.
For general construction detail references and compaction/inspection expectations, the NCHH Builder's Foundation Handbook provides representative practice for energy-efficient basements and crawl spaces: Builder's foundation handbook (pdf).
How to Choose the Right Natural Foundation for Your Site
Soil, Drainage, and Site Evaluation Basics
Start with simple tests: dig test pits to evaluate depth of organic topsoil, observe whether standing water appears after rain, and perform a rough percolation check by filling a hole with water and timing drainage. If topsoil is thick or you see peat, you'll need to remove it down to firm subsoil. For buildings over 100 m2 or with heavy walls, order a geotechnical report to establish allowable bearing pressure and frost-susceptibility.
On sloped sites, choose piers or stepped rubble-trench options to reduce cut-and-fill. Always plan for surface runoff to be diverted away from the foundation with swales or grade.
For permit and documentation tasks, consult your local authority early. See our regional example in the building permit guide and the broader DIY permits guide for steps to prepare permit packages and inspections.
Climate and Frost Depth — When Shallow Foundations Work
Frost-protected shallow foundations (FPSF) and insulated slabs are viable where frost-action is limited or can be thermally mitigated through insulation. FPSF works by redirecting heat from the building to raise near-foundation soil temperatures; it is widely accepted for residential use where local frost depth is moderate. Where frost-depth is severe or soils are highly frost-susceptible, deeper trench or pile solutions are safer.
Always check local code: many jurisdictions accept FPSF but require specific R-values and insulation placement.
Building Loads and Structure Type (tiny House vs Full-size Home)
Match foundation type to structural load. Light timber frames or pole barns pair well with piers or rubble trenches. Heavy masonry, multiple storeys, or concentrated loads require continuous footings or engineered piers. As a rule of thumb: for simple timber cabins under ~60 m2, non-engineered natural foundations often work; above that, involve an engineer.
Permits, Inspections, and Documentation to Prepare
Most building departments require: foundation plans, compaction reports (often 90% relative compaction is a standard), anchor details for sill plates, and drainage proof. The City of Brea’s foundation requirements note compaction checks and base-course pre-saturation for inspections; consult a similar document from your authority: foundation requirements for residential projects (PDF).
Document soil tests, take pre-build photos, and schedule inspections at key milestones (excavation, compaction, drainage install, and anchor placement).
Design and Construction Best Practices for Natural Foundations
Site Prep, Drainage, and Capillary Break Strategies
Excavate to competent subsoil and remove organic topsoil. Provide a capillary break: a minimum 150–300 mm layer of coarse, free-draining material (crushed rock or gravel) under footings or slabs. Use a geotextile where fine soils mix with gravel. Slopes should direct runoff away using a 5% grade for the first 2–3 metres and perimeter swales where appropriate.
Compact subgrade in lifts with a plate compactor to the compaction standard required by local inspectors—often 90% relative compaction. Over-compact, and you risk crushing stone; under-compact, and you’ll see settlement.
Moisture Control: Membranes, Gravel, and Ventilation Details
Use a continuous capillary break and a vapor barrier under slabs. For earth-facing walls (adobe or earthbag), provide a raised sill or foundation-to-wall offset and through-wall flashing. Where wood meets earth, specify treated or naturally rot-resistant sill materials plus a 50–100 mm air gap if possible.
Sequence airtight and damp-proof layers with the wall membrane: a continuous damp-proof course and detailing of membrane termination at sill plates is critical. For airtight membrane sequencing and wall-to-foundation interfaces, see our guide on airtight membrane installation.
Thermal Strategies: Insulation, Thermal Breaks, and Passive House Alignment
Thermal bridging often occurs at the sill-to-foundation junction. Continuous rigid insulation outside the foundation or insulated grade beams reduces bridging; on piers, thermal collars or EPS wraps around the pier can help. For Passive House-level performance, detail continuous exterior insulation from slab edge up to the wall sheathing and ensure the airtight layer ties into the slab vapor barrier.
For broader Passive House roof and envelope thinking that informs foundation insulation placement, consult exterior roof insulation and Passive House performance. For slab-edge and floor insulation techniques, see our piece on how to insulate a shed floor.
Load-bearing Details: Footings, Grading, and Reinforcement Where Needed
Where a grade beam is used, a shallow cast-in-place concrete beam over a rubble trench provides a uniform load path and an easy sill-attachment surface. If frost depth or load demands dictate, place rebar per engineer specifications. Hybrid solutions (stones plus a small concrete pad at concentrated loads) give a balance between low embodied energy and structural safety.
When using earthbag or rammed-earth footings, provide external render or a waterproof coating to keep water off the earthwork; add a capillary break beneath any earthen fill.
For detailed construction advice and industry standards on efficient basement and crawl-space construction, the MySitePlan house foundation guide offers practical tips on types, costs, and reinforcement practices: house foundation types and building guide.
Materials, Tools, and Cost Considerations for DIY Natural Foundations
Sourcing Local Materials: Stone, Gravel, Clay, and Recycled Concrete
Local quarries, landscape suppliers, and construction demolition yards are prime sources for crushed rock and recycled concrete aggregate. Search for reclaimed masonry and grade-run gravel that matches compaction and drainage needs. For earthbag infill, select well-graded subsoil with low organic content; you may need to import sand or gravel for drainage zones.
For practical sourcing tactics, see the guide on sourcing local materials.
Tool and Equipment Essentials for DIY Foundation Work
- Shovels and pickaxes
- Plate compactor rental (day or weekend)
- Gas-powered tamper for tight spots
- Wheelbarrows
- Long spirit level and laser level
- String lines and batter boards
- Masonry tools for stonework and concrete floats
For a full rental and purchase checklist, consult essential natural building tools.
Cost Breakdown: Materials, Labor Hours, and Equipment Rentals
Costs vary widely by region. Qualitatively:
- Rubble-trench: low-to-moderate material cost, moderate labor; good for DIY teams.
- Stone piers: low material cost, low labor for small numbers of piers.
- Earthbag: low material cost, high labor (bagging and tamping).
- Insulated slab/FPSF: higher material and concrete cost, higher labor and equipment needs.
Renting a plate compactor and pickup for one week is a common budget item. Expect the slab/FPSF approach to have the highest material cost but lowest long-term energy cost if properly insulated.
Compare material embodied-energy vs performance when choosing: for example, adding proper perimeter insulation to an FPSF increases initial cost but often reduces annual heating demand by 10–30% depending on climate.
For readers weighing wall systems that affect foundation loads and materials, a comparison such as hempcrete vs ICF comparison can inform choices that ripple into foundation sizing.
Also consider waste reduction strategies during excavation and backfill: our post on reduce construction waste explains reuse and reclamation tactics that lower costs and landfill loads.
Durability, Maintenance, and Lifecycle Trade-offs
Natural materials can last decades when detailed correctly. The biggest maintenance drivers are moisture, vegetation, and poor drainage. Investing in a shallow drainage layer, continuous perimeter insulation, and protective render or flashings usually offers the best lifecycle returns.
Expect periodic checks every 3–5 years for settled piers, erosion, or failed mortar joints; earth-based foundations may require occasional re-plastering or repair after extreme wet seasons.
Common Problems, Failure Modes, and Troubleshooting
Settlement and Differential Movement — Diagnosis and Fixes
Symptoms: doors that bind, cracks in finishes, uneven floors. Measure movement with a simple line level over time or install reference pins. If settlement is localized, underpinning with compacted crushed stone, screw piles, or concrete footings may be needed. For widespread settlement, consult a geotechnical engineer.
Poor compaction is the most frequent DIY cause. If compaction tests (via inspectors) show <90% required, rework the subbase in lifts, re-compact, and retest.
Moisture-related Failures: Rot, Mold, Freeze-thaw
Rot and mold appear where wood or earthen walls contact wet soil or where thermal bridges allow condensation. Solutions: raise sills, add through-wall flashing, ensure capillary breaks and perimeter drainage, and tie the airtight membrane into the slab vapor barrier. For guidance on finishing and insulating foundation-adjacent spaces, see basement finishing for energy efficiency.
For freeze-thaw damage in stonework, ensure good drainage and use air-entrained mortar where concrete is present. Replace failed mortar and regrade surface runoff.
Pests and Vegetation Impacts on Foundations
Keep shrubs and trees with deep roots well away from foundations; roots can undermine piers and lift slabs. Use pest barriers where termites are a local risk and inspect wooden elements annually for evidence of infestation.
Preventative maintenance checklist items: maintain 100–300 mm of vertical clearance between soil and wood, clear gutters and downspouts, and regrade soil to shed water.
Case Studies and Simple Build Walkthroughs (step-by-step)
Rubble-trench Foundation: Step-by-step for a Small Cabin
- Layout and batter boards: mark foundation with string lines and check squareness.
- Excavate trench to competent soil and to required width (commonly 300–600 mm).
- Place geotextile where fines could migrate; add 150–300 mm coarse crushed stone.
- Compact in lifts with a plate compactor to inspector-required compaction.
- Install a perforated drainage pipe in the gravel if site is wet; slope to daylight.
- Optionally cast a small concrete grade beam or lay treated sill plate with anchor bolts.
This DIY video shows you the hands-on process:
Simple Pier Foundation for an Off-grid Tiny House
- Mark pier locations under load points.
- Dig or form holes to required depth or to competent bearing strata.
- Backfill with crushed rock or set precast concrete pads; compact in lifts.
- Install treated posts or steel saddles anchored to pads; provide diagonal bracing.
- Fasten floor beams to saddles; test for level and lateral stability.
Time: a weekend for a 3–4 pier tiny house with two helpers. Note: add thermal collars or wraps if pier top will connect to a heated floor.
Earthbag Foundation Highlights and Key Considerations
- Excavate a shallow trench and lay a gravel drainage bed.
- Fill polypropylene bags with compactable fill; tamp each course and use barbed wire between courses for shear.
- Step in a batter if building earthen walls; cap with lime or cement plaster to shed water.
- Provide a raised timber sill plate on a treated plate above the top bag course.
Earthbag footings are labor-intensive but can be built with minimal equipment. For full technique guidance, see the earthbag building guide and our discussion of earthen wall techniques in adobe building techniques. Safety note: large or multistory loads should be engineered.
Key Points Checklist for Diyers Before You Break Ground
- Site checks: dig test pits and note topsoil depth
- Permits: submit plans and request permit conditions early
- Soil report: order if building >100 m2 or using heavy masonry
- Compaction standard: confirm local inspector requirement (often 90%)
- Drainage plan: grade, swales, and downspout routing
- Capillary break: plan for 150–300 mm of free-draining material
- Insulation plan: specify continuous exterior or slab-edge insulation
- Material sourcing: line up local stone, gravel, or recycled concrete
- Tools and rentals: book plate compactor and hauling vehicle
- Labour plan: schedule helpers for compaction, backfill, and curing
- Documentation: take pre-build photos and maintain inspection records
- Safety: use protective gear, shore trenches over 1.2 m, and avoid working alone
- Contingency: budget extra 10–20% for unexpected soil or drainage fixes
The Bottom Line
Match a natural building foundation to soil, climate, and expected loads; prioritize drainage and a capillary break to avoid most long-term failures. Balancing embodied energy against thermal performance often means combining natural footings with targeted insulation or small concrete elements. When in doubt—permit triggers, heavy masonry, or poor soils—seek an engineer.
Frequently Asked Questions
Can I build a natural foundation without an engineer?
For small, lightweight structures (tiny houses, storage sheds, simple cabins) many natural foundation methods can be built by experienced DIYers following local code and inspection requirements. Simple solutions like rubble-trench or stone piers often work if soils are competent and the loads are light.
However, buildings with large footprints, multiple storeys, heavy masonry walls, or poor soils should have engineering input. An engineer will size foundations, specify reinforcement, and document load paths for permitting and long-term safety.
How deep should a rubble-trench foundation be?
Depth varies by soil and frost conditions. Typical rubble-trench builds place the trench into competent subsoil and provide 150–300 mm of coarse drainage material under a grade beam or sill. In frost-prone areas the trench may need to reach below frost depth or be combined with an insulated slab strategy.
Always check local frost-depth requirements and your building department's guidance before finalizing trench depth.
Are earthbag foundations suitable for wet climates?
Earthbag foundations can work in wet climates if detailed for moisture protection: include a raised sill, good perimeter drainage, waterproof external render, and a continuous capillary break beneath the bags. Avoid using untreated earthen fill in areas with persistent standing water.
In very wet or flood-prone sites, choose engineered foundations, elevated piers, or hybrid approaches that keep earthen materials well above the water table.
Do natural foundations meet building codes?
Many jurisdictions accept natural foundation methods when they meet structural, fire, and health standards. Inspections typically focus on excavation, compaction, drainage, and anchoring details. Provide clear plans and test data to your building department.
Some areas require engineered designs for habitable structures or certain sizes. Use your local permitting office early to confirm acceptability and documentation requirements.
How do I prevent frost heave with a shallow natural foundation?
Options include digging to below frost depth, using frost-protected shallow foundations with perimeter insulation, or increasing the thermal mass/insulation around the foundation so soil temperatures remain above freezing. Proper drainage and avoiding saturated soils near the foundation also reduce heave risk.
Design details and required insulation R-values vary by climate; consult local code or a geotechnical engineer for specific R-value and depth recommendations.