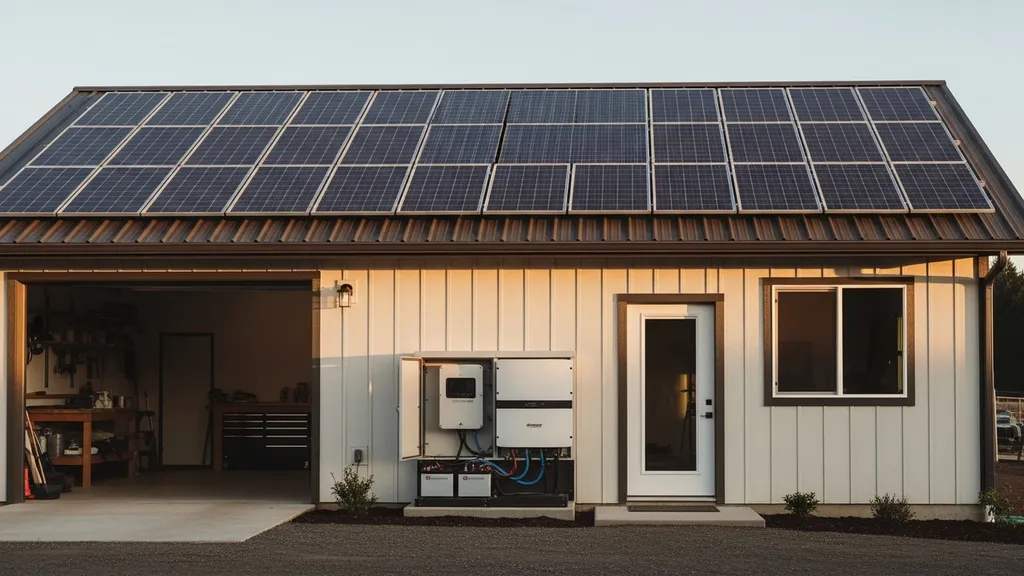
Step-by-step guide to sizing a 7kW solar system for a workshop — panels, batteries, inverter, costs, and payback estimates.
7KW Solar System for Workshop: Complete Sizing Guide
A 7kW solar system for workshop owners can supply roughly 20–35 kWh per day depending on sun exposure — often enough for a hobby shop or a modest commercial-style woodworking space when paired with the right inverter and battery. This guide explains how to calculate your actual energy needs, pick panel counts and orientations, size batteries and inverters for motor surges, estimate costs and payback, and plan installation and maintenance so a workshop stays powered reliably.
TL;DR:
- A 7kW solar array typically produces 20–35 kWh/day (3.5–5.5 sun-hours); use local PVWatts output for accurate estimates.
- For a 25 kWh/day shop, plan ~31 kWh nominal battery (80% DoD) for one-day backup; choose an inverter with high surge capacity for motors.
- Start with a tool inventory, add a 10–25% buffer for growth, then decide grid-tied vs hybrid based on outage risk and net-metering rules.
Is a 7kw Solar System Right for Your Workshop?
A 7kW solar system for workshop use is a common mid-size option that sits between compact 1–3 kW systems for sheds or tiny houses and large commercial arrays. A 7 kW nameplate array will often produce about 20–35 kWh per day depending on average sun-hours. For example:
- Hobby workshop with hand tools and lighting: roughly 10–25 kWh/day.
- Small woodworking shop with a table saw, planer, dust collector, and mini-split heat: typically 25–60 kWh/day.
- Medium shop with HVAC, large compressor, and continuous ventilation: 50–80+ kWh/day.
Use the Department of Energy's cost and production benchmarks for national context; for production detail run a location-specific estimate with NREL's PVWatts (see external link below). According to the DOE, cost benchmarks and system sizing data help identify realistic outcomes for systems in this size range: Department of Energy solar photovoltaic system cost benchmarks.
Key Points and Quick Checklist:
- Roof space available: 7 kW typically needs 14–22 panels depending on wattage (see table below).
- Average sun-hours: 3.5, 4.5, or 5.5 sun-hours greatly change kWh/day.
- Peak loads: note compressors, welders, and motor startup surges.
- Budget: expect broad equipment and installation ranges; see cost section.
- Growth buffer: add 10–25% to daily kWh estimates for future tools or longer work hours.
Compare this to a smaller shop option in our 3 kW shed sizing guide if your load is light and you want a simpler DIY install.
How to Estimate Your Workshop's Energy Use — Step-by-step
Accurate system sizing starts with a load inventory. The worksheet method below is simple and repeatable.
Inventory Your Tools and Motors (method and Example)
- List each device: Tool name and model.
- Rated watts: Use nameplate or motor horsepower (1 HP ≈ 746 W) and include motor efficiency.
- Estimated hours/day: Typical use per day.
- Duty cycle: For intermittent motors like dust collectors, estimate percent runtime.
Example (small woodshop):
- Table saw: 2 HP (1,492 W), average 0.5 hour/day → 0.75 kWh/day
- Planer: 1.5 HP (1,119 W), 0.25 hour/day → 0.28 kWh/day
- Dust collector: 1 HP (746 W), 1 hour/day (50% duty) → 0.37 kWh/day
- Mini-split heat/cool: 1,200 W average when running, 3 hours/day → 3.6 kWh/day
- LED lighting and outlets: 400 W continuous, 6 hours/day → 2.4 kWh/day
Total ≈ 7.4 kWh/day (small example); scale up for more machines and continuous ventilation.
Daily and Monthly Kwh Calculation with Worked Example
- For each device: kWh/day = (Watts × hours per day) / 1,000.
- Sum all devices for workshop kWh/day.
- Monthly kWh = daily kWh × average workdays per month (e.g., 22–26).
If the shop uses an air compressor or welder intermittently, model those as peak draws with short durations rather than steady-state draws.
Accounting for Heating, Ventilation and Peaks
- Heating or cooling (mini-splits) can dominate energy use during extreme seasons. Use manufacturer SEER/HSPF figures or measured amperage for better estimates; see our mini split installation guide for typical ratings.
- Ventilation systems often run continuously; refer to our ventilation guidance in ventilation for small eco homes to estimate continuous loads.
- Surge loads: Motors commonly draw 2–4× their running current at startup. For a 2 HP table saw, expect 2.5–3× surge for a few cycles. The inverter must handle these peaks; record each motor's locked-rotor or startup current where possible.
Practical tip: install an energy monitor for 2–4 weeks during normal operations. Our DIY energy monitor calibration guide explains how to capture accurate baselines before sizing.
Add a growth buffer of 10–25% to account for future tools, longer hours, or inefficiencies.
Sizing a 7kw Array: Panels, Orientation, and Production Estimates
Panel count and wattage depend on panel size. Typical panel options:
| Panel Wattage | Panels for ~7 kW | Approx. area per panel (m²) |
|---|---|---|
| 370 W | 19 panels (7,030 W) | 1.9 m² |
| 400 W | 18 panels (7,200 W) | 1.95 m² |
| 450 W | 16 panels (7,200 W) | 2.1 m² |
A realistic system derate factor accounts for inverter clipping, temperature, soiling, wiring and mismatch losses. Use a production factor between 0.75 and 0.88 when converting nameplate kW to expected AC output. For example, a 7 kW DC array at 0.80 derate in a 4.5 sun-hours region yields: 7 kW × 4.5 hours × 0.80 ≈ 25.2 kWh/day.
Site factors: roof tilt, orientation, shading, and losses
- Aim for south-facing (Northern Hemisphere) arrays with tilt near local latitude for balanced year-round output.
- East/west splits can be beneficial for morning/afternoon loads or to fit roof geometry.
- Even small shading on one panel can reduce string output; consider microinverters or power optimizers when shading is an issue.
- Panel temperature coefficient matters in hot climates — choose panels with better high-temperature performance if your shop roof gets hot.
Estimated Daily and Seasonal Output by Region
- Low insolation (3.5 peak sun-hours): ~18–21 kWh/day (7kW × 3.5 × 0.75–0.85).
- Moderate insolation (4.5 sun-hours): ~25–30 kWh/day.
- High insolation (5.5 sun-hours): ~31–38 kWh/day.
For precision, run a PVWatts estimate tailored to the workshop location (NREL PVWatts is recommended). Energy Market data from LBL also provides broader project-level performance context for solar deployments: Utility-scale solar data update.
Panel certifications and efficiency comparisons affect warranty and long-term reliability — see our primer on panel certifications explained and our piece on how to compare panel efficiency when choosing models.
Space needs and mounting
- Typical 400 W panels occupy ~1.95 m² each. For 18 panels, plan roughly 35–45 m² (375–480 ft²) of usable roof area depending on layout and access spacing. Ground mounts require additional setback and tilt clearance.
Batteries and Inverters for a Workshop on a 7kw System
How to Size Battery Capacity for Hours or Days of Backup
- Work from usable kWh needed. If the shop consumes 25 kWh/day and you want one day of backup usable, you need 25 kWh usable.
- Account for depth-of-discharge (DoD) and inverter efficiency. For lithium LFP at 80% usable DoD and 95% round-trip efficiency:
Nominal battery needed = required usable kWh / (DoD × inverter efficiency) Example: 25 kWh / (0.80 × 0.95) ≈ 32.9 kWh nominal.
- For two days of backup, double the usable requirement and recalc.
Choosing an Inverter: Continuous vs Surge and AC Coupling
- Match continuous inverter rating to expected workshop loads. For a 7kW array, a 5–8 kW inverter is common; avoid undersizing continuous capacity for simultaneous tools.
- Surge rating matters for motors: many inverters specify a 3–6× peak for seconds. If the shop has a 3 HP compressor and a 2 HP table saw that might start simultaneously, calculate combined surge needs (2–4× running watts).
- Consider hybrid or multi-mode inverters with AC-coupling if adding battery later; AC-coupled systems simplify retrofits using string inverters and battery inverters together.
- For full off-grid designs, DC-coupled battery inverters can be more efficient during charging from PV, but complexity and cost vary.
Battery Chemistry Options and Pros/cons for Workshops
- Lithium iron phosphate (LFP): higher upfront cost, long cycle life (4,000–10,000 cycles depending on use), safe thermal behavior, high usable DoD (80–90%). Good for frequent cycling and workshop use.
- AGM / flooded lead-acid: lower capital cost but shorter cycle life, lower DoD (40–50%), more maintenance, and ventilation needs. Not ideal where space and reliability matter.
- Other lithium chemistries (NMC) may offer higher energy density but shorter cycle life and different thermal properties.
For deeper battery and hybrid cost comparisons, see our hybrid systems cost breakdown and refer to industry data from SEIA for storage trends: SEIA solar and storage industry research data. Also consult our off-grid 3 kW case study for battery sizing principles applied to smaller systems.
Mounting, Wiring, and Balance-of-system (BOS) — Installation Checklist and Maintenance
Before install: permits and structural check
- Obtain local building and electrical permits; submit racking layout and electrical one-line diagrams as required.
- Verify roof load capacity and plan rafter or truss reinforcement if necessary.
Roof Mounting vs Ground Mount: Anchors, Layout, and Spacing
- Roof mounts: Choose curb-compatible racking, flash all penetrations, and stagger panels to allow airflow and access for cleaning.
- Ground mounts: Use concrete piers or helical piles, allow 1.5–2× panel height clearance for tilt and maintenance, and plan for security fencing if needed.
Wiring, combiner boxes, disconnects, and safety compliance
- String vs microinverters: string inverters are cost-efficient for uniform exposure; microinverters or power optimizers help under partial shading or complex roofs.
- Use proper conductor sizing based on DC string currents and code ampacity tables; include surge protection devices on both AC and DC sides.
- Install AC and DC disconnects accessible to emergency responders; label panels per NEC Article 690.
- Position inverter and battery in a dry, ventilated, and code-compliant location with firewall considerations and ease of maintenance.
Maintenance Checklist and Seasonal Checks
- Quarterly: Visual inspection for debris, water ingress, and wiring damage.
- Annually: Panel cleaning as needed, torque checks on module clamps and electrical connections, firmware updates on inverters and optimizers, battery state-of-health report.
- Every 3–5 years: Inverter service interval and battery capacity checks.
For commissioning and troubleshooting guidance see our troubleshooting post: how to troubleshoot [solar power systems](/blog/how-to-troubleshoot-solar-power-systems).
Watch this step-by-step guide on installing a home solar energy storage system, complete installation,eco worthy:
Grid-Tied vs Off-Grid vs Hybrid: Choosing the Right Setup for a Workshop
Pros and Cons for Workshops
- Grid-tied: Lower upfront battery cost and simpler permitting; relies on grid for outages. Good when reliability is high and net metering or time-of-use rates offer value.
- Off-grid: Independent from utility; requires sizable battery bank and possibly backup generator. Higher capital and complexity; useful in remote locations.
- Hybrid (grid-tied with battery): Offers outage protection and load shifting; adds cost for battery and controls but provides best balance for many workshops.
When to Pick Hybrid or Battery-backup Grid-tied
- Choose hybrid when outages would stop critical production, or when time-of-use rates make shifting export/import financially attractive.
- If the workshop requires near-continuous operation of critical machines during outages, size battery for required hours and include an inverter with reliable seamless transfer.
Permits, Interconnection, and Net Metering Basics
- Interconnection agreements and net-metering rules vary by utility; some utilities offer full retail net-metering, others provide export credits at lower rates. Check local rules before assuming economics.
- For procedural guidance, energy.gov is a starting point for incentives and interconnection references; also review local utility documentation for metering and anti-islanding requirements: Department of Energy solar photovoltaic system cost benchmarks.
- If wind is a potential supplement in a windy site, compare options with our analysis in solar vs wind for off-grid.
Typical Costs, Payback, and Incentives for a 7kw Workshop System
Breakdown of Equipment and Installation Costs (ranges)
- Panels: $0.30–$0.60 per watt (panel cost varies widely by brand and efficiency). For 7 kW, panels alone often range $2,100–$4,200.
- Inverter: $1,000–$3,500 depending on hybrid capability and surge rating.
- Batteries: Lithium LFP costs currently $350–$650 per kWh installed for residential-scale systems (varies by region and supplier); a 30 kWh nominal pack could run $10,500–$19,500.
- Racking, BOS, permitting, and electrical: $1,500–$4,000.
- Labor (pro install): $2,000–$6,000 depending on complexity.
Total installed for a grid-tied 7kW system without battery: roughly $9,000–$15,000 nationally (varies strongly). With batteries for multi-day backup, overall costs can rise to $20,000–$40,000.
Estimating Payback and Simple ROI Example
- Example: System produces 25 kWh/day ≈ 9,125 kWh/year. At $0.18/kWh retail rate, annual savings ≈ $1,642.
- If net installed cost after incentives is $12,000, simple payback ≈ 7.3 years.
- If batteries are added, include battery cost and reduced grid-export revenue; battery ROI is often longer and depends on outage value and arbitrage opportunities.
Available Incentives, Rebates, and Tax Credits
- The federal Investment Tax Credit (ITC) applies to many residential and commercial PV and storage projects when rules apply; check current eligibility on the Department of Energy and IRS resources.
- State and utility rebates vary. Use local incentive search tools and contact your utility to confirm interconnection and rebate programs. For national cost context, see DOE cost benchmarks: Department of Energy solar photovoltaic system cost benchmarks.
- For deeper guidance on equipment costs by home size and similar projects see our solar costs by house size.
The Bottom Line
A 7kW solar system for workshop use fits hobby shops and many small commercial-like shops when paired with an appropriately sized inverter and battery bank. Start with a detailed load inventory, run a local PVWatts production estimate, and decide between grid-tied, hybrid, or off-grid based on outage risk and economics.
Three next steps:
- Complete a full tool and heating/cooling load inventory.
- Run a PVWatts or similar location-specific production estimate.
- Choose grid-tied vs hybrid and size batteries to cover required backup hours.
Frequently Asked Questions
How many panels do I need for a 7kW workshop system?
Panel count depends on panel wattage. For 370 W panels you need about 19 panels (19 × 370 W ≈ 7,030 W). For 400 W panels you need roughly 18 panels, and for 450 W panels roughly 16. Account for roof layout, spacing, and shading when planning exact placement. Use panel efficiency and certification guides in selecting models for long-term reliability.
Will a 7kW system run my table saw and air compressor at the same time?
Possibly, but it depends on the inverter continuous rating and surge capability. Table saws and compressors have startup surges 2–4× running watts. If both start together, the inverter must handle the combined surge for brief moments. Choose an inverter with a high peak rating and size continuous kW above your most frequent simultaneous loads to avoid inverter trips.
How big a battery do I need to run my workshop overnight?
Battery size depends on the workshop's overnight kWh demand and desired days of autonomy. For example, a 25 kWh/day workshop that needs one day of usable backup should plan for about 31–33 kWh nominal battery if using LFP at ~80% DoD and accounting for inverter round-trip losses. For two days, double the usable requirement and recalculate with DoD and efficiency factors.
Do I need a special inverter for motor surge loads?
Yes. Select an inverter that lists both continuous and peak (surge) power ratings. Many hybrid and off-grid inverters provide several times the continuous rating for short durations to cover motor starts. Confirm the inverter's surge duration and compare to motor startup characteristics. Where frequent simultaneous starts occur, consider a slightly oversized continuous inverter or install soft-start devices on large motors.
Can I install a 7kW system myself or should I hire a pro?
DIY installation is possible for experienced homeowners comfortable with roofing and electrical work and where local codes allow owner-installed systems. However, grid interconnection typically requires an electrical permit and professional sign-off; batteries and code-compliant AC/DC disconnects add complexity. Many builders choose a hybrid approach: DIY racking and module mounting, then have a licensed electrician handle final wiring, inverter hookup, and inspection.